Security & Service Mesh
Cilium NetworkPolicy 기반 L3/L4/L7 보안 정책과 서비스 메시 구성 방법을 정리한다.
실습 환경 구성 및 보안 아키텍처
1. 확장된 보안 실습 환경 구성
1.1 실습 환경 개요
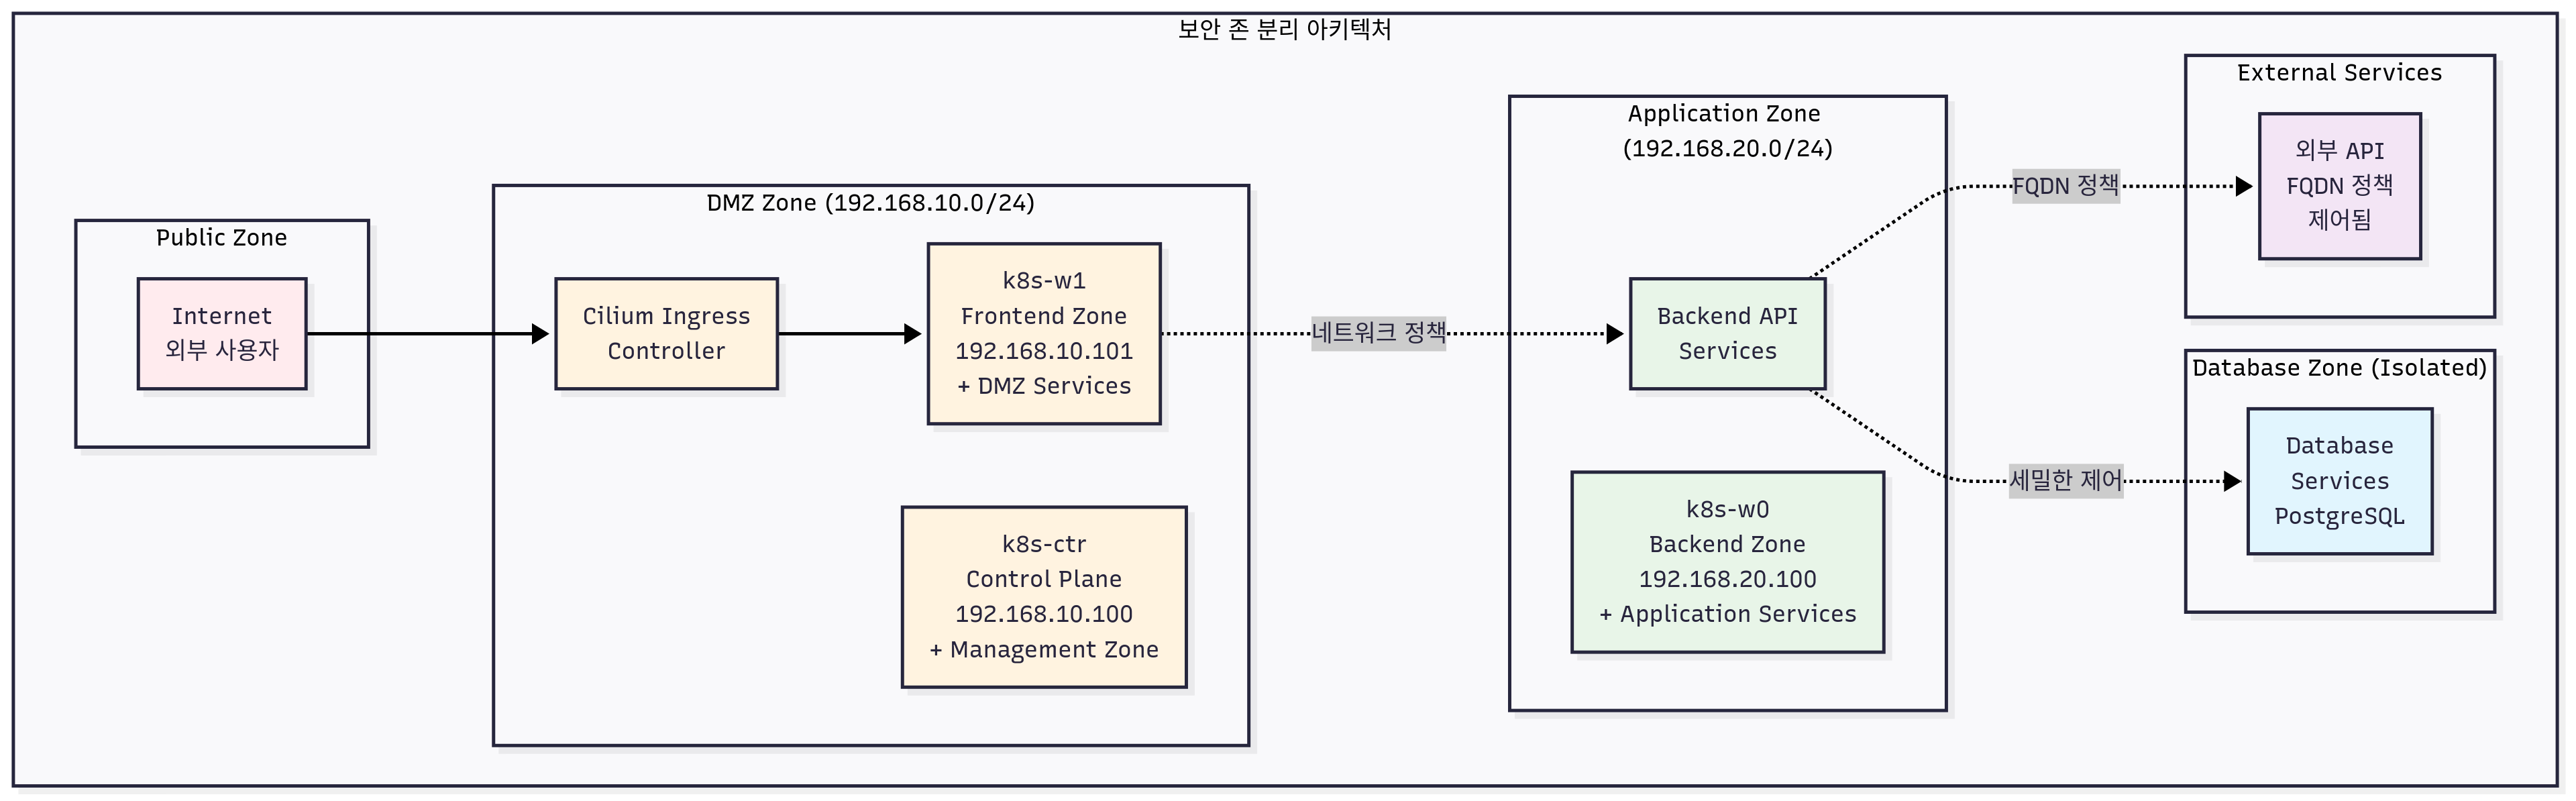
6주차 실습 환경은 Cilium의 고급 보안 기능과 Service Mesh 기능을 다루기 위해 멀티 티어 애플리케이션과 다양한 보안 시나리오를 포함한 복합적인 환경으로 구성된다.
환경 구성의 핵심 특징:
- 멀티 티어 애플리케이션 아키텍처:
- Frontend (React.js) - DMZ 존
- Backend API (Node.js) - Application 존
- Database (PostgreSQL) - Database 존
-
External Services - 외부 API 통신
-
네트워크 보안 존 분리:
- Public Zone: 외부 접근 가능한 서비스
- DMZ Zone: 웹 프론트엔드 및 로드밸런서
- Application Zone: 비즈니스 로직 처리
- Database Zone: 데이터 저장 및 백업
-
Management Zone: 모니터링 및 관리 도구
-
보안 시나리오 테스트:
- Zero Trust 네트워크 구현
- East-West 트래픽 암호화
- L7 애플리케이션 보안 정책
- 침입 탐지 및 응답
핵심 구성 요소:
| 노드 | 역할 | IP |
|---|---|---|
| k8s-ctr | Control Plane + Management Zone | 192.168.10.100 |
| k8s-w1 | Frontend + DMZ Zone | 192.168.10.101 |
| k8s-w0 | Backend + Database Zone | 192.168.20.100 |
| router | External Gateway + Security Appliance | 192.168.10.200/192.168.20.200 |
1.2 실습 환경 배포
Vagrant를 통한 확장 보안 환경 배포:
# 실습 환경 배포
mkdir cilium-security-lab && cd cilium-security-lab
curl -O https://raw.githubusercontent.com/gasida/vagrant-lab/refs/heads/main/cilium-study/6w/Vagrantfile

# 추가 보안 도구 설치 스크립트 다운로드
curl -O https://raw.githubusercontent.com/gasida/vagrant-lab/refs/heads/main/cilium-study/6w/security-tools.sh
curl -O https://raw.githubusercontent.com/gasida/vagrant-lab/refs/heads/main/cilium-study/6w/demo-apps.sh
chmod +x *.sh

# 보안 강화 환경 배포 (약 25-30분 소요)
vagrant up

# 추가 보안 도구 설치
./security-tools.sh
1.3 클러스터 보안 설정 확인
기본 보안 상태 확인:
# Cilium 보안 기능 상태 확인
cilium status | grep -i security
cilium config view | grep -E 'policy|encryption|identity'

# 네트워크 정책 엔진 상태
kubectl get ciliumpolicy,ciliumnetworkpolicy,ciliumclusterwidenetworkpolicy -A

# Identity 시스템 확인
kubectl exec -n kube-system ds/cilium -c cilium-agent -- cilium-dbg identity list
kubectl exec -n kube-system ds/cilium -c cilium-agent -- cilium-dbg endpoint list
Cilium Network Policies 심화 분석
1. Cilium Network Policy 아키텍처
1.1 Identity 기반 보안 모델
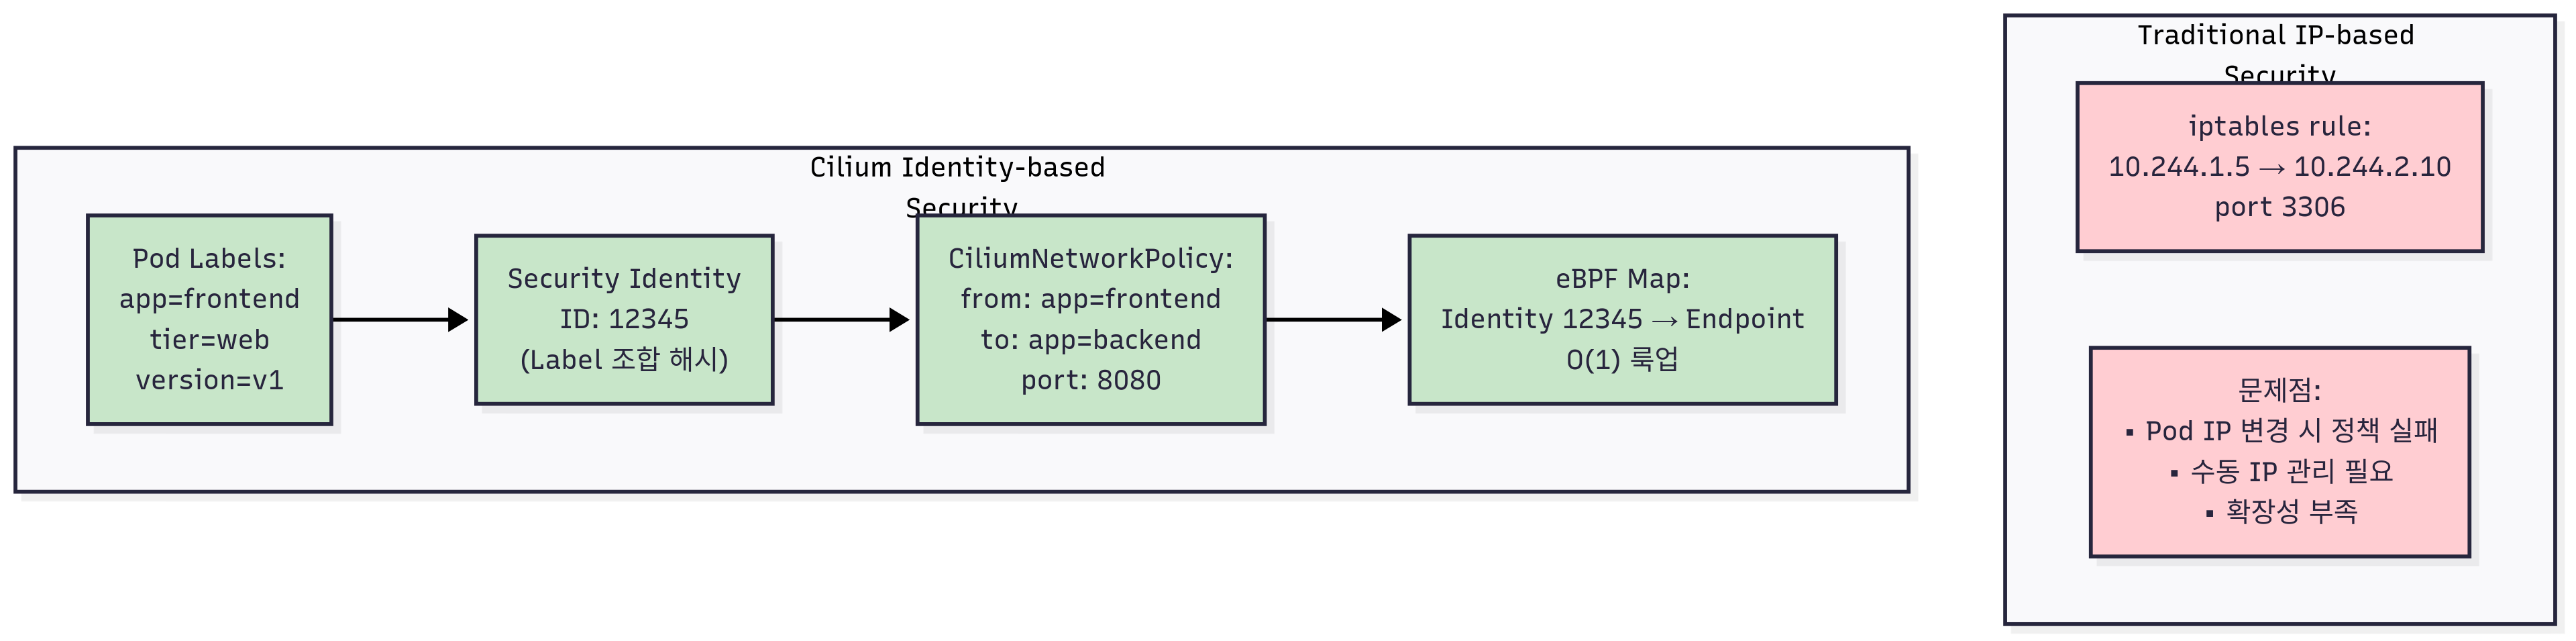
Cilium의 네트워크 보안은 기존의 IP 주소 기반 접근 방식을 벗어나 Identity 기반 보안 모델을 채택한다. 이는 클라우드 네이티브 환경의 동적 특성에 최적화된 접근 방식이다.
Identity 기반 보안의 핵심 개념:
1. Security Identity 자동 할당 - 각 Pod는 고유한 수치 Identity를 자동으로 할당받음 - Label 집합을 기반으로 동일한 Identity 공유 - IP 주소 변경에 무관한 안정적인 보안 정책 적용
2. Label Selector 기반 정책
# 예시: app=backend 라벨을 가진 모든 Pod가 동일한 Security Identity 공유
endpointSelector:
  matchLabels:
    app: backend
    version: v1
3. 동적 정책 업데이트 - Pod 생성/삭제 시 자동으로 정책 적용/해제 - Label 변경 시 실시간 Identity 재계산 - Zero-downtime 정책 업데이트
4. 성능 최적화 - eBPF 맵을 통한 O(1) 정책 룩업 - 커널 레벨에서 직접 정책 적용 - 사용자 공간 왕복 없는 고성능 처리
1.2 L3/L4 네트워크 정책
기본 L3/L4 정책 구조:
apiVersion: "cilium.io/v2"
kind: CiliumNetworkPolicy
metadata:
  name: "backend-policy"
spec:
  endpointSelector:
    matchLabels:
      app: backend
  ingress:
  - fromEndpoints:
    - matchLabels:
        app: frontend
    toPorts:
    - ports:
      - port: "8080"
        protocol: TCP
  egress:
  - toEndpoints:
    - matchLabels:
        app: database
    toPorts:
    - ports:
      - port: "5432"
        protocol: TCP
고급 L3/L4 정책 기능:
apiVersion: "cilium.io/v2"
kind: CiliumNetworkPolicy
metadata:
  name: "advanced-l3l4-policy"
spec:
  endpointSelector:
    matchLabels:
      tier: backend
  ingress:
  # CIDR 기반 접근 제어
  - fromCIDR:
    - "10.0.0.0/8"
    - "192.168.0.0/16"
  # Entity 기반 접근 제어
  - fromEntities:
    - "cluster"
    - "host"
  # 서비스 기반 접근 제어
  - fromServices:
    - name: "external-api"
      namespace: "external"
  egress:
  # DNS 기반 FQDN 정책
  - toFQDNs:
    - matchName: "api.external-service.com"
    - matchPattern: "*.safe-domain.com"
  # 포트 범위 정책
  - toPorts:
    - ports:
      - port: "3000"
        endPort: "3010"
        protocol: TCP
1.3 L7 애플리케이션 계층 정책
HTTP 프로토콜 보안:
apiVersion: "cilium.io/v2"
kind: CiliumNetworkPolicy
metadata:
  name: "api-security-policy"
spec:
  endpointSelector:
    matchLabels:
      app: api-server
  ingress:
  - fromEndpoints:
    - matchLabels:
        app: web-frontend
    toPorts:
    - ports:
      - port: "8080"
        protocol: TCP
      rules:
        http:
        # HTTP 메서드 제한
        - method: "GET"
          path: "/api/v1/users"
        - method: "POST"
          path: "/api/v1/users"
          headers:
          - "Content-Type: application/json"
          - "Authorization: Bearer .*"
        # 특정 경로 차단
        - method: "GET"
          path: "/api/v1/admin/.*"
          action: "DENY"
gRPC 프로토콜 보안:
apiVersion: "cilium.io/v2"
kind: CiliumNetworkPolicy
metadata:
  name: "grpc-service-policy"
spec:
  endpointSelector:
    matchLabels:
      app: grpc-service
  ingress:
  - fromEndpoints:
    - matchLabels:
        app: grpc-client
    toPorts:
    - ports:
      - port: "9090"
        protocol: TCP
      rules:
        grpc:
        # gRPC 서비스별 접근 제어
        - service: "user.UserService"
          method: "GetUser"
        - service: "user.UserService"
          method: "CreateUser"
        # 관리자 서비스 차단
        - service: "admin.*"
          action: "DENY"
Kafka 프로토콜 보안:
apiVersion: "cilium.io/v2"
kind: CiliumNetworkPolicy
metadata:
  name: "kafka-security-policy"
spec:
  endpointSelector:
    matchLabels:
      app: kafka-consumer
  egress:
  - toEndpoints:
    - matchLabels:
        app: kafka-broker
    toPorts:
    - ports:
      - port: "9092"
        protocol: TCP
      rules:
        kafka:
        # 특정 토픽만 접근 허용
        - apiKey: "produce"
          topic: "user-events"
        - apiKey: "consume"
          topic: "user-events"
        # 관리자 토픽 차단
        - apiKey: ".*"
          topic: "admin-.*"
          action: "DENY"
2. 네트워크 정책 실습
2.1 데모 애플리케이션 배포
멀티 티어 애플리케이션 배포:
# 네임스페이스 생성
kubectl create namespace frontend
kubectl create namespace backend
kubectl create namespace database
kubectl create namespace external

# Frontend 애플리케이션 배포
cat << EOF | kubectl apply -f -
apiVersion: apps/v1
kind: Deployment
metadata:
  name: frontend
  namespace: frontend
spec:
  replicas: 2
  selector:
    matchLabels:
      app: frontend
      tier: web
  template:
    metadata:
      labels:
        app: frontend
        tier: web
        version: v1
    spec:
      containers:
      - name: frontend
        image: nginx:alpine
        ports:
        - containerPort: 80
        env:
        - name: BACKEND_URL
          value: "http://backend.backend.svc.cluster.local:8080"
---
apiVersion: v1
kind: Service
metadata:
  name: frontend
  namespace: frontend
spec:
  selector:
    app: frontend
  ports:
  - port: 80
    targetPort: 80
  type: ClusterIP
EOF

# Backend API 서버 배포
cat << EOF | kubectl apply -f -
apiVersion: apps/v1
kind: Deployment
metadata:
  name: backend
  namespace: backend
spec:
  replicas: 2
  selector:
    matchLabels:
      app: backend
      tier: api
  template:
    metadata:
      labels:
        app: backend
        tier: api
        version: v1
    spec:
      containers:
      - name: backend
        image: httpd:alpine
        ports:
        - containerPort: 8080
        env:
        - name: DATABASE_URL
          value: "postgresql://database.database.svc.cluster.local:5432/appdb"
---
apiVersion: v1
kind: Service
metadata:
  name: backend
  namespace: backend
spec:
  selector:
    app: backend
  ports:
  - port: 8080
    targetPort: 8080
  type: ClusterIP
EOF

# Database 배포
cat << EOF | kubectl apply -f -
apiVersion: apps/v1
kind: Deployment
metadata:
  name: database
  namespace: database
spec:
  replicas: 1
  selector:
    matchLabels:
      app: database
      tier: data
  template:
    metadata:
      labels:
        app: database
        tier: data
        version: v1
    spec:
      containers:
      - name: database
        image: postgres:13-alpine
        ports:
        - containerPort: 5432
        env:
        - name: POSTGRES_DB
          value: "appdb"
        - name: POSTGRES_USER
          value: "appuser"
        - name: POSTGRES_PASSWORD
          value: "apppass"
---
apiVersion: v1
kind: Service
metadata:
  name: database
  namespace: database
spec:
  selector:
    app: database
  ports:
  - port: 5432
    targetPort: 5432
  type: ClusterIP
EOF

# 테스트 클라이언트 배포
cat << EOF | kubectl apply -f -
apiVersion: v1
kind: Pod
metadata:
  name: test-client
  namespace: frontend
  labels:
    app: test-client
spec:
  containers:
  - name: client
    image: nicolaka/netshoot
    command: ["tail"]
    args: ["-f", "/dev/null"]
EOF
2.2 기본 연결성 테스트
# 현재 연결성 확인 (정책 적용 전)
kubectl exec -it test-client -n frontend -- curl -s backend.backend.svc.cluster.local:8080
kubectl exec -it test-client -n frontend -- curl -s database.database.svc.cluster.local:5432

# Hubble로 트래픽 플로우 관찰
hubble observe -f --namespace frontend,backend,database

# Identity 정보 확인
kubectl exec -n kube-system ds/cilium -c cilium-agent -- cilium-dbg identity list
kubectl exec -n kube-system ds/cilium -c cilium-agent -- cilium-dbg endpoint list
2.3 Zero Trust 네트워크 정책 적용
1단계: 기본 거부 정책 (Default Deny)
# 모든 네임스페이스에 기본 거부 정책 적용
cat << EOF | kubectl apply -f -
apiVersion: "cilium.io/v2"
kind: CiliumNetworkPolicy
metadata:
  name: "default-deny-all"
  namespace: frontend
spec:
  endpointSelector: {}
  ingress: []
  egress: []
---
apiVersion: "cilium.io/v2"
kind: CiliumNetworkPolicy
metadata:
  name: "default-deny-all"
  namespace: backend
spec:
  endpointSelector: {}
  ingress: []
  egress: []
---
apiVersion: "cilium.io/v2"
kind: CiliumNetworkPolicy
metadata:
  name: "default-deny-all"
  namespace: database
spec:
  endpointSelector: {}
  ingress: []
  egress: []
EOF

# 연결성 테스트 (모든 통신 차단 확인)
kubectl exec -it test-client -n frontend -- curl -s --connect-timeout 5 backend.backend.svc.cluster.local:8080
# Expected: Connection timeout

# Hubble로 차단된 트래픽 확인
hubble observe -f --verdict DENIED
2단계: 선택적 통신 허용 정책
# Frontend → Backend 통신 허용
cat << EOF | kubectl apply -f -
apiVersion: "cilium.io/v2"
kind: CiliumNetworkPolicy
metadata:
  name: "frontend-to-backend"
  namespace: backend
spec:
  endpointSelector:
    matchLabels:
      app: backend
  ingress:
  - fromEndpoints:
    - matchLabels:
        app: frontend
      namespaceSelector:
        matchLabels:
          name: frontend
    toPorts:
    - ports:
      - port: "8080"
        protocol: TCP
EOF

# Backend → Database 통신 허용
cat << EOF | kubectl apply -f -
apiVersion: "cilium.io/v2"
kind: CiliumNetworkPolicy
metadata:
  name: "backend-to-database"
  namespace: database
spec:
  endpointSelector:
    matchLabels:
      app: database
  ingress:
  - fromEndpoints:
    - matchLabels:
        app: backend
      namespaceSelector:
        matchLabels:
          name: backend
    toPorts:
    - ports:
      - port: "5432"
        protocol: TCP
EOF

# DNS 해결을 위한 CoreDNS 통신 허용
cat << EOF | kubectl apply -f -
apiVersion: "cilium.io/v2"
kind: CiliumNetworkPolicy
metadata:
  name: "allow-dns"
  namespace: frontend
spec:
  endpointSelector:
    matchLabels:
      app: frontend
  egress:
  - toEndpoints:
    - matchLabels:
        k8s-app: kube-dns
      namespaceSelector:
        matchLabels:
          name: kube-system
    toPorts:
    - ports:
      - port: "53"
        protocol: UDP
      - port: "53"
        protocol: TCP
---
apiVersion: "cilium.io/v2"
kind: CiliumNetworkPolicy
metadata:
  name: "allow-dns"
  namespace: backend
spec:
  endpointSelector:
    matchLabels:
      app: backend
  egress:
  - toEndpoints:
    - matchLabels:
        k8s-app: kube-dns
      namespaceSelector:
        matchLabels:
          name: kube-system
    toPorts:
    - ports:
      - port: "53"
        protocol: UDP
      - port: "53"
        protocol: TCP
EOF

# 연결성 테스트
kubectl exec -it test-client -n frontend -- curl -s backend.backend.svc.cluster.local:8080
# Expected: Success

# 허용되지 않은 연결 테스트
kubectl exec -it test-client -n frontend -- curl -s --connect-timeout 5 database.database.svc.cluster.local:5432
# Expected: Connection timeout (정책에 의해 차단)
3. L7 애플리케이션 보안 실습
3.1 HTTP L7 정책 적용
HTTP 애플리케이션 배포:
# HTTP API 서버 배포
cat << EOF | kubectl apply -f -
apiVersion: apps/v1
kind: Deployment
metadata:
  name: http-api
  namespace: backend
spec:
  replicas: 2
  selector:
    matchLabels:
      app: http-api
      tier: api
  template:
    metadata:
      labels:
        app: http-api
        tier: api
    spec:
      containers:
      - name: api
        image: traefik/whoami
        ports:
        - containerPort: 80
        env:
        - name: WHOAMI_PORT_NUMBER
          value: "80"
---
apiVersion: v1
kind: Service
metadata:
  name: http-api
  namespace: backend
spec:
  selector:
    app: http-api
  ports:
  - port: 80
    targetPort: 80
  type: ClusterIP
EOF
L7 HTTP 보안 정책 적용:
cat << EOF | kubectl apply -f -
apiVersion: "cilium.io/v2"
kind: CiliumNetworkPolicy
metadata:
  name: "http-l7-policy"
  namespace: backend
spec:
  endpointSelector:
    matchLabels:
      app: http-api
  ingress:
  - fromEndpoints:
    - matchLabels:
        app: frontend
      namespaceSelector:
        matchLabels:
          name: frontend
    toPorts:
    - ports:
      - port: "80"
        protocol: TCP
      rules:
        http:
        # GET 요청만 허용
        - method: "GET"
          path: "/"
        # 특정 헤더가 있는 요청만 허용
        - method: "GET"
          path: "/api/.*"
          headers:
          - "X-API-Version: v1"
        # Admin 경로 차단
        - method: ".*"
          path: "/admin/.*"
          action: "DENY"
EOF

# L7 정책 테스트
kubectl exec -it test-client -n frontend -- curl -s http-api.backend.svc.cluster.local
# Expected: Success (GET / 허용)

kubectl exec -it test-client -n frontend -- curl -s -X POST http-api.backend.svc.cluster.local
# Expected: Denied (POST 차단)

kubectl exec -it test-client -n frontend -- curl -s -H "X-API-Version: v1" http-api.backend.svc.cluster.local/api/users
# Expected: Success (헤더 조건 만족)

kubectl exec -it test-client -n frontend -- curl -s http-api.backend.svc.cluster.local/admin/config
# Expected: Denied (admin 경로 차단)

# Hubble로 L7 트래픽 분석
hubble observe -f --protocol http --namespace backend
hubble observe -f --verdict DENIED --namespace backend
3.2 FQDN 기반 외부 통신 정책
# 외부 API 통신을 위한 FQDN 정책
cat << EOF | kubectl apply -f -
apiVersion: "cilium.io/v2"
kind: CiliumNetworkPolicy
metadata:
  name: "external-api-policy"
  namespace: backend
spec:
  endpointSelector:
    matchLabels:
      app: backend
  egress:
  # 신뢰할 수 있는 외부 API만 허용
  - toFQDNs:
    - matchName: "api.github.com"
    - matchName: "httpbin.org"
    - matchPattern: "*.googleapis.com"
  # DNS 해결 허용
  - toEndpoints:
    - matchLabels:
        k8s-app: kube-dns
      namespaceSelector:
        matchLabels:
          name: kube-system
    toPorts:
    - ports:
      - port: "53"
        protocol: UDP
      - port: "53"
        protocol: TCP
  # HTTPS 트래픽 허용 (443 포트)
  - toPorts:
    - ports:
      - port: "443"
        protocol: TCP
EOF

# FQDN 정책 테스트
kubectl exec -it test-client -n frontend -- curl -s https://httpbin.org/get
# Expected: Success (허용된 FQDN)

kubectl exec -it test-client -n frontend -- curl -s --connect-timeout 5 https://malicious-site.com
# Expected: Timeout (차단된 FQDN)

# DNS 쿼리 및 FQDN 매핑 확인
kubectl exec -n kube-system ds/cilium -c cilium-agent -- cilium-dbg fqdn cache list
WireGuard 투명 암호화
1. WireGuard 암호화 개념
1.1 WireGuard vs IPSec 비교
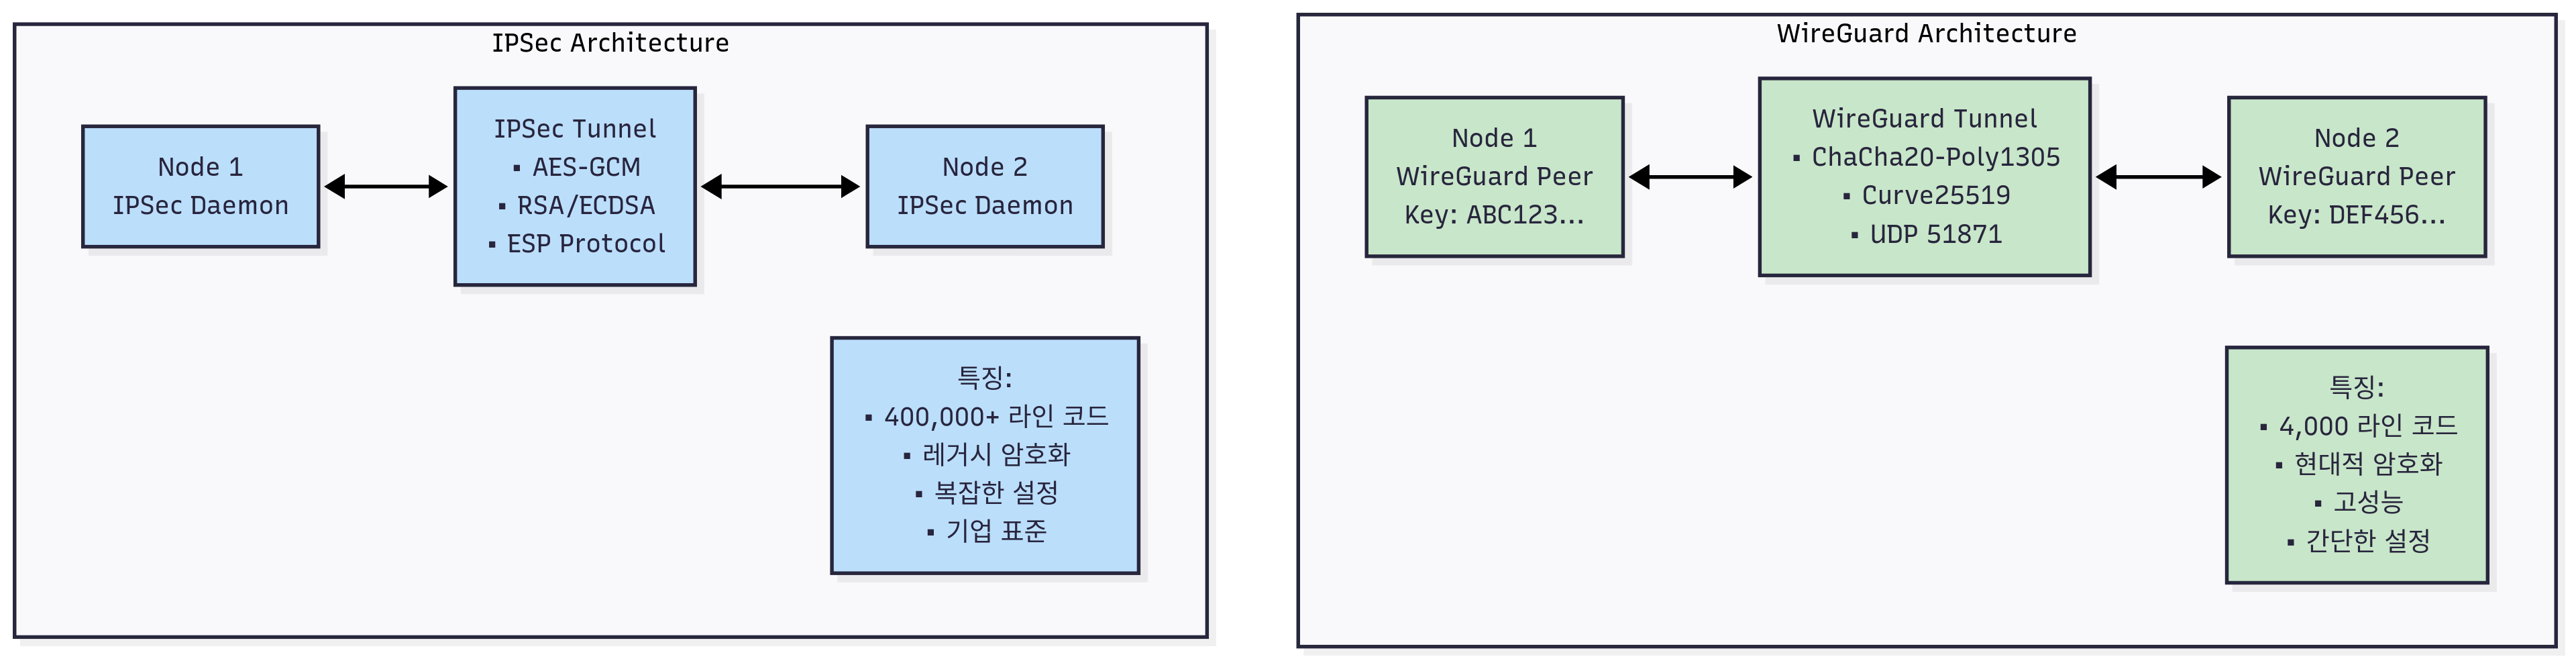
WireGuard의 특징:
1. 현대적 암호화 - Curve25519: 타원곡선 Diffie-Hellman 키 교환 - ChaCha20: 스트림 암호화 (AES보다 빠름) - Poly1305: 메시지 인증 코드 - BLAKE2s: 해시 함수
2. 단순한 구현 - 코드베이스: ~4,000 라인 (IPSec: ~400,000+ 라인) - 설정의 단순함: 최소한의 설정 옵션 - 디버깅 용이성: 명확한 로그 및 상태 정보
3. 고성능 - 커널 공간에서 직접 실행 - Zero-copy 네트워킹 지원 - CPU 효율적인 암호화 알고리즘
4. 투명한 암호화 - 애플리케이션 코드 변경 없이 암호화 적용 - Pod 간 모든 통신 자동 암호화 - 성능 오버헤드 최소화
WireGuard vs IPSec 비교표:
| 특징 | WireGuard | IPSec |
|---|---|---|
| 코드 크기 | ~4,000 라인 | ~400,000+ 라인 |
| 설정 복잡도 | 간단 | 복잡 |
| 암호화 알고리즘 | 현대적 (ChaCha20) | 레거시 (AES) |
| 성능 | 높음 | 보통 |
| 디버깅 | 쉬움 | 어려움 |
| 키 교환 | Curve25519 | RSA/DH |
1.2 Cilium WireGuard 아키텍처
Cilium WireGuard 구현의 특징:
1. 자동 키 관리 - 노드별 WireGuard 키 페어 자동 생성 - 키 로테이션 및 배포 자동화 - Kubernetes Secret을 통한 안전한 키 저장
2. 투명한 암호화 - 모든 노드 간 트래픽 자동 암호화 - 애플리케이션 레벨 변경 불필요 - 기존 네트워크 정책과 완전 호환
3. 성능 최적화 - 암호화 오버헤드 최소화 (약 5-10%) - CPU 효율적인 ChaCha20 알고리즘 - 하드웨어 가속 지원
2. WireGuard 암호화 실습
2.1 WireGuard 암호화 활성화
# WireGuard 모듈 확인
lsmod | grep wireguard
modinfo wireguard

# 모든 노드에서 WireGuard 모듈 로드
modprobe wireguard
sshpass -p 'vagrant' ssh vagrant@k8s-w1 sudo modprobe wireguard
sshpass -p 'vagrant' ssh vagrant@k8s-w0 sudo modprobe wireguard

# Cilium에서 WireGuard 암호화 활성화
helm upgrade cilium cilium/cilium \
  --namespace kube-system \
  --reuse-values \
  --set encryption.enabled=true \
  --set encryption.type=wireguard

# Cilium Agent 재시작
kubectl rollout restart -n kube-system ds/cilium

# 암호화 상태 확인
cilium status | grep -i encryption
# Expected: Encryption: Wireguard [NodeEncryption: Disabled, cilium_wg0 (Pubkey: <public-key>, Port: 51871, Peers: 2)]
2.2 WireGuard 인터페이스 및 설정 확인
# WireGuard 인터페이스 확인
ip -c addr show cilium_wg0
ip -c link show cilium_wg0

# WireGuard 설정 확인
wg show cilium_wg0

# 모든 노드의 WireGuard 상태 확인
for node in w1 w0; do
  echo "=== Node: k8s-$node ==="
  sshpass -p 'vagrant' ssh vagrant@k8s-$node sudo wg show cilium_wg0
  echo
done

# Cilium WireGuard 키 정보
kubectl get secret -n kube-system cilium-wireguard-keys -o yaml | yq
kubectl exec -n kube-system ds/cilium -c cilium-agent -- cilium-dbg wg

# 예상 출력:
# interface: cilium_wg0
#   public key: <base64-public-key>
#   private key: (hidden)
#   listening port: 51871
#
# peer: <peer-public-key>
#   endpoint: 192.168.10.101:51871
#   allowed ips: 172.20.1.0/24
#   latest handshake: 2 minutes, 15 seconds ago
#   transfer: 1.25 MiB received, 1.18 MiB sent
2.3 암호화된 통신 테스트
# 테스트 Pod 간 통신
kubectl exec -it test-client -n frontend -- ping -c 3 backend.backend.svc.cluster.local

# 패킷 캡처로 암호화 확인
# 터미널 1: WireGuard 트래픽 모니터링
tcpdump -i cilium_wg0 -nn
tcpdump -i eth1 udp port 51871 -nn

# 터미널 2: 암호화되지 않은 인터페이스에서 확인
tcpdump -i eth1 icmp -nn
# 암호화 후에는 ICMP 패킷이 보이지 않고 WireGuard UDP 패킷만 보임

# Hubble로 암호화된 플로우 확인
hubble observe -f --namespace frontend,backend

# WireGuard 통계 정보
wg show all transfer
cat /proc/net/dev | grep cilium_wg0
2.4 암호화 성능 테스트
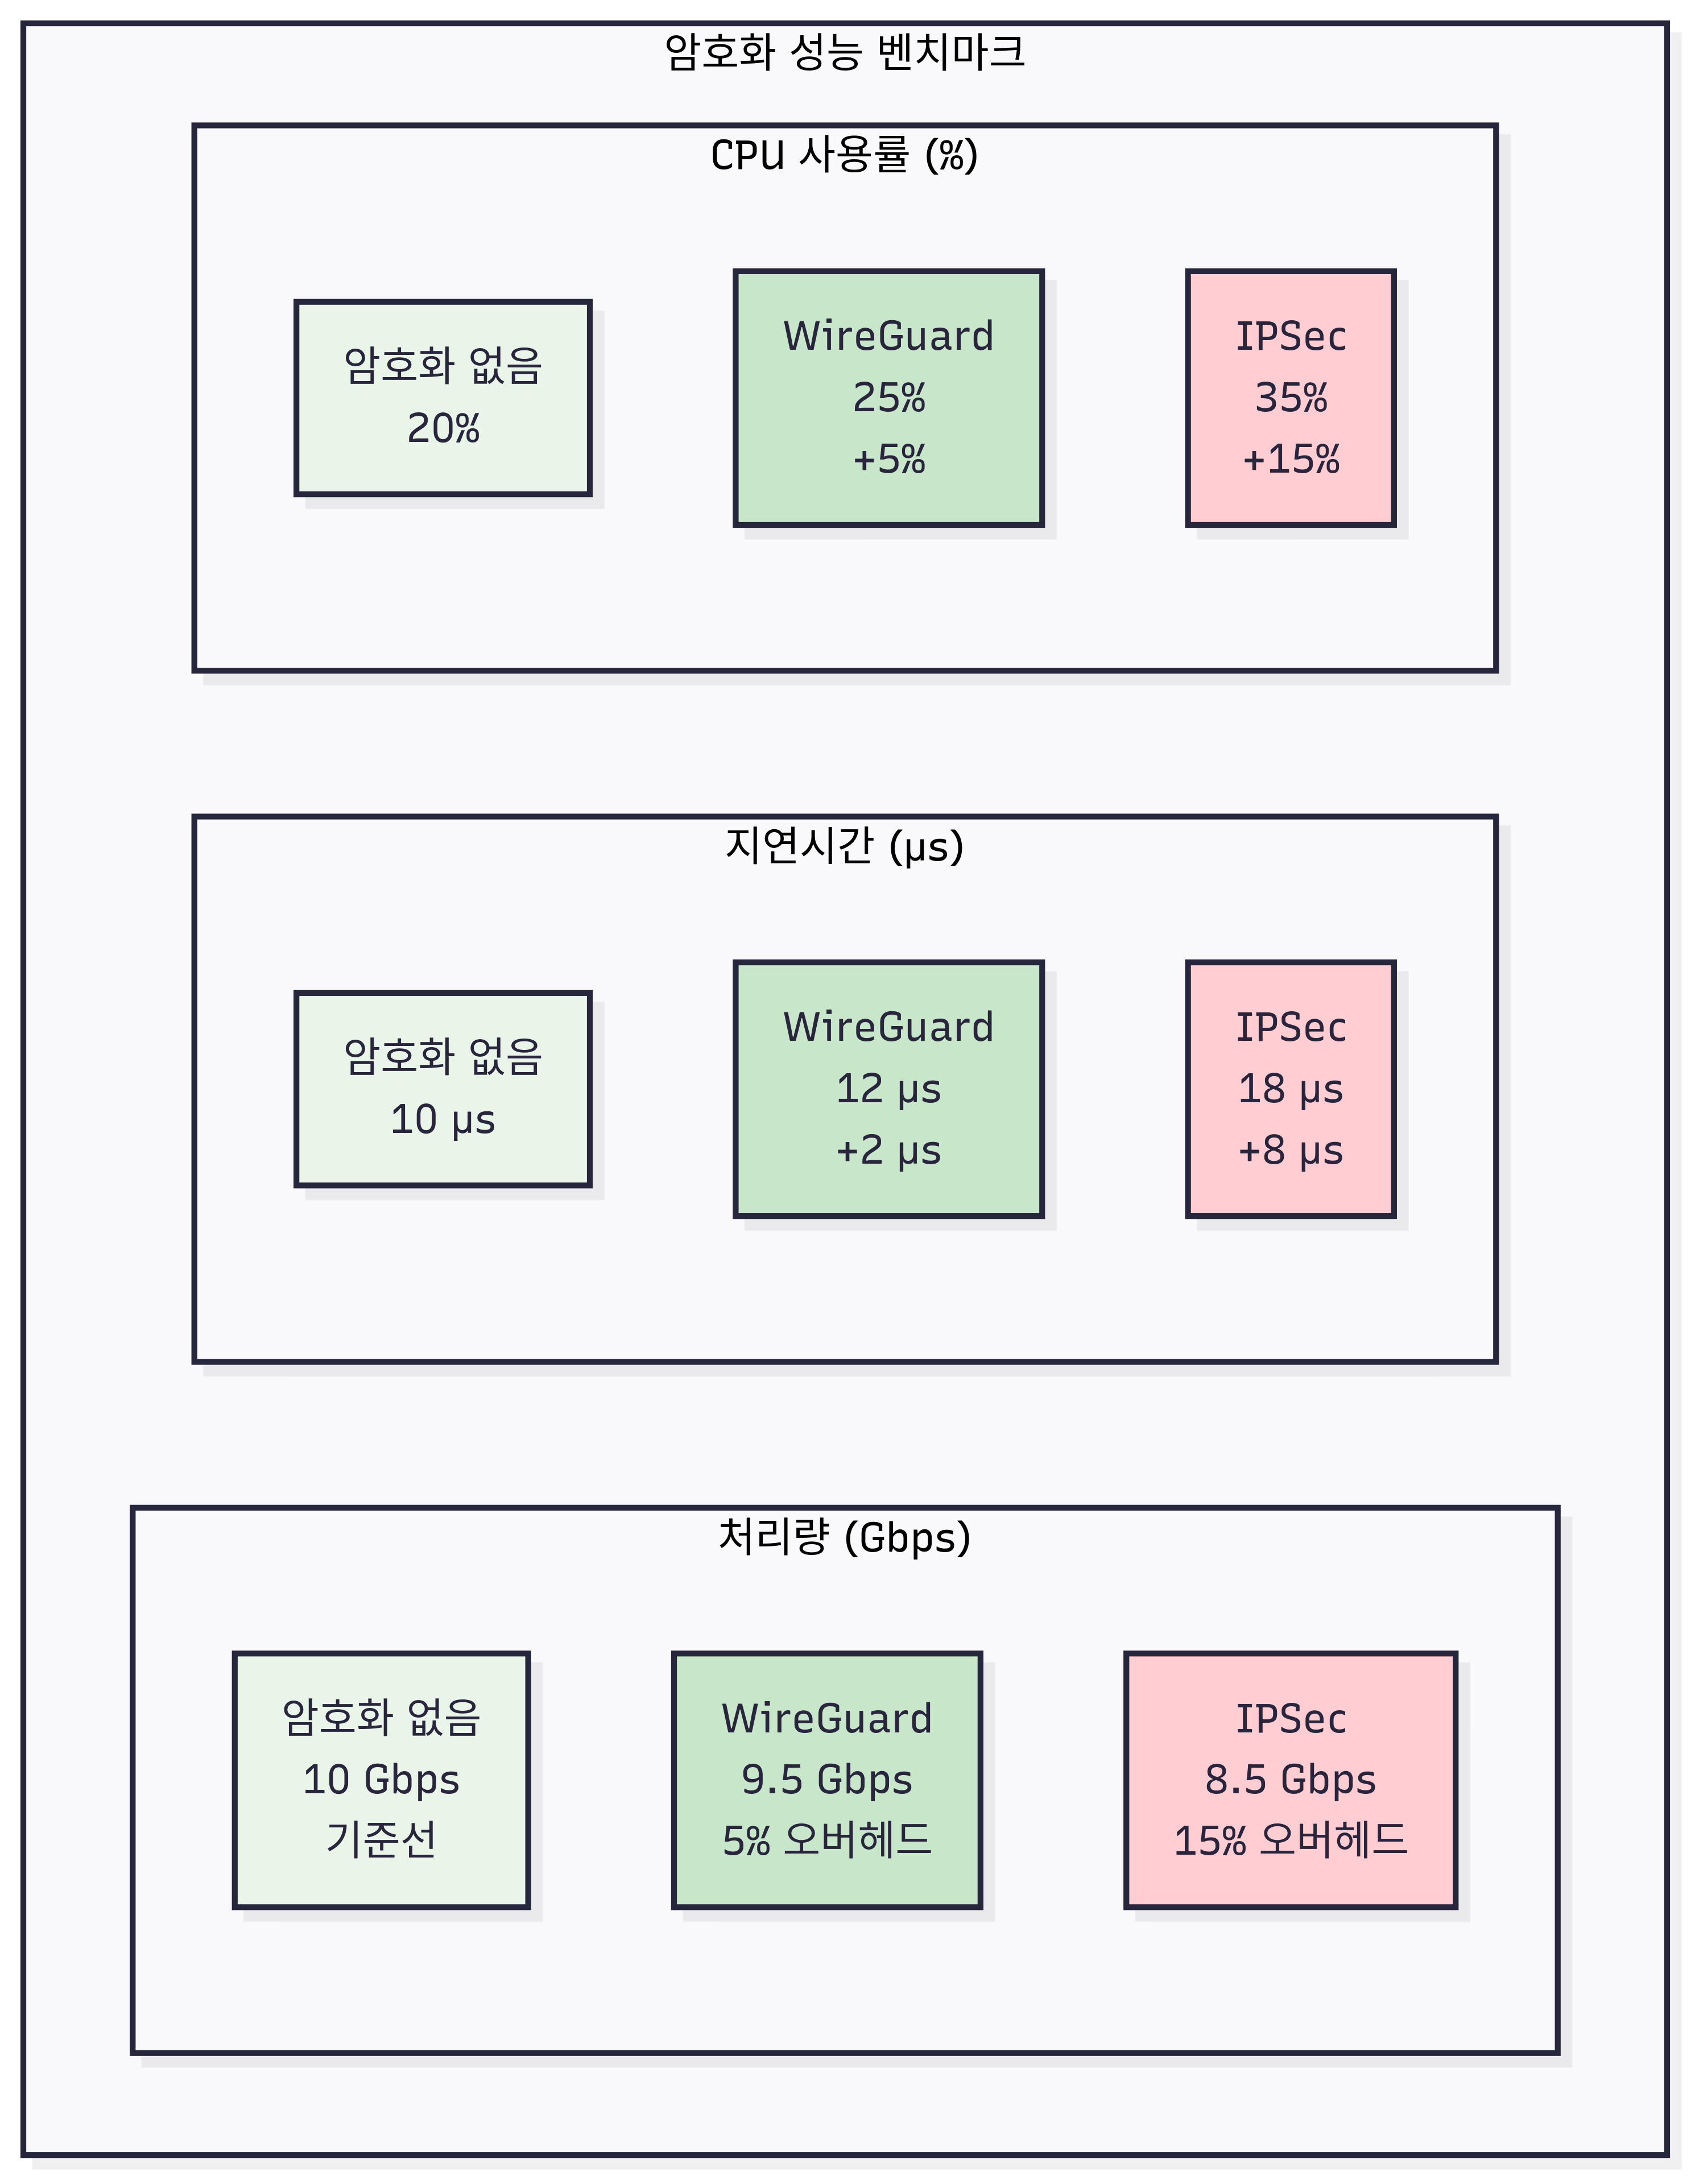
# iperf3를 통한 암호화 성능 측정
# 서버 Pod 배포
cat << EOF | kubectl apply -f -
apiVersion: v1
kind: Pod
metadata:
  name: iperf3-server
  namespace: backend
  labels:
    app: iperf3-server
spec:
  containers:
  - name: iperf3
    image: networkstatic/iperf3
    args: ["-s"]
    ports:
    - containerPort: 5201
EOF

# 클라이언트에서 성능 테스트
kubectl exec -it test-client -n frontend -- iperf3 -c iperf3-server.backend.svc.cluster.local -t 30

# 암호화 비활성화 후 성능 비교
helm upgrade cilium cilium/cilium \
  --namespace kube-system \
  --reuse-values \
  --set encryption.enabled=false

kubectl rollout restart -n kube-system ds/cilium

# 다시 성능 테스트하여 오버헤드 측정
kubectl exec -it test-client -n frontend -- iperf3 -c iperf3-server.backend.svc.cluster.local -t 30

# 결과 비교 (일반적으로 5-10% 성능 저하)
3. 노드 간 암호화 (Node-to-Node Encryption)
3.1 호스트 네트워크 암호화
# 노드 간 암호화 활성화 (호스트 네트워크 포함)
helm upgrade cilium cilium/cilium \
  --namespace kube-system \
  --reuse-values \
  --set encryption.enabled=true \
  --set encryption.type=wireguard \
  --set encryption.nodeEncryption=true

# 호스트 네트워크 암호화 확인
kubectl exec -n kube-system ds/cilium -c cilium-agent -- cilium status | grep -i "Node Encryption"
# Expected: Node Encryption: Enabled

# 호스트 간 통신 암호화 테스트
ping -c 3 192.168.10.101  # k8s-w1로 ping
sshpass -p 'vagrant' ssh vagrant@k8s-w1 ping -c 3 192.168.20.100  # k8s-w0로 ping

# 호스트 트래픽 모니터링
tcpdump -i cilium_wg0 -nn host 192.168.10.101
Cilium Service Mesh 기능
1. 사이드카 없는 Service Mesh 아키텍처
1.1 전통적 Service Mesh vs Cilium Service Mesh
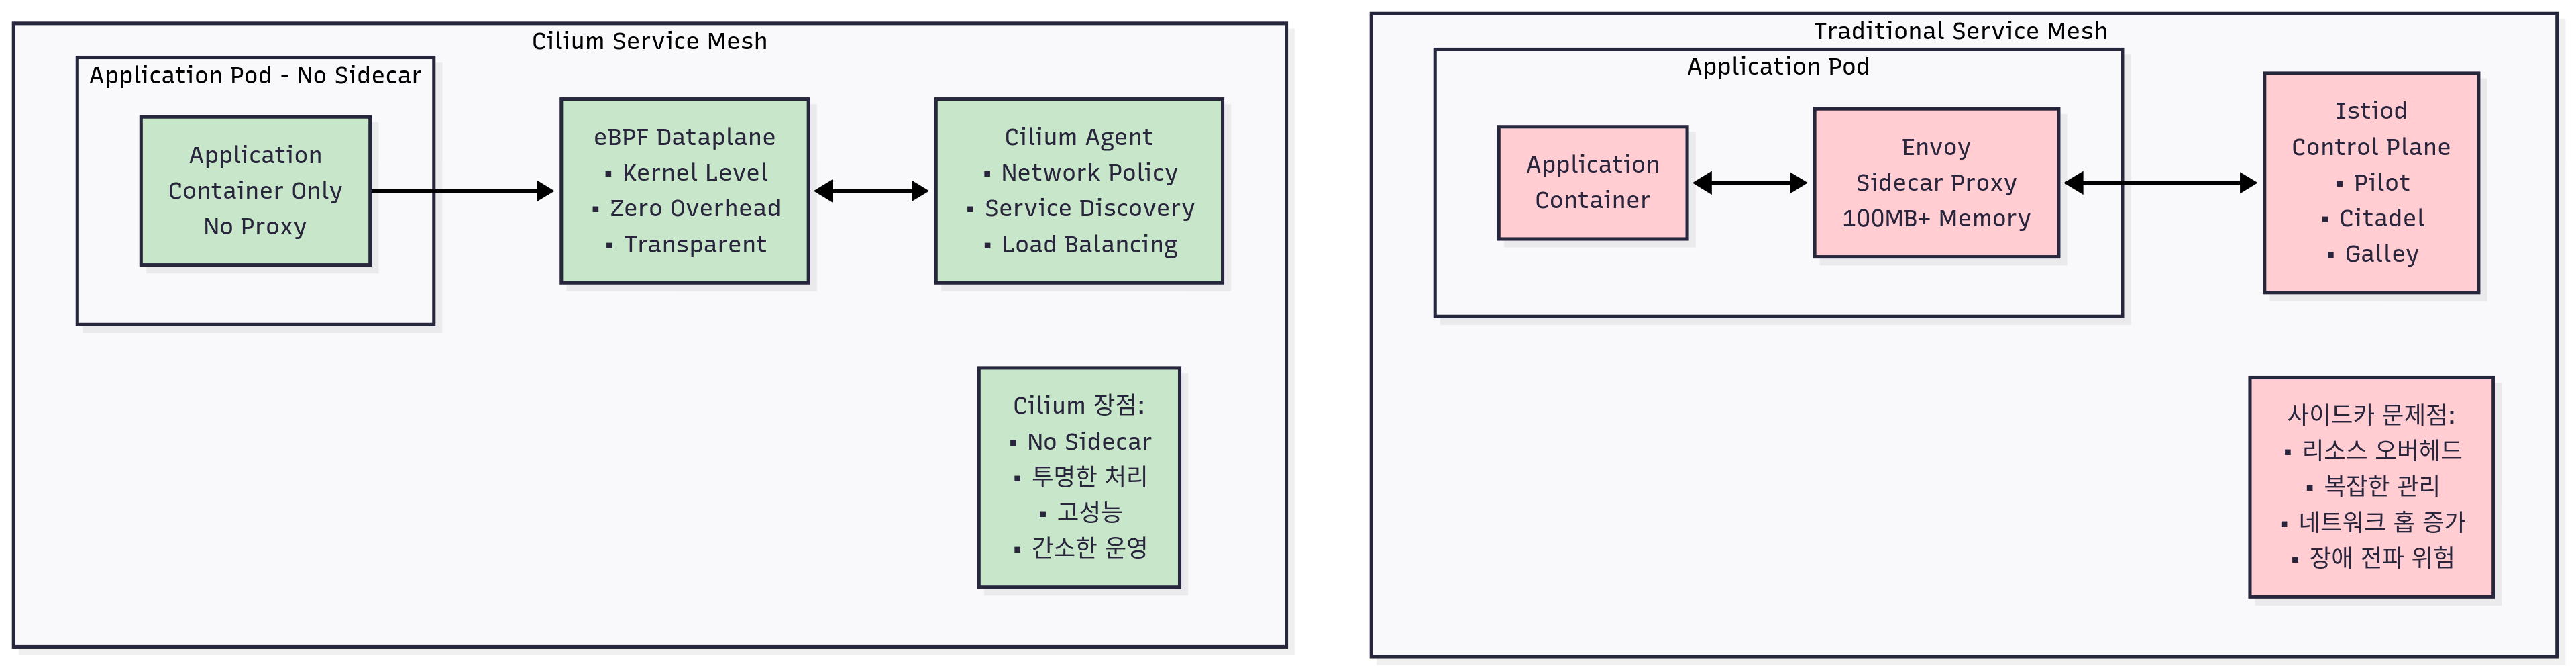
전통적 Service Mesh (Istio, Linkerd)의 한계:
1. 사이드카 오버헤드 - 각 Pod마다 추가 프록시 컨테이너 필요 - 메모리 및 CPU 오버헤드 (Pod당 50-100MB+) - 네트워크 홉 증가로 인한 지연시간 상승 - 복잡한 설정 및 관리
2. 운영 복잡성 - 사이드카 버전 관리 복잡성 - 사이드카 재시작 시 애플리케이션 영향 - 디버깅 및 트러블슈팅 어려움
Cilium Service Mesh의 특징:
1. eBPF 기반 구현 - 사이드카 프록시 불필요 - 커널 레벨에서 직접 처리 - 낮은 리소스 오버헤드 - 고성능 패킷 처리
2. 투명한 서비스 메시 - 애플리케이션 코드 변경 불필요 - 기존 Kubernetes 서비스와 호환 - 간소화된 운영 및 관리
1.2 Cilium Service Mesh 핵심 기능
1. Ingress 트래픽 관리 - L7 로드밸런싱 및 라우팅 - TLS 종료 및 재암호화 - Rate Limiting 및 Circuit Breaking - 헤더 조작 및 리라이팅
2. Service-to-Service 통신 - mTLS 자동 암호화 - 트래픽 분할 및 카나리 배포 - 헤더 기반 라우팅 - 장애 격리 및 복구
3. 관찰 가능성 - L7 메트릭 및 트레이싱 - 서비스 토폴로지 맵 - 성능 분석 및 SLI 측정
2. Ingress Controller 실습
2.1 Cilium Ingress Controller 활성화
# Cilium Ingress Controller 활성화
helm upgrade cilium cilium/cilium \
  --namespace kube-system \
  --reuse-values \
  --set ingressController.enabled=true \
  --set ingressController.service.type=NodePort \
  --set ingressController.service.nodePorts.http=30080 \
  --set ingressController.service.nodePorts.https=30443

# Ingress Controller 상태 확인
kubectl get pods -n kube-system -l app.kubernetes.io/name=cilium-ingress
kubectl get svc -n kube-system cilium-ingress

# Ingress Class 확인
kubectl get ingressclass
# Expected: cilium ingressclass 생성됨
2.2 HTTP Ingress 설정
# 백엔드 서비스를 위한 Ingress 생성
cat << EOF | kubectl apply -f -
apiVersion: networking.k8s.io/v1
kind: Ingress
metadata:
  name: basic-ingress
  namespace: backend
  annotations:
    ingress.cilium.io/service-type: "ClusterIP"
spec:
  ingressClassName: cilium
  rules:
  - host: api.example.com
    http:
      paths:
      - path: /
        pathType: Prefix
        backend:
          service:
            name: http-api
            port:
              number: 80
      - path: /v2
        pathType: Prefix
        backend:
          service:
            name: backend
            port:
              number: 8080
EOF

# Ingress 상태 확인
kubectl get ingress -n backend
kubectl describe ingress basic-ingress -n backend

# 외부에서 접근 테스트
curl -H "Host: api.example.com" http://192.168.10.100:30080/
curl -H "Host: api.example.com" http://192.168.10.100:30080/v2
2.3 HTTPS/TLS Ingress 설정
# TLS 인증서 생성
openssl req -x509 -newkey rsa:4096 -keyout tls.key -out tls.crt -days 365 -nodes \
  -subj "/CN=api.example.com/O=Example Org"

# TLS Secret 생성
kubectl create secret tls api-tls-secret --cert=tls.crt --key=tls.key -n backend

# HTTPS Ingress 설정
cat << EOF | kubectl apply -f -
apiVersion: networking.k8s.io/v1
kind: Ingress
metadata:
  name: tls-ingress
  namespace: backend
  annotations:
    ingress.cilium.io/service-type: "ClusterIP"
spec:
  ingressClassName: cilium
  tls:
  - hosts:
    - api.example.com
    secretName: api-tls-secret
  rules:
  - host: api.example.com
    http:
      paths:
      - path: /
        pathType: Prefix
        backend:
          service:
            name: http-api
            port:
              number: 80
EOF

# HTTPS 접근 테스트
curl -k -H "Host: api.example.com" https://192.168.10.100:30443/
3. Gateway API 활용
3.1 Gateway API 개념
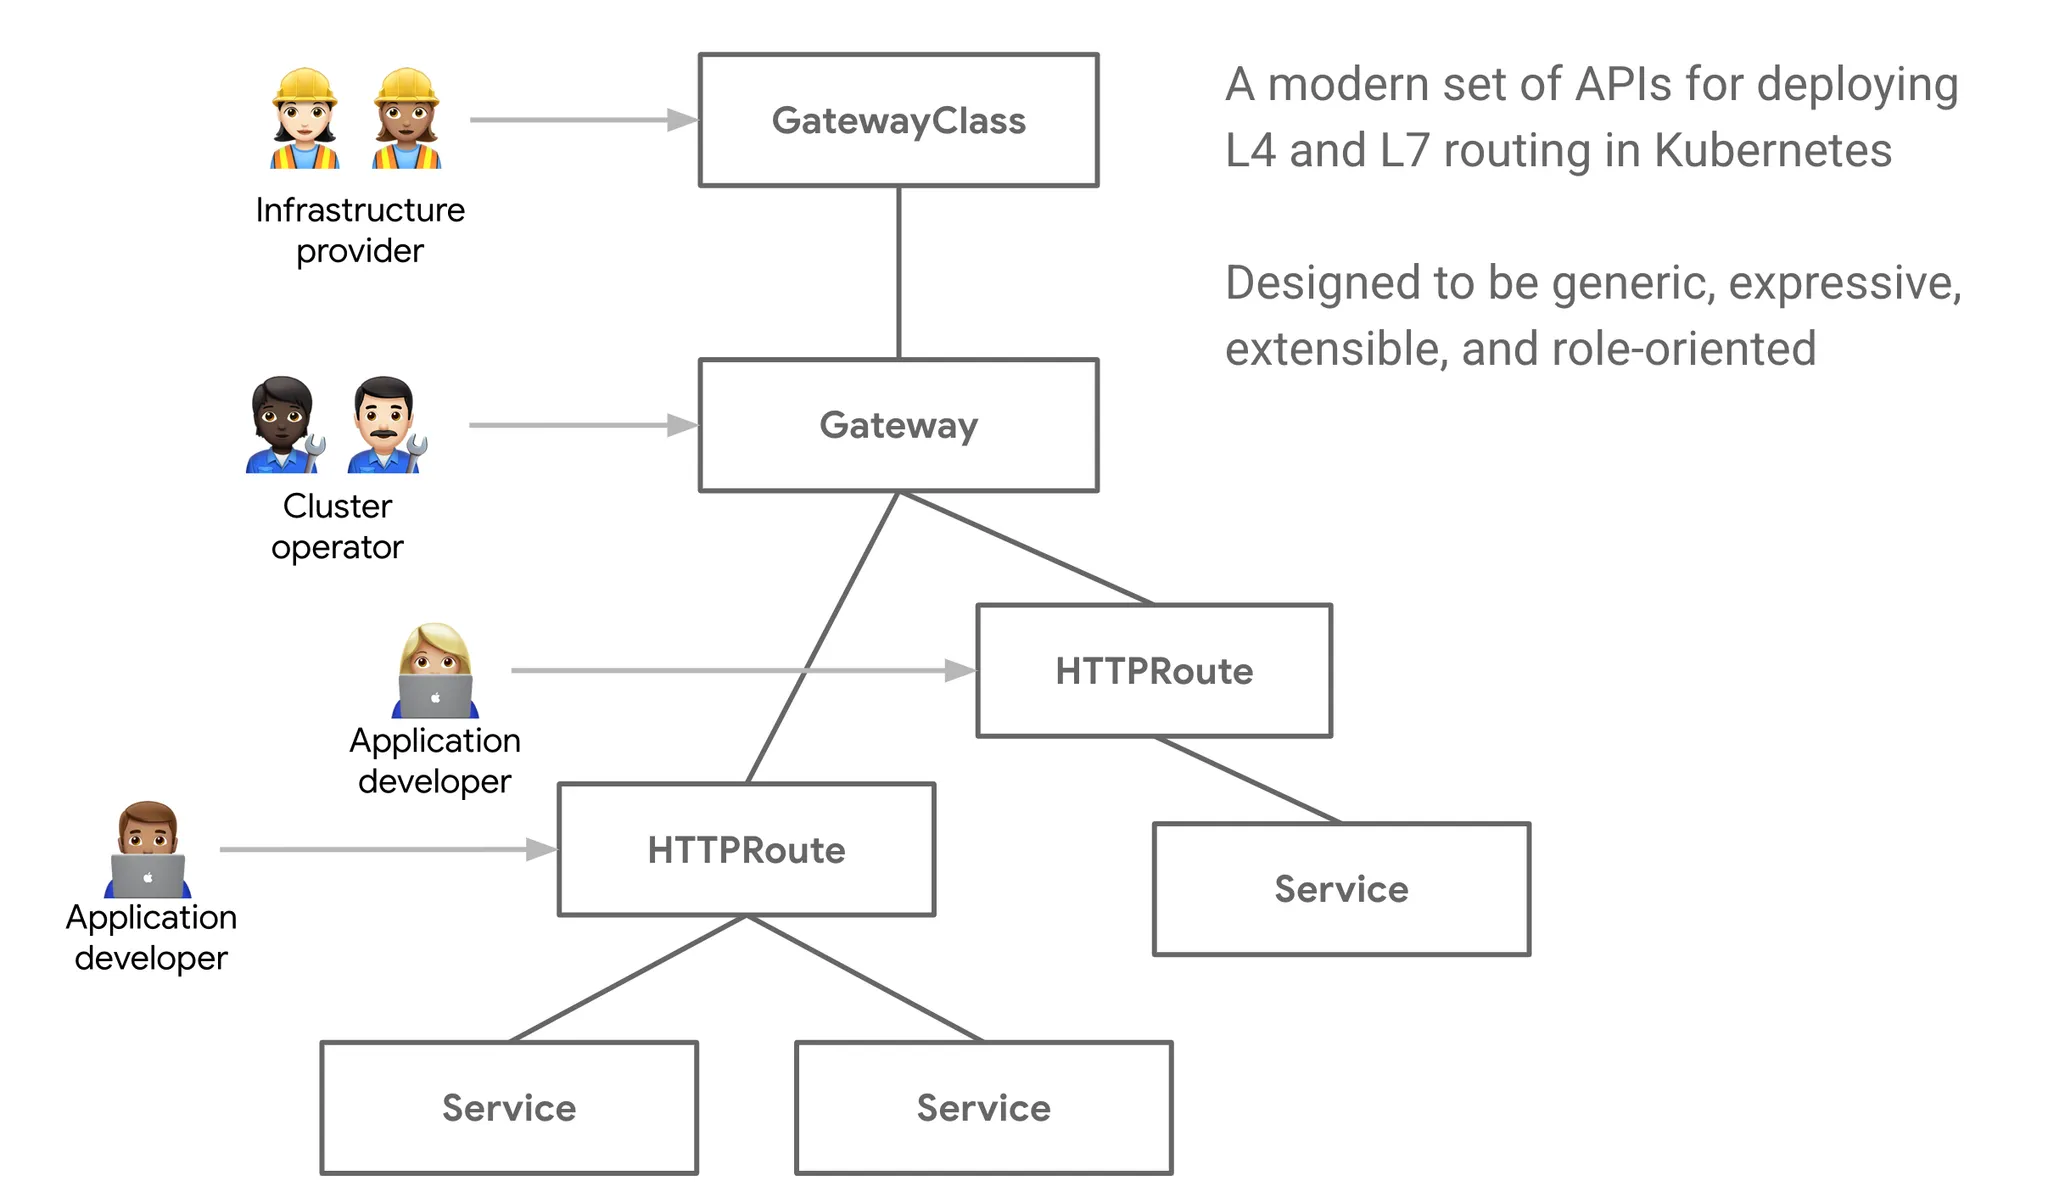
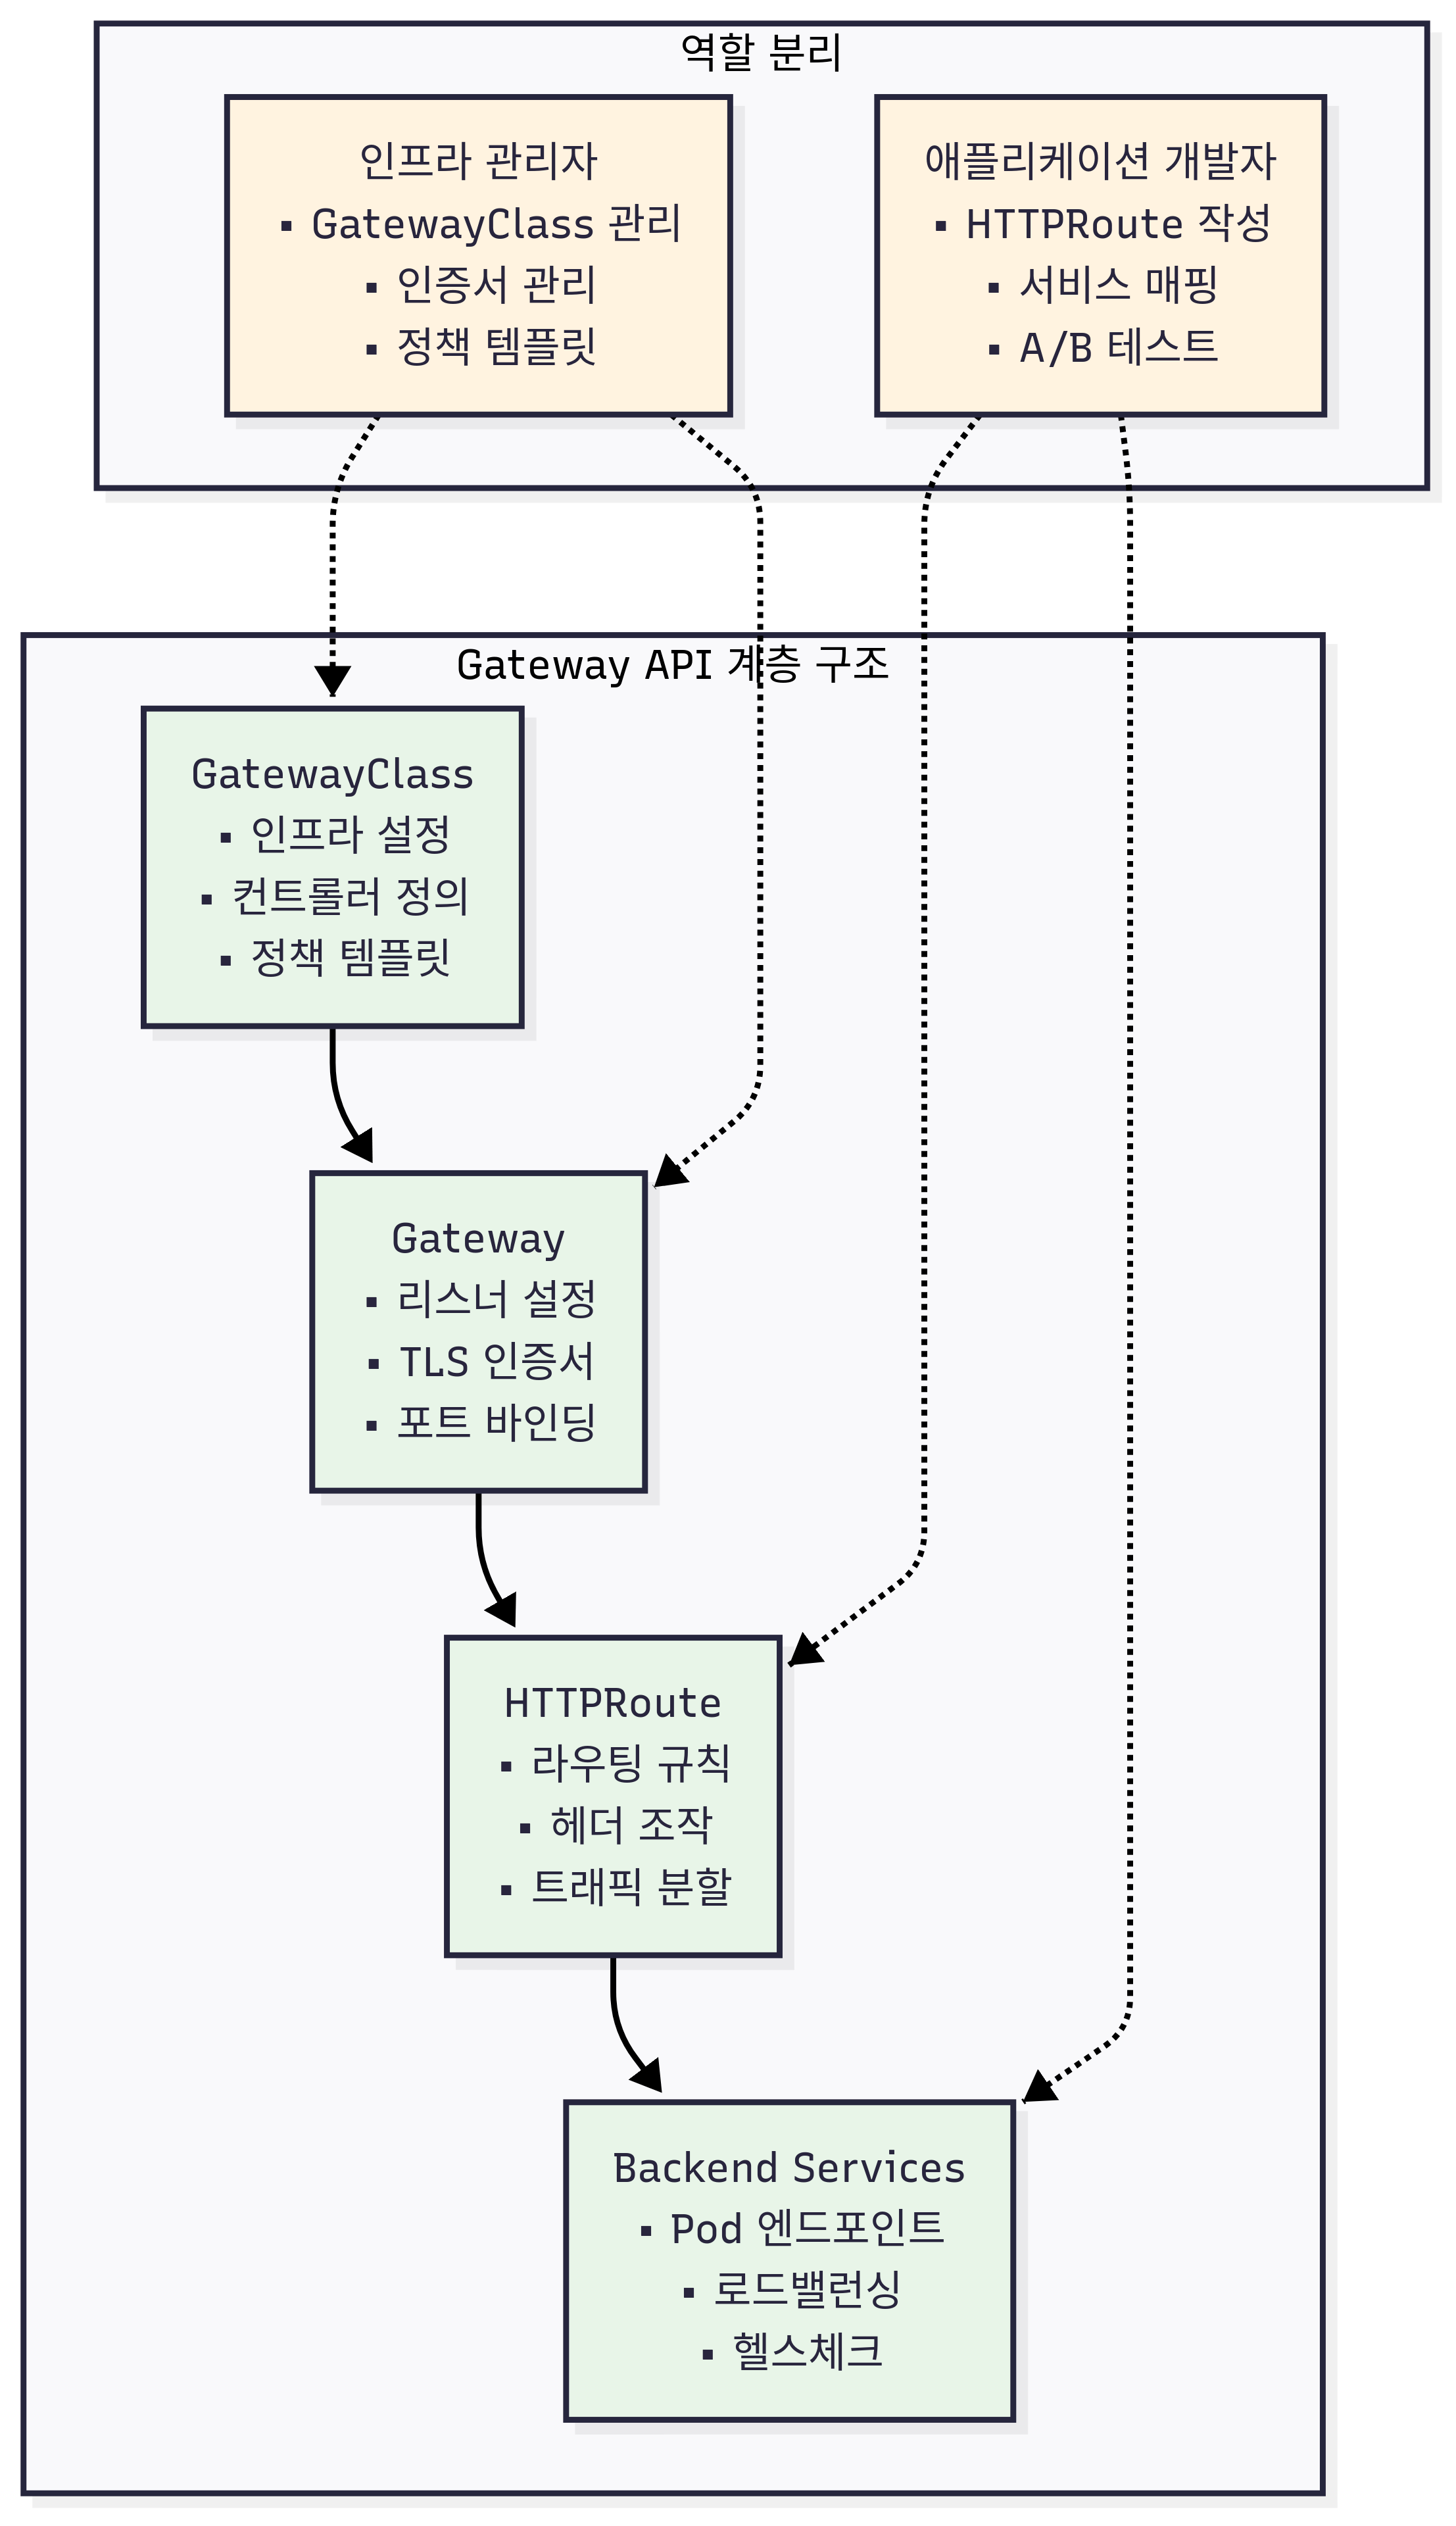
Gateway API는 Ingress의 한계를 극복하기 위해 설계된 트래픽 관리 API이다:
Gateway API의 주요 특징:
- 역할 기반 분리: Infrastructure vs Route 관리
- 확장성: 다양한 프로토콜 지원 (HTTP, TCP, UDP, gRPC)
- 표현력: 복잡한 라우팅 규칙 지원
- 이식성: 벤더 중립적 API
3.2 Gateway API 설치 및 설정
# Gateway API CRD 설치
kubectl apply -f https://github.com/kubernetes-sigs/gateway-api/releases/download/v1.0.0/standard-install.yaml

# Cilium Gateway API 지원 활성화
helm upgrade cilium cilium/cilium \
  --namespace kube-system \
  --reuse-values \
  --set gatewayAPI.enabled=true

# GatewayClass 생성
cat << EOF | kubectl apply -f -
apiVersion: gateway.networking.k8s.io/v1
kind: GatewayClass
metadata:
  name: cilium
spec:
  controllerName: io.cilium/gateway-controller
EOF

# Gateway 생성
cat << EOF | kubectl apply -f -
apiVersion: gateway.networking.k8s.io/v1
kind: Gateway
metadata:
  name: api-gateway
  namespace: backend
spec:
  gatewayClassName: cilium
  listeners:
  - name: http
    port: 80
    protocol: HTTP
    allowedRoutes:
      namespaces:
        from: Same
  - name: https
    port: 443
    protocol: HTTPS
    allowedRoutes:
      namespaces:
        from: Same
    tls:
      certificateRefs:
      - name: api-tls-secret
EOF

# HTTPRoute 생성
cat << EOF | kubectl apply -f -
apiVersion: gateway.networking.k8s.io/v1
kind: HTTPRoute
metadata:
  name: api-route
  namespace: backend
spec:
  parentRefs:
  - name: api-gateway
  hostnames:
  - api.example.com
  rules:
  - matches:
    - path:
        type: PathPrefix
        value: /api/v1
    backendRefs:
    - name: http-api
      port: 80
  - matches:
    - path:
        type: PathPrefix
        value: /api/v2
    backendRefs:
    - name: backend
      port: 8080
EOF

# Gateway 상태 확인
kubectl get gateway,httproute -n backend
kubectl describe gateway api-gateway -n backend
4. L7 트래픽 관리
4.1 헤더 기반 라우팅
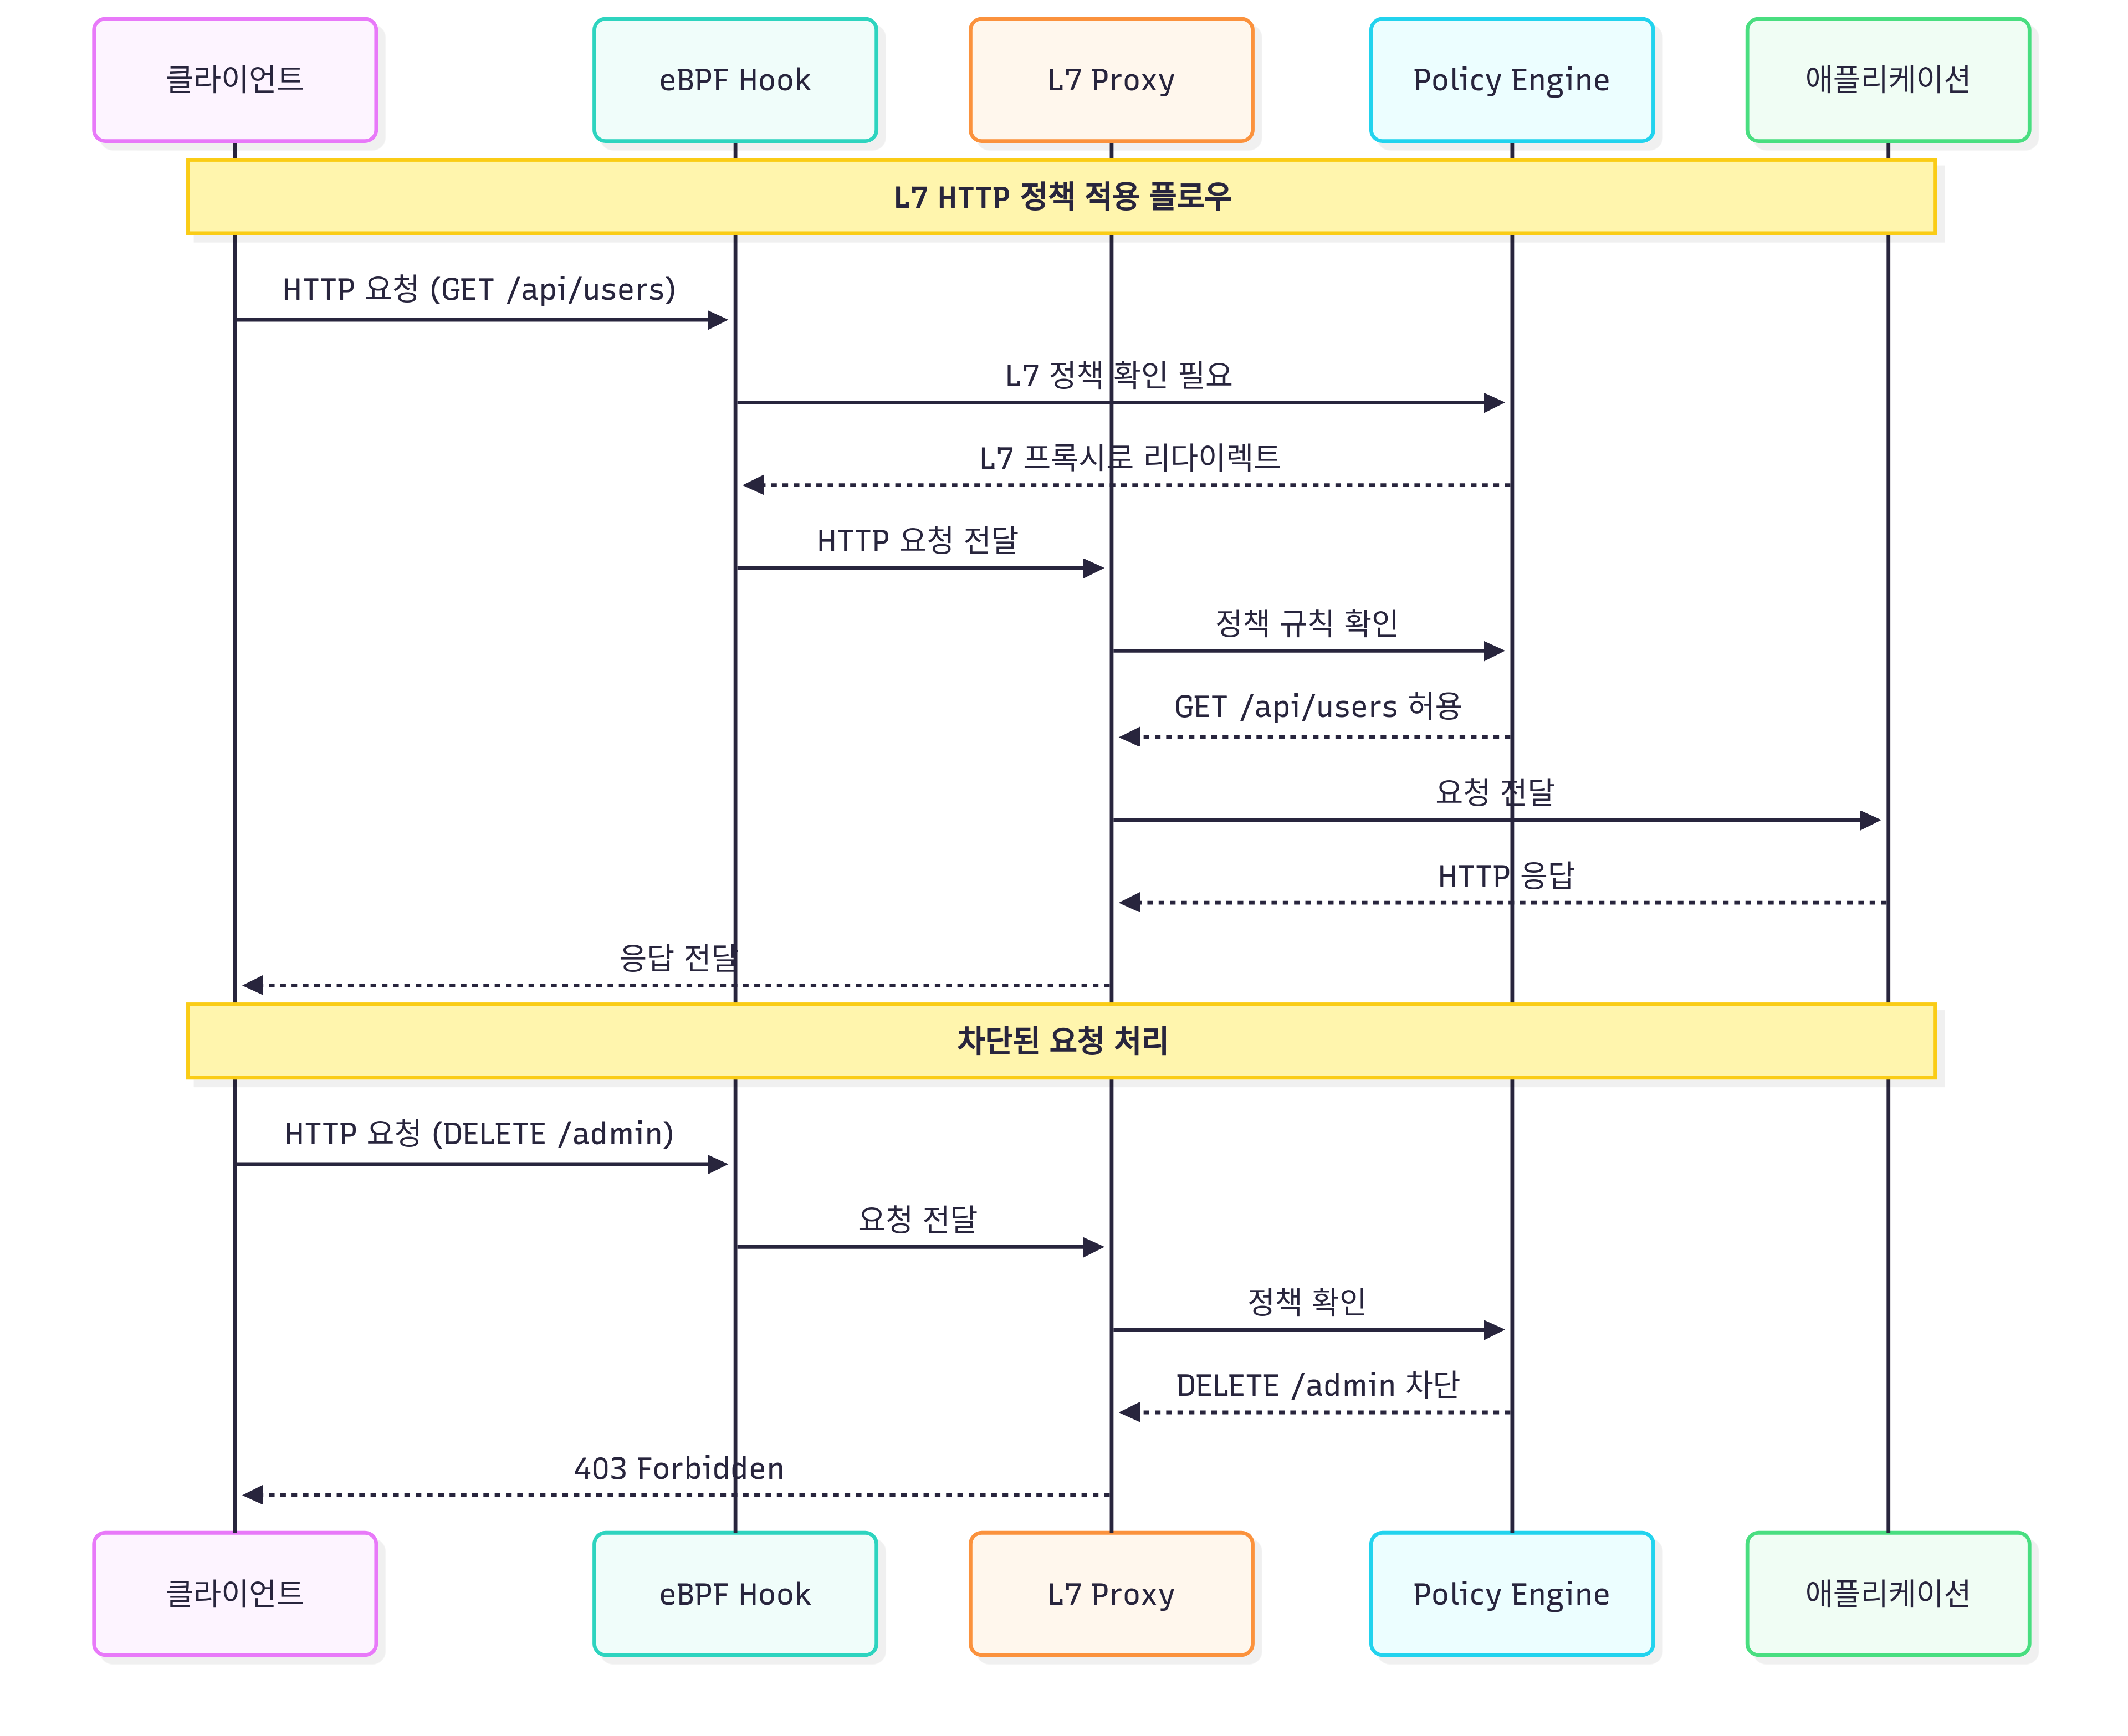
# 헤더 기반 라우팅 HTTPRoute
cat << EOF | kubectl apply -f -
apiVersion: gateway.networking.k8s.io/v1
kind: HTTPRoute
metadata:
  name: header-based-route
  namespace: backend
spec:
  parentRefs:
  - name: api-gateway
  rules:
  # API 버전별 라우팅
  - matches:
    - headers:
      - name: "X-API-Version"
        value: "v1"
    backendRefs:
    - name: http-api
      port: 80
  - matches:
    - headers:
      - name: "X-API-Version"
        value: "v2"
    backendRefs:
    - name: backend
      port: 8080
  # 기본 라우팅
  - backendRefs:
    - name: http-api
      port: 80
EOF

# 헤더 기반 라우팅 테스트
curl -H "Host: api.example.com" -H "X-API-Version: v1" http://192.168.10.100:30080/
curl -H "Host: api.example.com" -H "X-API-Version: v2" http://192.168.10.100:30080/
4.2 트래픽 분할 (Traffic Splitting)
# 카나리 배포를 위한 트래픽 분할
cat << EOF | kubectl apply -f -
apiVersion: gateway.networking.k8s.io/v1
kind: HTTPRoute
metadata:
  name: canary-route
  namespace: backend
spec:
  parentRefs:
  - name: api-gateway
  rules:
  - matches:
    - path:
        type: PathPrefix
        value: /canary
    backendRefs:
    # 90% 트래픽을 stable 버전으로
    - name: http-api
      port: 80
      weight: 90
    # 10% 트래픽을 canary 버전으로
    - name: backend
      port: 8080
      weight: 10
EOF

# 트래픽 분할 테스트
for i in {1..100}; do
  curl -s -H "Host: api.example.com" http://192.168.10.100:30080/canary | grep -o "backend\|http-api"
done | sort | uniq -c
# Expected: 약 90:10 비율로 분산
4.3 Rate Limiting
# Rate Limiting 정책 적용
cat << EOF | kubectl apply -f -
apiVersion: cilium.io/v2
kind: CiliumEnvoyConfig
metadata:
  name: rate-limit-config
  namespace: backend
spec:
  services:
  - name: http-api
    namespace: backend
  resources:
  - "@type": type.googleapis.com/envoy.config.listener.v3.Listener
    name: envoy-prometheus-metrics-listener
    address:
      socket_address:
        address: "0.0.0.0"
        port_value: 9964
    filter_chains:
    - filters:
      - name: envoy.filters.network.http_connection_manager
        typed_config:
          "@type": type.googleapis.com/envoy.extensions.filters.network.http_connection_manager.v3.HttpConnectionManager
          stat_prefix: ingress_http
          route_config:
            name: local_route
            virtual_hosts:
            - name: local_service
              domains: ["*"]
              routes:
              - match:
                  prefix: "/"
                route:
                  cluster: backend
              rate_limits:
              - actions:
                - request_headers:
                    header_name: "x-client-id"
                    descriptor_key: "client_id"
          http_filters:
          - name: envoy.filters.http.local_ratelimit
            typed_config:
              "@type": type.googleapis.com/udpa.type.v1.TypedStruct
              type_url: type.googleapis.com/envoy.extensions.filters.http.local_ratelimit.v3.LocalRateLimit
              value:
                stat_prefix: http_local_rate_limiter
                token_bucket:
                  max_tokens: 10
                  tokens_per_fill: 10
                  fill_interval: 60s
                filter_enabled:
                  runtime_key: test_enabled
                  default_value:
                    numerator: 100
                    denominator: HUNDRED
                filter_enforced:
                  runtime_key: test_enforced
                  default_value:
                    numerator: 100
                    denominator: HUNDRED
          - name: envoy.filters.http.router
EOF

# Rate Limiting 테스트
for i in {1..20}; do
  curl -s -o /dev/null -w "%{http_code}\n" -H "Host: api.example.com" http://192.168.10.100:30080/
done
# Expected: 처음 10개는 200, 나머지는 429 (Too Many Requests)
보안 모니터링 및 알림
1. 보안 이벤트 모니터링
1.1 Hubble을 통한 보안 가시성
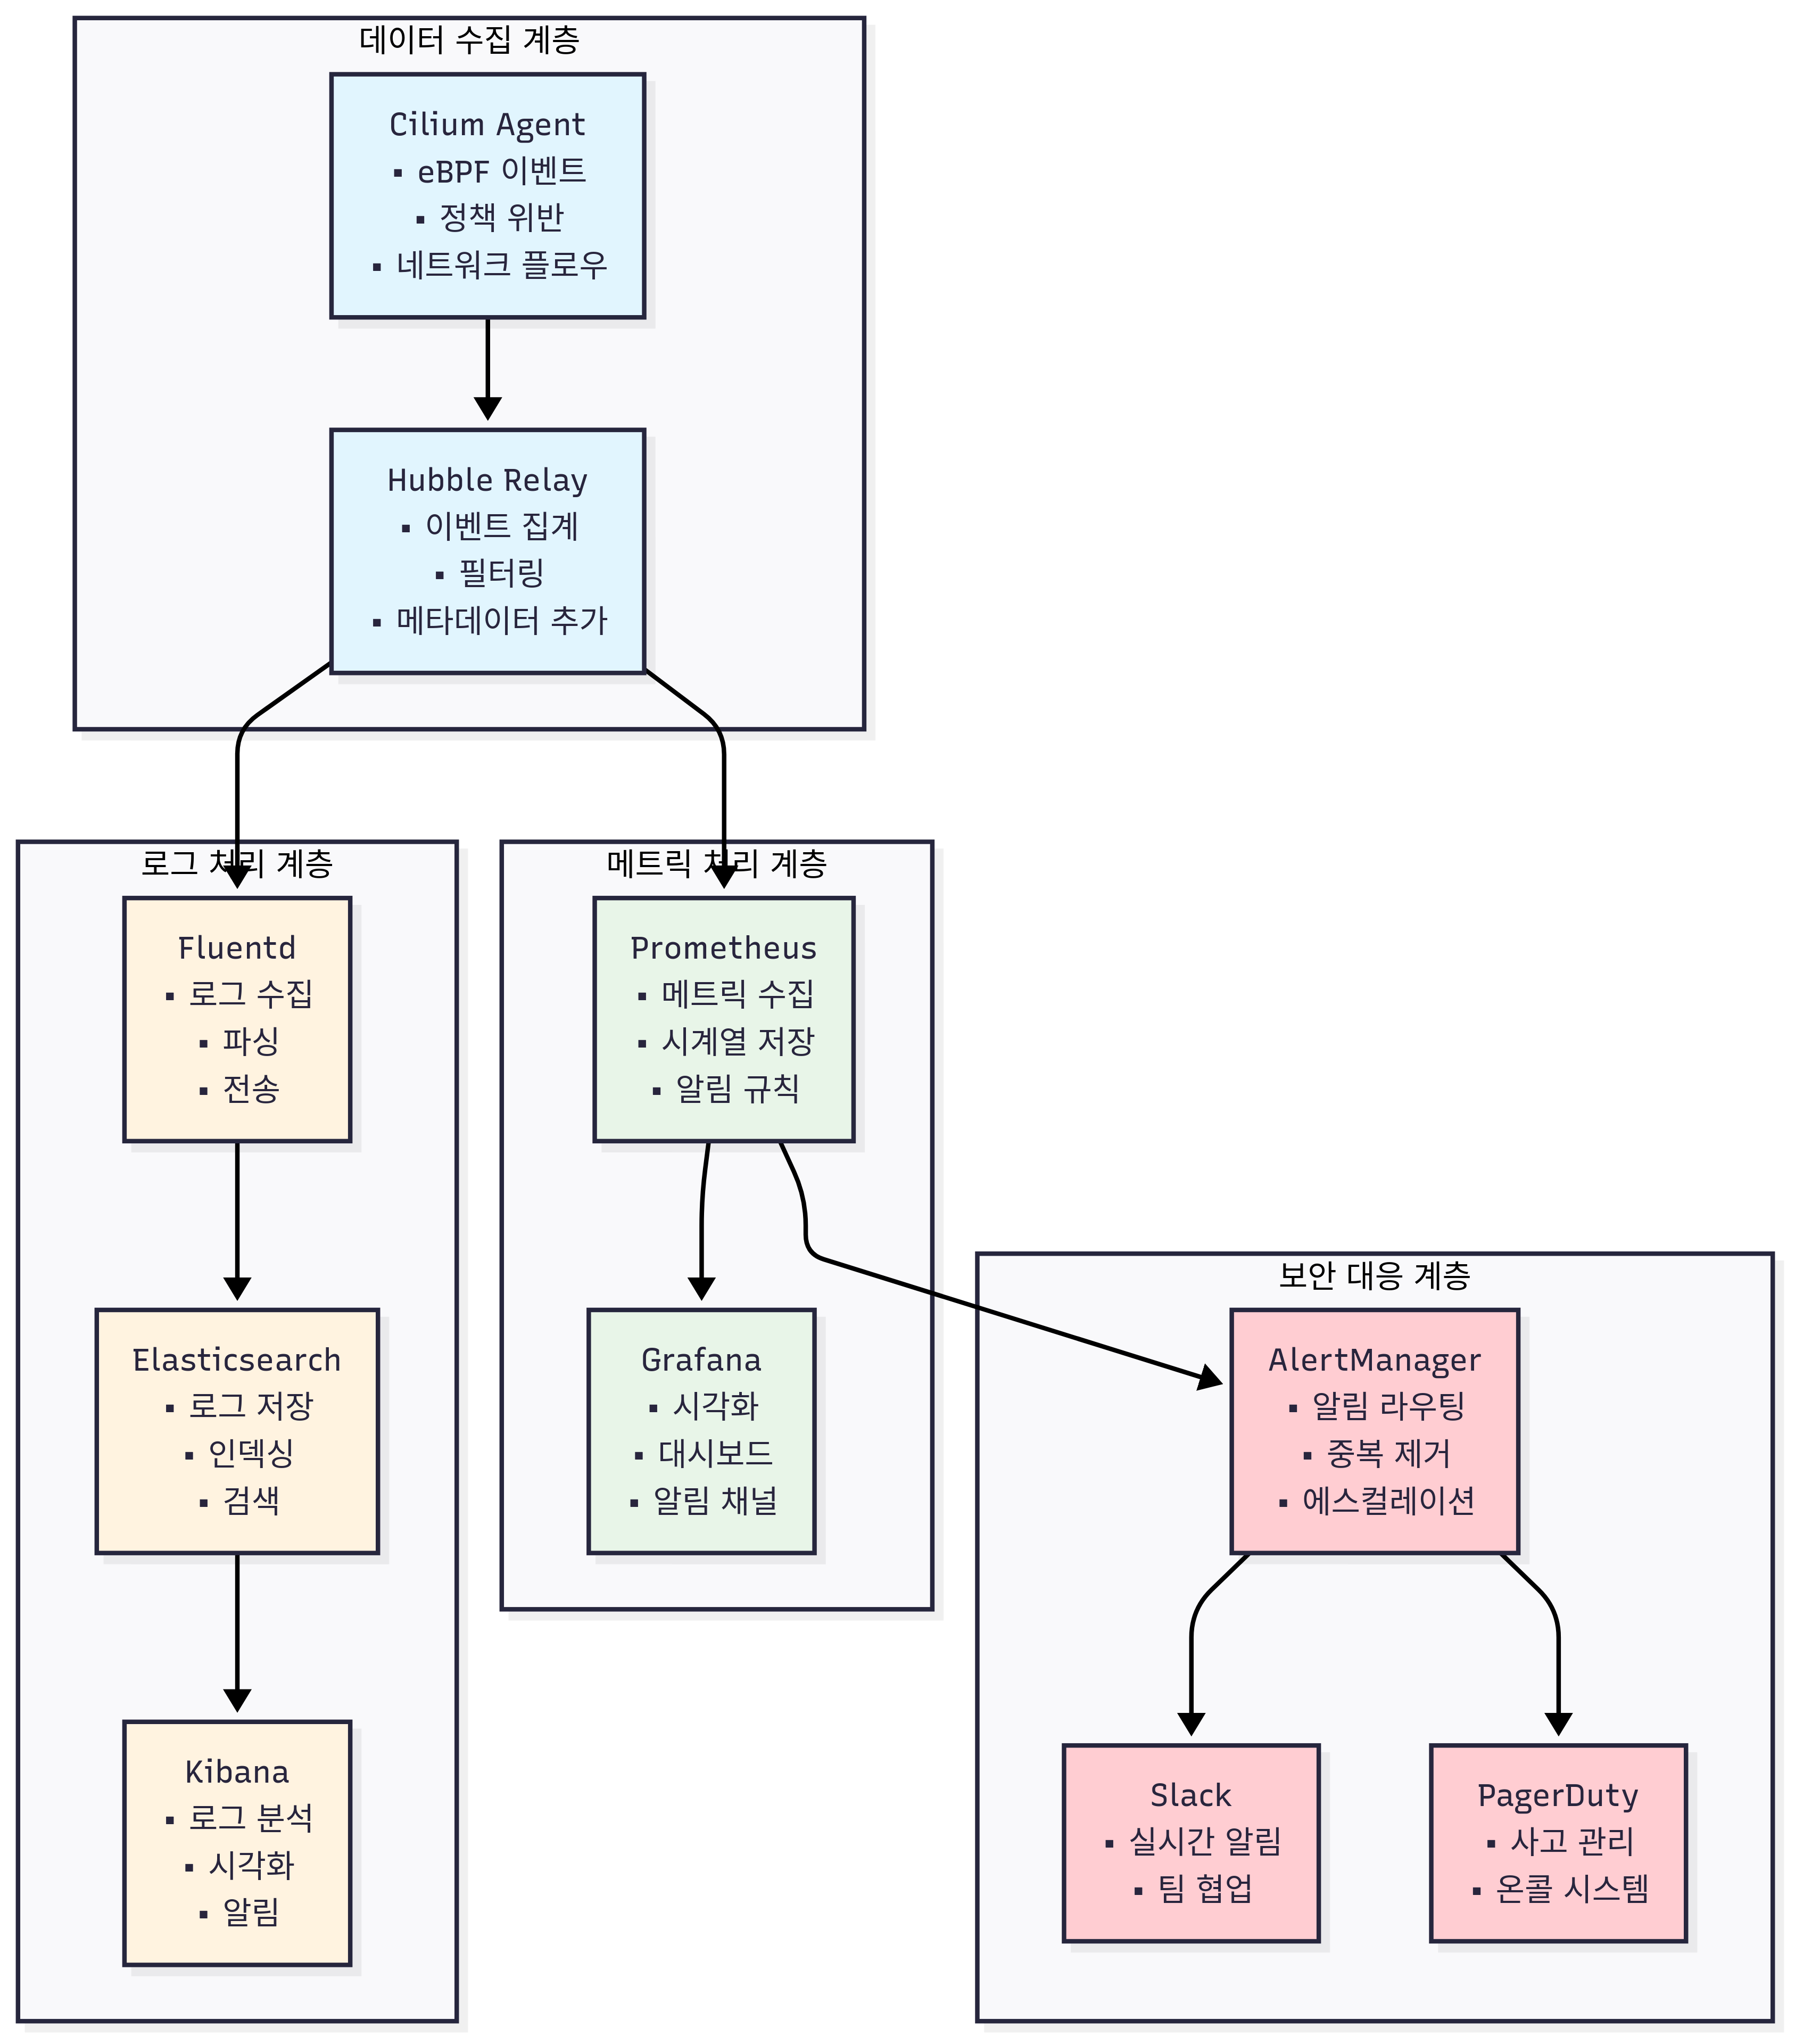
# 보안 관련 플로우 모니터링
hubble observe -f --verdict DENIED
hubble observe -f --type policy-verdict
hubble observe -f --type drop

# L7 보안 이벤트 모니터링
hubble observe -f --protocol http --verdict DENIED
hubble observe -f --namespace backend --type l7

# 실시간 보안 대시보드
watch "hubble observe --last 100 --verdict DENIED | tail -20"
1.2 보안 메트릭 수집
# Cilium 보안 메트릭 확인
kubectl exec -n kube-system ds/cilium -c cilium-agent -- curl -s localhost:9962/metrics | grep -E "policy|drop|denied"

# 주요 보안 메트릭:
# cilium_policy_verdict_total{verdict="DENIED"}
# cilium_drop_count_total
# cilium_drops_total{reason="Policy denied"}
# cilium_policy_l7_denied_total
2. 보안 알림 설정
2.1 Prometheus 알림 규칙
# 보안 알림 규칙 생성
cat << EOF | kubectl apply -f -
apiVersion: monitoring.coreos.com/v1
kind: PrometheusRule
metadata:
  name: cilium-security-alerts
  namespace: kube-system
spec:
  groups:
  - name: cilium-security
    rules:
    - alert: CiliumPolicyViolationHigh
      expr: increase(cilium_policy_verdict_total{verdict="DENIED"}[5m]) > 10
      for: 2m
      labels:
        severity: warning
      annotations:
        summary: "High number of policy violations detected"
        description: "{{ $value }} policy violations in the last 5 minutes"

    - alert: CiliumPacketDropHigh
      expr: increase(cilium_drop_count_total[5m]) > 100
      for: 2m
      labels:
        severity: critical
      annotations:
        summary: "High packet drop rate detected"
        description: "{{ $value }} packets dropped in the last 5 minutes"

    - alert: CiliumL7PolicyViolation
      expr: increase(cilium_policy_l7_denied_total[5m]) > 5
      for: 1m
      labels:
        severity: warning
      annotations:
        summary: "L7 policy violations detected"
        description: "{{ $value }} L7 policy violations in the last 5 minutes"
EOF
2.2 보안 대시보드
# Grafana 보안 대시보드 Import
# Dashboard ID: Cilium Security Dashboard (커스텀 제작)

# 주요 보안 패널:
# - Policy Violation Rate
# - Packet Drop Rate
# - L7 Security Events
# - FQDN Policy Violations
# - Top Denied Sources/Destinations
# - Security Identity Changes
2단계: 점진적 정책 적용
# 관찰 모드 정책 (모니터링만, 차단 안 함)
apiVersion: "cilium.io/v2"
kind: CiliumNetworkPolicy
metadata:
  name: "observe-only-policy"
spec:
  endpointSelector:
    matchLabels:
      app: production-app
  ingress:
  - fromEndpoints:
    - matchLabels:
        app: authorized-client
  policyEnforcement: false  # 관찰 모드
3단계: 강제 적용
# 점진적으로 정책 강제 적용
kubectl patch ciliumnetworkpolicy observe-only-policy \
  --type='merge' -p='{"spec":{"policyEnforcement":true}}'
1.2 보안 정책 모범 사례
레이블 설계 전략:
# 일관된 레이블 체계
metadata:
  labels:
    app: "user-service"           # 애플리케이션 이름
    version: "v1.2.3"            # 버전
    tier: "backend"              # 계층 (frontend/backend/database)
    team: "platform"             # 팀
    environment: "production"     # 환경 (dev/staging/production)
    security-zone: "restricted"  # 보안 존 (public/internal/restricted)
네임스페이스 분리 전략:
# 환경별 네임스페이스
kubectl create namespace production
kubectl create namespace staging
kubectl create namespace development

# 팀별 네임스페이스
kubectl create namespace team-platform
kubectl create namespace team-data
kubectl create namespace team-mobile

# 보안 존별 네임스페이스
kubectl create namespace public-zone
kubectl create namespace internal-zone
kubectl create namespace restricted-zone
2. 암호화 구현 전략
2.1 WireGuard vs IPSec 선택 가이드
WireGuard 권장 시나리오: - 현대적인 리눅스 커널 환경 (5.6+) - 고성능이 중요한 환경 - 운영 복잡성을 최소화하려는 경우 - 클라우드 네이티브 환경
IPSec 권장 시나리오: - 레거시 시스템과의 호환성이 중요한 경우 - 기존 IPSec 인프라와 통합이 필요한 경우 - 특정 컴플라이언스 요구사항이 있는 경우
2.2 암호화 성능 최적화
하드웨어 가속 활용:
# Intel AES-NI 지원 확인
grep -m1 -o aes /proc/cpuinfo
lscpu | grep AES

# WireGuard 성능 최적화 설정
helm upgrade cilium cilium/cilium \
  --namespace kube-system \
  --reuse-values \
  --set encryption.enabled=true \
  --set encryption.type=wireguard \
  --set encryption.wireguard.userspaceFallback=false
암호화 오버헤드 최소화:
# 점보 프레임 활용 (가능한 경우)
ip link set dev eth1 mtu 9000

# CPU 친화성 설정
kubectl patch daemonset cilium -n kube-system -p='
{
  "spec": {
    "template": {
      "spec": {
        "containers": [
          {
            "name": "cilium-agent",
            "resources": {
              "requests": {
                "cpu": "500m",
                "memory": "512Mi"
              },
              "limits": {
                "cpu": "2000m",
                "memory": "2Gi"
              }
            }
          }
        ]
      }
    }
  }
}'
3. Service Mesh 운영 전략
3.1 점진적 Service Mesh 도입
1단계: Ingress Controller 도입
# 기존 NGINX Ingress Controller 대체
helm upgrade cilium cilium/cilium \
  --namespace kube-system \
  --reuse-values \
  --set ingressController.enabled=true

# 점진적 트래픽 이전
kubectl patch ingress app-ingress -p='
{
  "metadata": {
    "annotations": {
      "kubernetes.io/ingress.class": "cilium"
    }
  }
}'
2단계: L7 정책 적용
# HTTP 기반 세밀한 접근 제어
apiVersion: "cilium.io/v2"
kind: CiliumNetworkPolicy
metadata:
  name: "api-rate-limiting"
spec:
  endpointSelector:
    matchLabels:
      app: api-server
  ingress:
  - fromEndpoints:
    - matchLabels:
        app: frontend
    toPorts:
    - ports:
      - port: "8080"
        protocol: TCP
      rules:
        http:
        - method: "GET|POST"
          path: "/api/v1/.*"
          headers:
          - "X-Rate-Limit: .*"
3단계: mTLS 도입
# 서비스 간 mTLS 암호화
helm upgrade cilium cilium/cilium \
  --namespace kube-system \
  --reuse-values \
  --set encryption.enabled=true \
  --set encryption.type=wireguard \
  --set serviceMesh.enableMutualTLS=true
3.2 카나리 배포 및 A/B 테스트
가중치 기반 트래픽 분할:
apiVersion: gateway.networking.k8s.io/v1
kind: HTTPRoute
metadata:
  name: canary-deployment
spec:
  parentRefs:
  - name: api-gateway
  rules:
  - matches:
    - path:
        type: PathPrefix
        value: /api/v2
    backendRefs:
    - name: api-v2-stable
      port: 80
      weight: 90
    - name: api-v2-canary
      port: 80
      weight: 10
사용자 기반 A/B 테스트:
apiVersion: gateway.networking.k8s.io/v1
kind: HTTPRoute
metadata:
  name: ab-test-route
spec:
  parentRefs:
  - name: api-gateway
  rules:
  # 베타 사용자
  - matches:
    - headers:
      - name: "X-User-Type"
        value: "beta"
    backendRefs:
    - name: api-beta
      port: 80
  # 일반 사용자
  - backendRefs:
    - name: api-stable
      port: 80
트러블슈팅 가이드
1. 네트워크 정책 관련 문제
1.1 정책 적용 안 됨
증상: - 정책을 적용했지만 트래픽이 여전히 허용됨 - Hubble에서 ALLOWED 상태로 표시
진단 단계:
# 1. 정책 문법 확인
kubectl get ciliumnetworkpolicy -o yaml | yq '.items[].spec'

# 2. 엔드포인트 매칭 확인
kubectl exec -n kube-system ds/cilium -c cilium-agent -- \
  cilium-dbg endpoint list -o json | jq '.[] | select(.status.policy.realized != null)'

# 3. 정책 프로그래밍 상태 확인
kubectl exec -n kube-system ds/cilium -c cilium-agent -- \
  cilium-dbg policy get -o json | jq '.policy.revision'
해결 방안:
# 라벨 확인 및 수정
kubectl get pods --show-labels | grep app=backend

# 네임스페이스 라벨 확인
kubectl get namespace --show-labels

# 정책 재적용
kubectl delete ciliumnetworkpolicy problematic-policy
kubectl apply -f fixed-policy.yaml
1.2 L7 정책 작동 안 함
증상: - L7 HTTP 규칙이 적용되지 않음 - 모든 HTTP 요청이 통과
진단 단계:
# 1. L7 프록시 상태 확인
kubectl exec -n kube-system ds/cilium -c cilium-agent -- \
  cilium status | grep -i proxy

# 2. Envoy 설정 확인
kubectl exec -n kube-system ds/cilium -c cilium-agent -- \
  cilium-dbg proxy statistics

# 3. 엔드포인트 L7 정책 확인
kubectl exec -n kube-system ds/cilium -c cilium-agent -- \
  cilium-dbg endpoint get <endpoint-id> -o json | jq '.status.policy.l7'
해결 방안:
# L7 프록시 재시작
kubectl exec -n kube-system ds/cilium -c cilium-agent -- \
  cilium-dbg endpoint regenerate <endpoint-id>

# 정책 우선순위 확인 및 조정
kubectl annotate ciliumnetworkpolicy l7-policy \
  policy.cilium.io/priority="100"
2. 암호화 관련 문제
2.1 WireGuard 핸드셰이크 실패
증상: - WireGuard 인터페이스는 존재하지만 트래픽 미암호화 - 핸드셰이크 시간이 오래되었거나 실패
진단 단계:
# 1. WireGuard 상태 확인
wg show all

# 2. 핸드셰이크 시간 확인
wg show all latest-handshakes

# 3. 엔드포인트 연결성 확인
ping <peer-endpoint-ip>

# 4. 포트 방화벽 확인
ss -ulnp | grep 51871
iptables -L | grep 51871
해결 방안:
# 키 재생성
kubectl delete secret -n kube-system cilium-wireguard-keys
kubectl rollout restart -n kube-system ds/cilium

# 방화벽 규칙 확인
ufw allow 51871/udp
iptables -A INPUT -p udp --dport 51871 -j ACCEPT
2.2 암호화 성능 저하
증상: - 암호화 활성화 후 현저한 성능 저하 (20%+) - CPU 사용률 급증
진단 단계:
# 1. CPU 사용률 모니터링
top -p $(pidof cilium-agent)

# 2. 암호화 통계 확인
cat /proc/net/dev | grep cilium_wg0

# 3. WireGuard 통계
wg show all transfer

# 4. 커널 모듈 확인
lsmod | grep wireguard
modinfo wireguard
해결 방안:
# CPU 리소스 증대
kubectl patch daemonset cilium -n kube-system --patch='
{
  "spec": {
    "template": {
      "spec": {
        "containers": [
          {
            "name": "cilium-agent",
            "resources": {
              "limits": {
                "cpu": "2000m"
              }
            }
          }
        ]
      }
    }
  }
}'

# 하드웨어 가속 활용
grep aes /proc/cpuinfo
echo 'options wireguard prefer_chacha20_poly1305=0' > /etc/modprobe.d/wireguard.conf
3. Service Mesh 관련 문제
3.1 Ingress Controller 응답 없음
증상: - Ingress 설정은 정상이지만 외부에서 접근 불가 - 503 Service Unavailable 오류
진단 단계:
# 1. Ingress Controller Pod 상태
kubectl get pods -n kube-system -l app.kubernetes.io/name=cilium-ingress

# 2. 서비스 엔드포인트 확인
kubectl get endpoints -n kube-system cilium-ingress

# 3. 백엔드 서비스 상태
kubectl get endpoints <backend-service>

# 4. Ingress 상태 확인
kubectl describe ingress <ingress-name>
해결 방안:
# Ingress Controller 재시작
kubectl rollout restart -n kube-system deployment/cilium-ingress

# 백엔드 연결성 확인
kubectl exec -n kube-system deployment/cilium-ingress -- \
  curl <backend-service>:<port>

# Ingress 클래스 확인
kubectl patch ingress <ingress-name> -p='
{
  "spec": {
    "ingressClassName": "cilium"
  }
}'
3.2 Gateway API 라우팅 실패
증상: - HTTPRoute가 정상 생성되었지만 라우팅되지 않음 - 404 Not Found 오류
진단 단계:
# 1. Gateway 상태 확인
kubectl describe gateway <gateway-name>

# 2. HTTPRoute 상태 확인
kubectl describe httproute <route-name>

# 3. Gateway Controller 로그
kubectl logs -n kube-system -l app.kubernetes.io/name=cilium-gateway

# 4. 호스트 헤더 확인
curl -v -H "Host: <hostname>" http://<gateway-ip>/
해결 방안:
# Gateway Controller 재시작
kubectl rollout restart -n kube-system deployment/cilium-gateway

# 호스트명 매칭 확인
kubectl patch httproute <route-name> --patch='
{
  "spec": {
    "hostnames": ["api.example.com", "*.example.com"]
  }
}'
4. 성능 문제 진단
4.1 패킷 드롭 분석
# 드롭 원인 분석
hubble observe --verdict DROPPED --last 1000 | \
  jq -r '.drop_reason_desc' | sort | uniq -c

# eBPF 맵 상태 확인
kubectl exec -n kube-system ds/cilium -c cilium-agent -- \
  cilium-dbg bpf metrics

# 메트릭 기반 분석
kubectl exec -n kube-system ds/cilium -c cilium-agent -- \
  curl -s localhost:9962/metrics | grep drop_count
4.2 메모리 누수 진단
# Cilium Agent 메모리 사용량
kubectl top pods -n kube-system -l k8s-app=cilium

# eBPF 맵 메모리 사용량
kubectl exec -n kube-system ds/cilium -c cilium-agent -- \
  cilium-dbg bpf metrics | grep -i memory

# 가비지 컬렉션 강제 실행
kubectl exec -n kube-system ds/cilium -c cilium-agent -- \
  cilium-dbg bpf ct flush global
성능 최적화 및 모니터링
1. 성능 벤치마킹
1.1 네트워크 성능 측정
처리량 테스트:
# iperf3 서버 배포
kubectl apply -f - <<EOF
apiVersion: v1
kind: Pod
metadata:
  name: iperf3-server
  labels:
    app: iperf3-server
spec:
  containers:
  - name: iperf3
    image: networkstatic/iperf3
    args: ["-s", "-p", "5201"]
    ports:
    - containerPort: 5201
EOF

# 클라이언트 테스트
kubectl run iperf3-client --rm -it --image=networkstatic/iperf3 -- \
  -c iperf3-server -p 5201 -t 60 -P 4

# 결과 분석
# - 암호화 전후 처리량 비교
# - CPU 사용률 모니터링
# - 메모리 사용량 확인
지연시간 테스트:
# 기본 ping 테스트
kubectl exec iperf3-client -- ping -c 100 iperf3-server

# hping3를 통한 상세 분석
kubectl exec iperf3-client -- hping3 -S -p 80 -c 100 iperf3-server

# 결과 분석
# - 평균 RTT
# - 지터 (변동성)
# - 패킷 손실률
1.2 정책 처리 성능
정책 적용 오버헤드 측정:
# 정책 없는 상태에서 측정
kubectl delete ciliumnetworkpolicy --all

# 기준 성능 측정
kubectl exec iperf3-client -- iperf3 -c iperf3-server -t 30

# 복잡한 정책 적용 후 재측정
kubectl apply -f complex-policies.yaml
kubectl exec iperf3-client -- iperf3 -c iperf3-server -t 30

# 성능 차이 분석
2. 고급 모니터링 설정
2.1 커스텀 메트릭 수집
# Cilium 확장 메트릭 활성화
helm upgrade cilium cilium/cilium \
  --namespace kube-system \
  --reuse-values \
  --set prometheus.enabled=true \
  --set prometheus.metrics="+cilium_endpoint_regenerations_total,+cilium_policy_verdict_total,+cilium_drop_count_total,+cilium_forward_count_total"
2.2 분산 트레이싱 통합
# Jaeger 설치
kubectl apply -f https://raw.githubusercontent.com/jaegertracing/jaeger-operator/main/deploy/crds/jaegertracing.io_jaegers.yaml
kubectl apply -f https://raw.githubusercontent.com/jaegertracing/jaeger-operator/main/deploy/operator.yaml

# Cilium과 Jaeger 연동
helm upgrade cilium cilium/cilium \
  --namespace kube-system \
  --reuse-values \
  --set hubble.enabled=true \
  --set hubble.relay.enabled=true \
  --set hubble.ui.enabled=true \
  --set hubble.export.static.enabled=true \
  --set hubble.export.static.backends.jaeger.endpoint="jaeger-collector:14268"
핵심 성취 내용
고급 보안 기능:
- Identity 기반 보안: IP 비의존적 동적 보안 정책 모델 이해 및 구현
- L3/L4/L7 네트워크 정책: 계층별 세밀한 접근 제어 설계
- Zero Trust 아키텍처: 단계적 도입 전략 (가시성 → 점진적 적용 → 강제)
- WireGuard 투명 암호화: 노드 간 자동 암호화 적용 및 성능 최적화
- FQDN 기반 외부 통신 제어: DNS 기반 egress 정책 운영
Service Mesh 기능:
- 사이드카 없는 아키텍처: eBPF 기반 서비스 메시로 리소스 오버헤드 절감
- Cilium Ingress Controller: L7 라우팅, TLS 종료, Rate Limiting 운영
- Gateway API: HTTPRoute를 통한 헤더 기반 라우팅 및 트래픽 분할
- 카나리 배포 / A/B 테스트: 가중치 기반 트래픽 분산으로 안전한 배포
보안 모니터링 및 운영:
- Hubble 보안 이벤트: 실시간 정책 위반 및 드롭 트래픽 가시성 확보
- Prometheus 알림: 정책 위반 임계치 기반 자동 알림 구성
- 성능 최적화: 암호화 오버헤드 측정 및 하드웨어 가속 활용
- 트러블슈팅: 정책/암호화/Service Mesh 장애 진단 방법론
YouTube eCHO Episode 시리즈
보안 관련 에피소드:
| 에피소드 | 주제 |
|---|---|
| eCHO Episode 15 | Network Policy Deep Dive - 네트워크 정책 심화 분석 |
| eCHO Episode 32 | Zero Trust with Cilium - Zero Trust 아키텍처 구현 |
| eCHO Episode 78 | WireGuard Encryption - 투명 암호화 실습 |
| eCHO Episode 91 | Advanced Security Policies - 고급 보안 정책 |
Service Mesh 관련 에피소드:
| 에피소드 | 주제 |
|---|---|
| eCHO Episode 56 | Service Mesh with Cilium - 사이드카 없는 서비스 메시 |
| eCHO Episode 104 | Ingress Controller - Cilium Ingress Controller 활용 |
| eCHO Episode 112 | Gateway API - 트래픽 관리 |
| eCHO Episode 125 | mTLS and Security - 서비스 메시 보안 |
공식 문서
보안 정책: - Cilium Network Policies - Layer 7 Security Policies - FQDN Based Policies - Identity Based Security
암호화: - WireGuard Transparent Encryption - IPSec Transparent Encryption - Encryption Performance Guide
Service Mesh: - Cilium Service Mesh - Ingress Controller - Gateway API Integration - L7 Traffic Management