Scaling
EKS의 HPA, KEDA, Karpenter, VPA를 활용한 파드·노드 오토스케일링 전략을 정리한다.
들어가며
Week 3에서는 Amazon EKS 환경에서의 다양한 Auto Scaling 메커니즘을 학습한다.
Week 1에서 EKS 클러스터 배포와 기본 구성을 익히고, Week 2에서 네트워킹을 이해했다면, 이번 주차에서는 워크로드 변화에 따른 자동 확장/축소를 통해 비용 최적화와 성능을 동시에 달성하는 방법을 배웁니다.
학습 목표
| 카테고리 | 세부 내용 |
|---|---|
| Pod 레벨 스케일링 | HPA, VPA, KEDA, CPA |
| 노드 레벨 스케일링 | Cluster Autoscaler, Karpenter |
| 서버리스 컴퓨팅 | AWS Fargate |
| 동작 원리 이해 | 각 스케일링 메커니즘의 동작 원리 및 적용 시나리오 이해 |
| 전략 수립 | 실전 환경에서의 Auto Scaling 전략 수립 |
실습 환경
가상머신 및 인프라 구성
| 리소스 | 사양 | 용도 |
|---|---|---|
| myeks-bastion-EC2 | t3.medium | 관리 호스트 (kubectl, eksctl, awscli) |
| EKS Cluster | myeks | Kubernetes 클러스터 (v1.31) |
| VPC | 192.168.0.0/16 | 전용 네트워크 환경 |
| Public Subnet | 3개 (각 AZ) | 퍼블릭 리소스 배치 |
| Private Subnet | 3개 (각 AZ) | EKS 노드 배치 |
| NAT Gateway | 3개 (각 AZ) | 프라이빗 서브넷 인터넷 통신 |
EKS 노드 그룹
| 노드 그룹 | 인스턴스 타입 | 용량 | 용도 |
|---|---|---|---|
| myeks-nodegroup | t3.medium | 3대 (고정) | 초기 워커 노드 |
| Karpenter Provisioner | 다양 (동적) | 필요 시 자동 생성 | Just-in-time 노드 프로비저닝 |
네트워크 설정
- VPC CIDR: 192.168.0.0/16
- Pod CIDR: AWS VPC CNI 사용 (VPC 서브넷 IP 직접 할당)
- Service CIDR: 10.100.0.0/16
- DNS: CoreDNS (ClusterIP: 10.100.0.10)
주요 애드온
| 애드온 | 버전 | 용도 |
|---|---|---|
| VPC CNI | v1.18.x | Pod 네트워킹 (ENI 기반) |
| kube-proxy | v1.31.x | Service 네트워킹 (iptables) |
| CoreDNS | v1.11.x | 클러스터 DNS |
| AWS Load Balancer Controller | v2.x | Ingress/Service LoadBalancer 관리 |
| Metrics Server | v0.7.x | 리소스 메트릭 수집 (HPA/VPA 필수) |
| KEDA | v2.16.x | 이벤트 기반 스케일링 |
| Cluster Autoscaler | v1.31.x | 노드 자동 확장 |
| Karpenter | v1.1.x | 고급 노드 프로비저닝 |
| Vertical Pod Autoscaler | v1.2.x | Pod 리소스 자동 조정 |
컴포넌트 버전
- Kubernetes: v1.31
- eksctl: v0.x
- kubectl: v1.31
- AWS CLI: v2.x
- Helm: v3.x
- Terraform: v1.x
핵심 개념 정리
스케일링 기법은 무엇을 조정하는지에 따라 네 층위로 나뉜다.
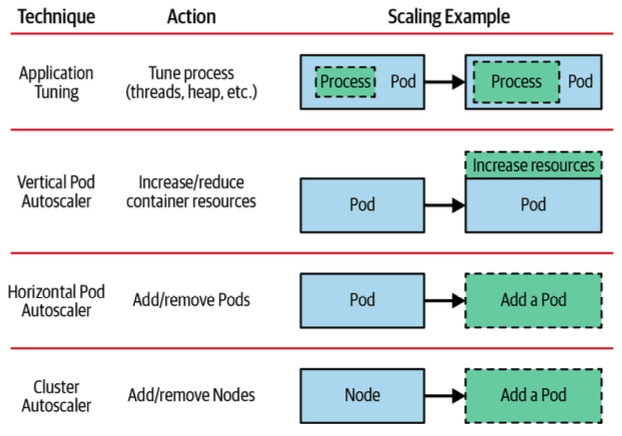
Application Tuning은 프로세스 내부(스레드, 힙)를, VPA는 컨테이너 리소스를, HPA는 Pod 개수를, Cluster Autoscaler는 노드 개수를 조정한다. 아래로 갈수록 조정 단위가 커지고 반영에 걸리는 시간도 길어진다.
실무에서 어떤 기법을 고를지는 트래픽 패턴의 예측 가능성에서 출발한다.
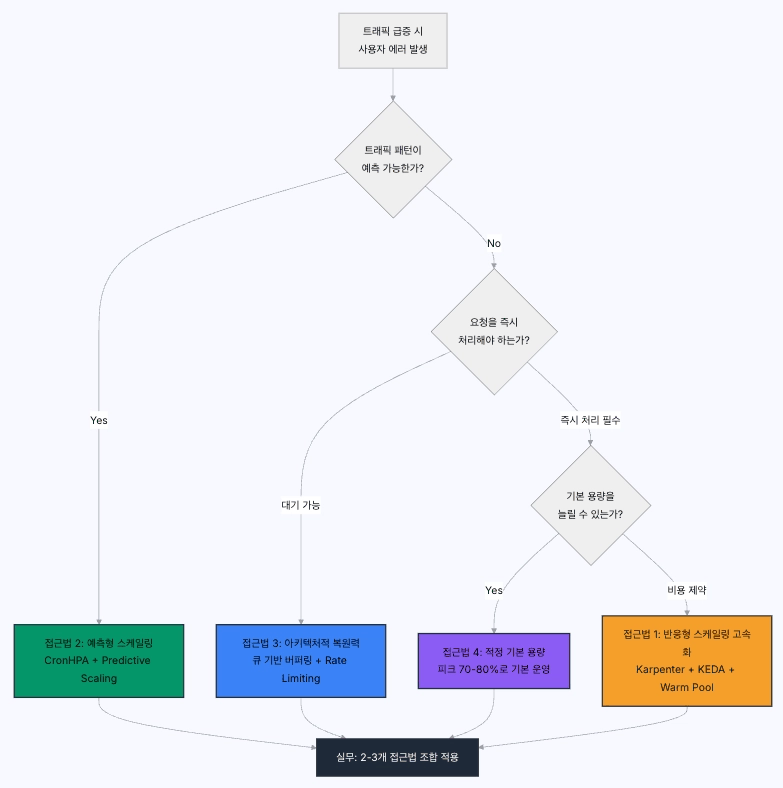
트래픽이 예측 가능하면 CronHPA 같은 예측형 스케일링으로 미리 늘려두고, 예측이 안 되면 즉시 처리가 필요한지를 따진다. 대기가 가능하면 큐로 버퍼링하고, 즉시 처리가 필수인데 비용 제약이 있으면 Karpenter와 KEDA로 고속 반응형 스케일링을 구성한다. 실무에서는 보통 이 중 2~3개를 조합한다.
EKS Auto Scaling 전체 구조:
graph TB
    subgraph Pod_Level["Pod 레벨 스케일링"]
        HPA["HPA<br/>메트릭 기반"]
        VPA["VPA<br/>리소스 최적화"]
        KEDA["KEDA<br/>이벤트 기반<br/>Scale to Zero"]
        CPA["CPA<br/>클러스터 비례"]
    end

    subgraph Node_Level["노드 레벨 스케일링"]
        CAS["Cluster Autoscaler<br/>ASG 기반<br/>3-5분 소요"]
        Karpenter["Karpenter<br/>Just-in-time<br/>1-2분 소요<br/>비용 최적화"]
    end

    subgraph Serverless["서버리스"]
        Fargate["AWS Fargate<br/>노드 관리 불필요<br/>Pod 격리"]
    end

    HPA -.->|Pending Pod 발생| CAS
    KEDA -.->|Pending Pod 발생| Karpenter

    Pod_Level -.->|노드 부족 시| Node_Level
1. HPA (Horizontal Pod Autoscaler)
정의: CPU, 메모리, 커스텀 메트릭 기반으로 Pod 수를 자동 조정
- Metrics Server 필수 (resource metrics)
- Target 메트릭 도달 시 ReplicaSet 조정
- ScaleUp: 즉시 실행
- ScaleDown: 5분 안정화 후 실행
- 최소/최대 Replica 수 지정 가능
동작 원리: Metrics Server가 kubelet으로부터 Pod CPU/메모리 메트릭을 수집하면, HPA Controller가 기본 15초 주기로 현재 메트릭 값과 Target을 비교한다. 목표 Replica 수는 ceil[현재 Replicas × (현재 메트릭 / Target 메트릭)] 공식으로 계산하며, 결과에 따라 Deployment/ReplicaSet의 replicas 필드를 업데이트한다.
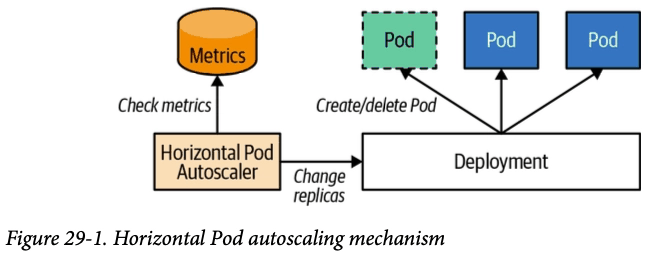
HPA가 Pod을 직접 만들거나 지우지 않는다는 점이 중요하다. HPA는 Deployment의 replicas 값만 바꾸고, 실제 Pod 생성/삭제는 Deployment가 한다.
메트릭을 여러 개 지정하면 각각에 대해 replica 수를 계산한 뒤 가장 큰 값을 택한다.
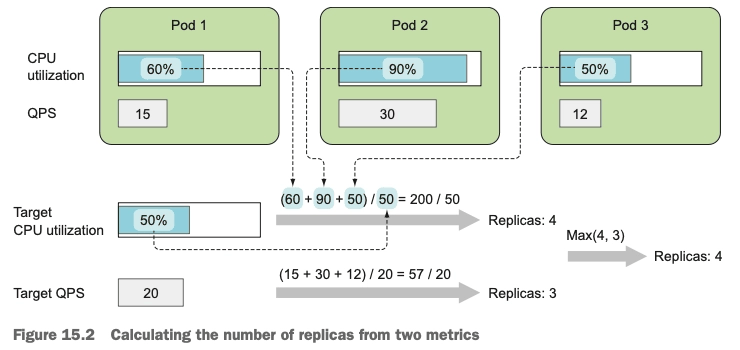
CPU 기준으로는 평균 사용률 (60+90+50)/50 = 200/50이라 4개가 필요하고, QPS 기준으로는 (15+30+12)/20 = 57/20이라 3개가 필요하다. 최종적으로 Max(4, 3) = 4가 선택된다. 어느 한 메트릭이라도 과부하면 그쪽에 맞추는 보수적 동작이다.
HPA가 읽는 메트릭은 세 종류이고 각각 경로가 다르다.
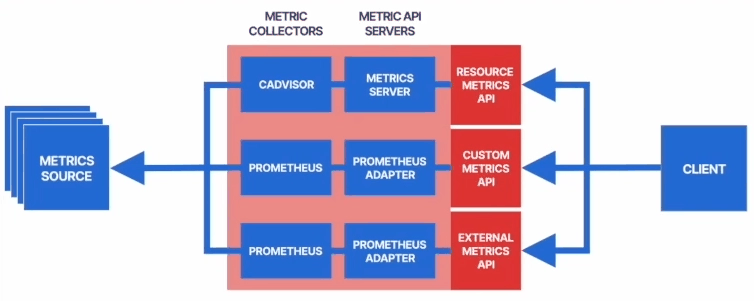
Resource Metrics API는 cAdvisor → Metrics Server 경로로 CPU/메모리를 제공하고, Custom/External Metrics API는 Prometheus Adapter를 거친다. HPA에서 CPU 외의 메트릭을 쓰려면 이 어댑터 계층이 필요한 이유다.
설정 예시:
apiVersion: autoscaling/v2
kind: HorizontalPodAutoscaler
metadata:
  name: php-apache
spec:
  scaleTargetRef:
    apiVersion: apps/v1
    kind: Deployment
    name: php-apache
  minReplicas: 1
  maxReplicas: 10
  metrics:
  - type: Resource
    resource:
      name: cpu
      target:
        type: Utilization
        averageUtilization: 50
HPA 동작 흐름:
graph TD
    A[Kubelet] -->|메트릭 수집| B[Metrics Server]
    B -->|메트릭 제공| C[HPA Controller]
    C -->|주기적 확인<br/>기본 15초| D{현재 메트릭 vs Target}
    D -->|현재 > Target| E[Scale Up]
    D -->|현재 < Target| F[Scale Down<br/>5분 안정화]
    D -->|현재 = Target| G[유지]
    E -->|replicas 증가| H[ReplicaSet]
    F -->|replicas 감소| H
    H -->|Pod 생성/제거| I[Pod]
2. VPA (Vertical Pod Autoscaler)
정의: Pod의 CPU/메모리 requests/limits를 자동으로 조정
- Recommender: 과거 메트릭 분석, 권장 값 계산
- Updater: 오래된 Pod 제거 (재생성 트리거)
- Admission Controller: 새 Pod 생성 시 권장 값 주입
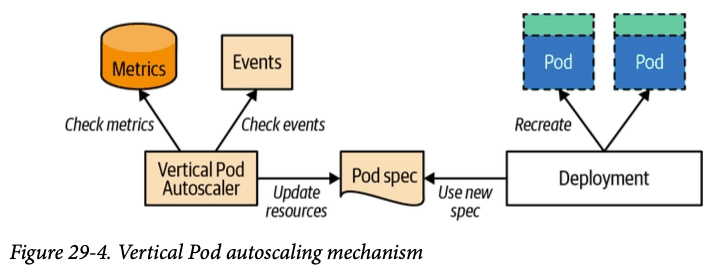
VPA는 메트릭과 이벤트를 보고 Pod spec의 리소스 값을 갱신한 뒤, Deployment가 그 새 spec으로 Pod을 재생성하게 한다. HPA가 개수를 바꾸는 것과 달리 VPA는 spec을 바꾸므로 Pod 재시작이 불가피하다는 점이 그림에 그대로 드러난다.
Update Mode:
- Off: 권장 값만 계산 (적용 안 함)
- Initial: Pod 생성 시에만 적용
- Recreate: 실시간 조정 (Pod 재시작)
- Auto: Recreate와 동일
설정 예시:
apiVersion: autoscaling.k8s.io/v1
kind: VerticalPodAutoscaler
metadata:
  name: hamster-vpa
spec:
  targetRef:
    apiVersion: apps/v1
    kind: Deployment
    name: hamster
  updatePolicy:
    updateMode: "Auto"
  resourcePolicy:
    containerPolicies:
    - containerName: hamster
      minAllowed:
        cpu: 100m
        memory: 50Mi
      maxAllowed:
        cpu: 1
        memory: 500Mi
VPA 컴포넌트 상호작용:
graph TD
    A[Pod] -->|메트릭 수집| B[Metrics Server]
    B -->|과거 메트릭| C[VPA Recommender]
    C -->|분석| D[권장 값 계산<br/>Target, Lower, Upper]
    D -->|VPA 객체 업데이트| E[VPA Status]

    E -->|updateMode: Auto/Recreate| F[VPA Updater]
    F -->|오래된 Pod 식별| G[Pod Eviction]
    G -->|Pod 재생성| H[VPA Admission Controller]
    H -->|권장 값 주입<br/>requests/limits| I[새 Pod]

    E -->|updateMode: Initial| J[신규 Pod 생성 시]
    J --> H

    E -->|updateMode: Off| K[권장 값만 표시]
3. KEDA (Kubernetes Event-driven Autoscaling)
정의: 외부 이벤트 소스 메트릭 기반 Pod 스케일링 (0 → N, N → 0 지원)
- Metrics Server: 외부 메트릭을 Kubernetes Metrics API로 변환
- Controller: ScaledObject/ScaledJob CRD 관리
- Admission Webhooks: 리소스 검증
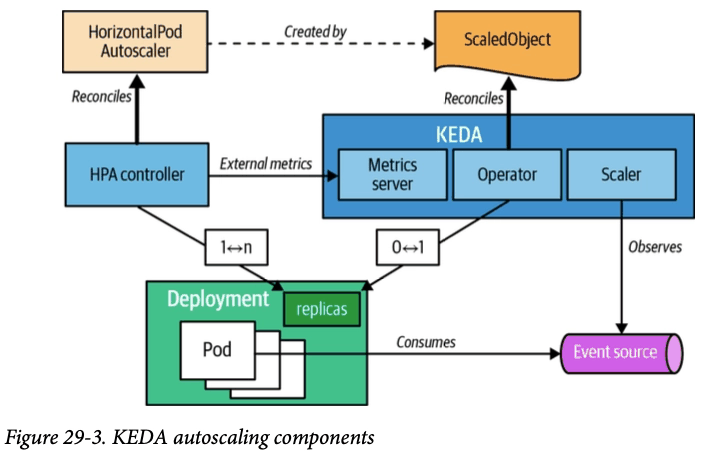
KEDA가 HPA를 대체하는 게 아니라 그 위에 얹힌다는 구조가 핵심이다. Scaler가 이벤트 소스를 관찰하고, KEDA가 ScaledObject로부터 HPA를 생성하며, 1↔n 구간의 스케일링은 HPA 컨트롤러가 외부 메트릭을 받아 처리한다. 반면 0↔1 구간만은 KEDA Operator가 직접 담당한다. HPA 자체는 0으로 줄이지 못하기 때문이며, 이것이 Scale to Zero가 KEDA의 차별점인 이유다.
지원 Scaler (60+ 종류): - AWS SQS, CloudWatch, Kinesis - Kafka, RabbitMQ, Redis - Prometheus, Datadog - Cron (시간 기반) - MySQL, PostgreSQL
설정 예시 (SQS):
apiVersion: keda.sh/v1alpha1
kind: ScaledObject
metadata:
  name: aws-sqs-queue-scaledobject
spec:
  scaleTargetRef:
    name: keda-aws-sqs-queue-deployment
  minReplicaCount: 0
  maxReplicaCount: 10
  triggers:
  - type: aws-sqs-queue
    metadata:
      queueURL: https://sqs.ap-northeast-2.amazonaws.com/123456789/keda-test
      queueLength: "5"
      awsRegion: "ap-northeast-2"
      identityOwner: operator
KEDA 아키텍처:
graph LR
    A[External Event Source<br/>SQS, Kafka, Prometheus] -->|메트릭 조회| B[KEDA Scaler]
    B -->|메트릭 변환| C[KEDA Metrics Server]
    C -->|Kubernetes Metrics API| D[HPA]
    D -->|replicas 조정| E[Deployment]
    E -->|Pod 생성/제거| F[Pod]

    G[ScaledObject CRD] -.->|정의| B
    B -->|HPA 자동 생성| D

    F -->|Scale to Zero<br/>가능| H[0 Replicas]
4. CPA (Cluster Proportional Autoscaler)
정의: 클러스터 크기(노드/코어 수)에 비례하여 Deployment/ReplicaSet Replica 수 조정
사용 사례: - CoreDNS Pod 수 조정 (노드 증가 시 DNS 쿼리 증가 대응) - 로깅/모니터링 에이전트 (노드당 일정 비율 유지)
설정 모드:
- Linear: replicas = max(ceil(cores × coresPerReplica), ceil(nodes × nodesPerReplica), min)
- Ladder: 구간별 고정 Replica 수 지정
5. Cluster Autoscaler (CAS)
정의: AWS Auto Scaling Group과 연동하여 노드 수 자동 조정
- Scale Up: Pending Pod 발생 시 노드 추가 (약 3~5분 소요)
- Scale Down: 노드 사용률 낮을 시 제거 (10분 안정화 후)
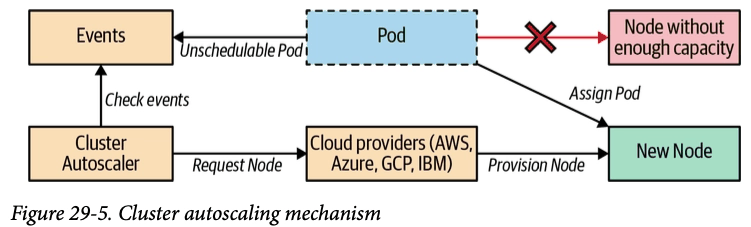
CAS의 트리거는 CPU 사용률이 아니라 스케줄 실패다. 스케줄러가 배치할 노드를 찾지 못해 Pod이 Pending으로 남고, CAS가 그 이벤트를 감지해 클라우드 프로바이더에 노드를 요청한다.
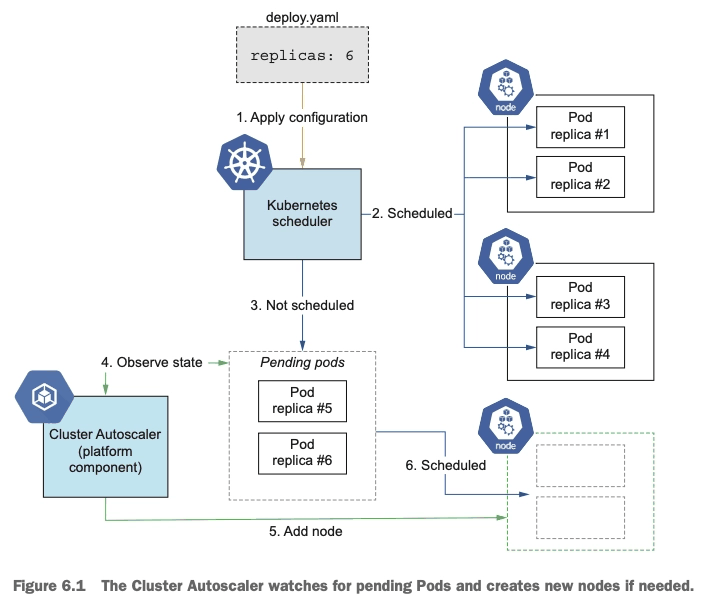
replicas를 6으로 올렸을 때 4개는 기존 노드에 배치되지만 5·6번은 자리가 없어 Pending이 된다(3단계). CAS가 이 상태를 관찰하고(4단계) 노드를 추가하면(5단계) 그제서야 스케줄된다(6단계). 노드가 EC2로 부팅되는 시간이 통째로 지연에 포함되는 이유가 이 순서에 있다.
필수 설정:
- Auto Scaling Group 태그: k8s.io/cluster-autoscaler/enabled, k8s.io/cluster-autoscaler/myeks
- IAM 권한: autoscaling:DescribeAutoScalingGroups, autoscaling:SetDesiredCapacity, ec2:DescribeInstanceTypes
제약 사항: - 노드 추가 시간 지연 (EC2 인스턴스 부팅) - 단일 노드 그룹 환경에서 비효율적 - Spot Instance 관리 제한적
Cluster Autoscaler와 Karpenter 비교:
graph TB
    subgraph CAS["Cluster Autoscaler"]
        A1[Pending Pod 감지] --> A2[ASG 확인]
        A2 --> A3[ASG Desired 증가]
        A3 --> A4[EC2 인스턴스 부팅<br/>3-5분 소요]
        A4 --> A5[노드 등록]
        A5 --> A6[Pod 스케줄링]
    end

    subgraph Karpenter["Karpenter"]
        B1[Pending Pod 감지] --> B2[NodePool 평가]
        B2 --> B3[최적 인스턴스 타입 선택<br/>Spot/On-Demand 혼합]
        B3 --> B4[EC2 직접 생성<br/>1-2분 소요]
        B4 --> B5[노드 등록]
        B5 --> B6[Pod 스케줄링]
    end
6. Karpenter
정의: AWS 네이티브 Kubernetes 노드 오토스케일러, Just-in-time 노드 프로비저닝
핵심 차별점 (vs Cluster Autoscaler): - 속도: 노드 기동 시간 단축 (사전 준비된 Launch Template 활용) - 유연성: Pod 요구사항에 맞춘 최적 인스턴스 타입 자동 선택 - 비용 최적화: Spot/On-Demand 혼합, 다양한 인스턴스 타입 활용 - 통합 관리: Auto Scaling Group 불필요, Karpenter가 EC2 직접 관리
- NodePool: 노드 프로비저닝 정책 정의
- EC2NodeClass: AWS 인프라 설정 (AMI, UserData, Security Group 등)
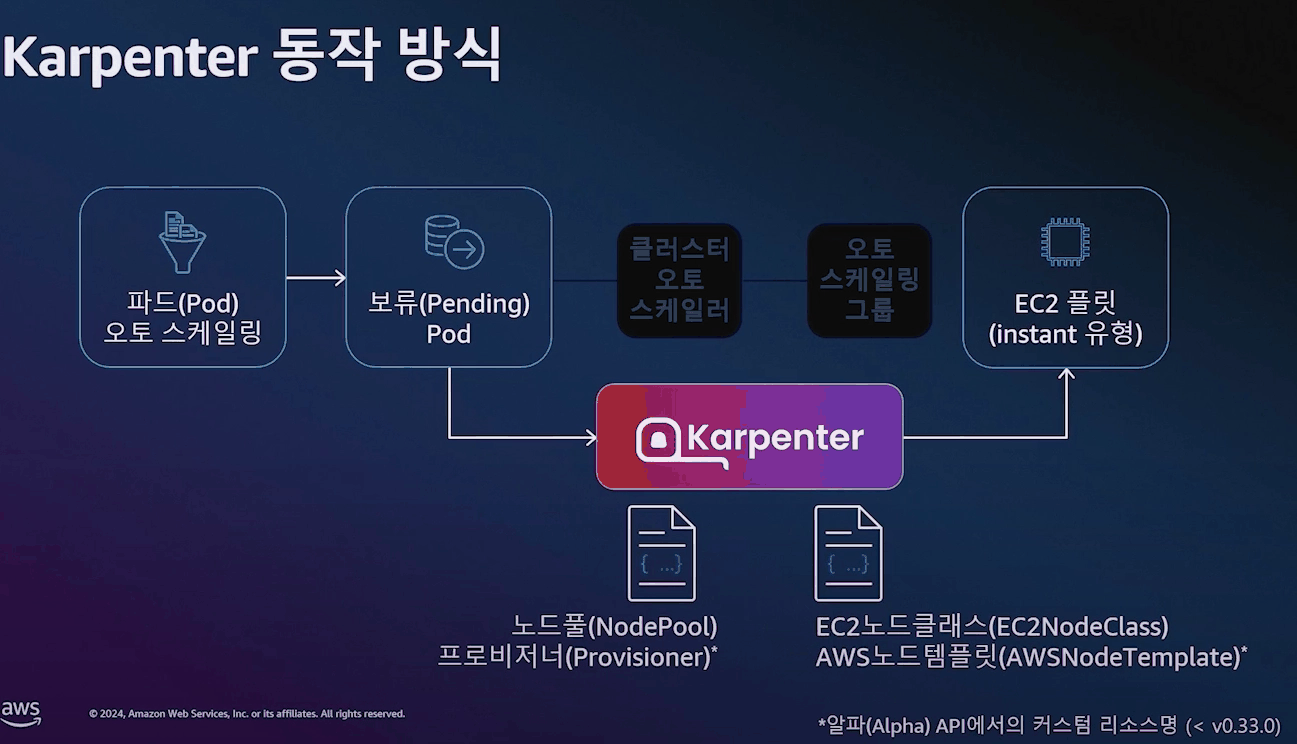
위쪽 경로가 기존 CAS 방식이다. Pending Pod → 클러스터 오토스케일러 → 오토스케일링 그룹 → EC2를 거친다. Karpenter는 이 중간 두 단계를 걷어내고 Pending Pod에서 EC2 플릿으로 직행한다. Auto Scaling Group이라는 간접 계층이 사라지는 것이 속도 차이의 근본 원인이며, 무엇을 띄울지는 NodePool과 EC2NodeClass 두 CRD가 결정한다.
NodePool 예시:
apiVersion: karpenter.sh/v1
kind: NodePool
metadata:
  name: default
spec:
  template:
    spec:
      nodeClassRef:
        group: karpenter.k8s.aws
        kind: EC2NodeClass
        name: default
      requirements:
      - key: karpenter.sh/capacity-type
        operator: In
        values: ["spot", "on-demand"]
      - key: node.kubernetes.io/instance-type
        operator: In
        values: ["t3.medium", "t3.large", "t3a.medium"]
  limits:
    cpu: 1000
    memory: 1000Gi
  disruption:
    consolidationPolicy: WhenEmptyOrUnderutilized
    consolidateAfter: 1m
Provisioning 워크플로우:
sequenceDiagram
    participant P as Pending Pod
    participant K as Karpenter Controller
    participant NP as NodePool
    participant EC2 as EC2NodeClass
    participant AWS as AWS EC2 API
    participant N as Node

    P->>K: Pod 생성 (Pending 상태)
    K->>NP: NodePool 요구사항 확인
    NP->>EC2: EC2NodeClass 참조
    EC2->>K: AMI, SecurityGroup, Subnet 정보
    K->>K: 최적 인스턴스 타입 계산<br/>(CPU, 메모리, 아키텍처)
    K->>AWS: RunInstances 호출
    AWS-->>N: EC2 인스턴스 생성 (1-2분)
    N->>K: 노드 등록
    K->>P: Pod 바인딩
    P->>N: Pod 실행
Disruption 메커니즘:
graph TD
    A[Karpenter Disruption Controller] --> B{Disruption 유형}

    B -->|Consolidation| C[노드 사용률 모니터링]
    C -->|Underutilized| D[Pod 재배치 가능 여부 확인]
    D -->|가능| E[Pod Drain]
    E --> F[노드 종료<br/>비용 절감]

    B -->|Drift| G[NodePool/EC2NodeClass 변경 감지]
    G --> H[새 설정으로 노드 교체]

    B -->|Expiration| I[노드 수명 확인<br/>ttlSecondsAfterEmpty]
    I -->|만료| E

    B -->|Interruption| J[SQS Queue<br/>Spot Interruption]
    J -->|2분 전 알림| K[신속 Pod 재배치]
    K --> F
7. AWS Fargate
정의: 서버리스 컨테이너 컴퓨팅 엔진, Pod별 격리된 실행 환경 제공
- 노드 관리 불필요: EC2 인스턴스 없이 Pod 직접 실행
- 보안 격리: 각 Pod가 독립된 microVM에서 실행
- 자동 스케일링: Pod 수만큼 컴퓨팅 리소스 자동 할당
제약 사항: - Daemonset 사용 불가 - Privileged Container 지원 안 함 - HostNetwork, HostPort 사용 제한 - EBS 볼륨 미지원 (EFS 사용 가능) - GPU 미지원
비용: - vCPU 및 메모리 사용량 기준 과금 - 최소 과금 단위: vCPU 0.25, 메모리 0.5GB
주요 실습 절차
1. 실습 환경 구축
# CloudFormation Stack 생성

> EKS Auto Scaling (HPA, KEDA, Cluster Autoscaler, Karpenter, VPA)을 학습한다.
aws cloudformation deploy \
  --template-file eks-scaling-stack.yaml \
  --stack-name myeks \
  --parameter-overrides KeyName=mykey \
  --capabilities CAPABILITY_NAMED_IAM

# Bastion SSH 접속
BASTION_IP=$(aws cloudformation describe-stacks \
  --stack-name myeks \
  --query "Stacks[0].Outputs[?OutputKey=='BastionPublicIp'].OutputValue" \
  --output text)
ssh -i ~/.ssh/mykey.pem ec2-user@$BASTION_IP

# kubeconfig 설정
aws eks update-kubeconfig --region ap-northeast-2 --name myeks
kubectl get nodes
2. Metrics Server 설치
kubectl apply -f https://github.com/kubernetes-sigs/metrics-server/releases/latest/download/components.yaml

# 확인
kubectl get deployment metrics-server -n kube-system
kubectl top nodes
kubectl top pods -A
3. HPA 실습
# PHP-Apache 배포
kubectl apply -f https://k8s.io/examples/application/php-apache.yaml

# HPA 생성
kubectl autoscale deployment php-apache --cpu-percent=50 --min=1 --max=10

# 부하 생성
kubectl run -i --tty load-generator --rm --image=busybox:1.28 --restart=Never -- \
  /bin/sh -c "while sleep 0.01; do wget -q -O- http://php-apache; done"

# 모니터링
kubectl get hpa -w
4. KEDA 설치 및 SQS 스케일링
# KEDA Helm 설치
helm repo add kedacore https://kedacore.github.io/charts
helm install keda kedacore/keda --namespace keda --create-namespace

# SQS Queue 생성
aws sqs create-queue --queue-name keda-test

# IRSA 생성
eksctl create iamserviceaccount \
  --name keda-operator \
  --namespace keda \
  --cluster myeks \
  --attach-policy-arn arn:aws:iam::aws:policy/AmazonSQSFullAccess \
  --approve \
  --override-existing-serviceaccounts

# ScaledObject 적용
cat <<EOF | kubectl apply -f -
apiVersion: keda.sh/v1alpha1
kind: ScaledObject
metadata:
  name: aws-sqs-queue-scaledobject
spec:
  scaleTargetRef:
    name: keda-deployment
  minReplicaCount: 0
  maxReplicaCount: 10
  triggers:
  - type: aws-sqs-queue
    metadata:
      queueURL: https://sqs.ap-northeast-2.amazonaws.com/123456789/keda-test
      queueLength: "5"
      awsRegion: "ap-northeast-2"
      identityOwner: operator
EOF

# 메시지 전송
for i in {1..100}; do
  aws sqs send-message \
    --queue-url https://sqs.ap-northeast-2.amazonaws.com/123456789/keda-test \
    --message-body "Hello KEDA $i"
done

# Pod 스케일링 확인
kubectl get pods -w
5. VPA 설치
# VPA 설치
git clone https://github.com/kubernetes/autoscaler.git
cd autoscaler/vertical-pod-autoscaler/
./hack/vpa-up.sh

# Hamster 애플리케이션 배포
kubectl apply -f examples/hamster.yaml

# VPA 상태 확인
kubectl get vpa
kubectl describe vpa hamster-vpa

# 권장 값 확인
kubectl get vpa hamster-vpa -o jsonpath='{.status.recommendation.containerRecommendations[0]}'
6. Karpenter 설치
# 환경 변수 설정
export KARPENTER_VERSION="1.1.0"
export CLUSTER_NAME="myeks"
export AWS_DEFAULT_REGION="ap-northeast-2"
export AWS_ACCOUNT_ID="$(aws sts get-caller-identity --query Account --output text)"

# CloudFormation으로 IAM Role 생성
curl -fsSL https://raw.githubusercontent.com/aws/karpenter-provider-aws/v${KARPENTER_VERSION}/website/content/en/preview/getting-started/getting-started-with-karpenter/cloudformation.yaml > karpenter-iam.yaml

aws cloudformation deploy \
  --stack-name "Karpenter-${CLUSTER_NAME}" \
  --template-file karpenter-iam.yaml \
  --capabilities CAPABILITY_NAMED_IAM \
  --parameter-overrides "ClusterName=${CLUSTER_NAME}"

# IRSA 생성
eksctl create iamserviceaccount \
  --cluster "${CLUSTER_NAME}" \
  --name karpenter \
  --namespace kube-system \
  --role-name "${CLUSTER_NAME}-karpenter" \
  --attach-policy-arn "arn:aws:iam::${AWS_ACCOUNT_ID}:policy/KarpenterControllerPolicy-${CLUSTER_NAME}" \
  --role-only \
  --approve

# Helm으로 Karpenter 설치
helm upgrade --install karpenter oci://public.ecr.aws/karpenter/karpenter \
  --version "${KARPENTER_VERSION}" \
  --namespace kube-system \
  --create-namespace \
  --set "settings.clusterName=${CLUSTER_NAME}" \
  --set controller.resources.requests.cpu=1 \
  --set controller.resources.requests.memory=1Gi \
  --wait

# EC2NodeClass 생성
cat <<EOF | kubectl apply -f -
apiVersion: karpenter.k8s.aws/v1
kind: EC2NodeClass
metadata:
  name: default
spec:
  amiFamily: AL2023
  role: "KarpenterNodeRole-${CLUSTER_NAME}"
  subnetSelectorTerms:
  - tags:
      karpenter.sh/discovery: "${CLUSTER_NAME}"
  securityGroupSelectorTerms:
  - tags:
      karpenter.sh/discovery: "${CLUSTER_NAME}"
  amiSelectorTerms:
  - alias: al2023@latest
EOF

# NodePool 생성
cat <<EOF | kubectl apply -f -
apiVersion: karpenter.sh/v1
kind: NodePool
metadata:
  name: default
spec:
  template:
    spec:
      nodeClassRef:
        group: karpenter.k8s.aws
        kind: EC2NodeClass
        name: default
      requirements:
      - key: "karpenter.sh/capacity-type"
        operator: In
        values: ["spot", "on-demand"]
      - key: "node.kubernetes.io/instance-type"
        operator: In
        values: ["t3.medium", "t3.large", "t3a.medium"]
  limits:
    cpu: 1000
  disruption:
    consolidationPolicy: WhenEmptyOrUnderutilized
    consolidateAfter: 1m
EOF

# 테스트
kubectl scale deployment inflate --replicas=5
kubectl logs -f -n kube-system -l app.kubernetes.io/name=karpenter
7. Fargate Profile 생성
# Fargate Profile 생성
eksctl create fargateprofile \
  --cluster myeks \
  --name fg-1 \
  --namespace default \
  --labels env=fargate

# Fargate Pod 배포
cat <<EOF | kubectl apply -f -
apiVersion: v1
kind: Pod
metadata:
  name: fargate-pod
  labels:
    env: fargate
spec:
  containers:
  - name: nginx
    image: nginx
    resources:
      requests:
        cpu: 500m
        memory: 1Gi
EOF

# Fargate 노드 확인
kubectl get nodes -l eks.amazonaws.com/compute-type=fargate
kubectl get pod fargate-pod -o wide
트러블슈팅
1. HPA CPU 메트릭 <unknown> 표시
증상:
원인: - Metrics Server 미설치 - Pod의 CPU requests 미설정해결:
# Metrics Server 설치 확인
kubectl get deployment metrics-server -n kube-system

# Deployment에 CPU requests 추가
kubectl set resources deployment <deployment-name> --requests=cpu=200m
2. KEDA Scale to Zero 안 됨
원인: minReplicaCount 설정이 0이 아님
해결:
3. Cluster Autoscaler 노드 추가 안 됨
원인: - Auto Scaling Group 태그 누락 - IAM 권한 부족 - ASG Max Capacity 초과
해결:
# ASG 태그 확인
aws autoscaling describe-auto-scaling-groups \
  --auto-scaling-group-names <asg-name> \
  --query "AutoScalingGroups[0].Tags"

# Cluster Autoscaler 로그 확인
kubectl logs -f -n kube-system deployment/cluster-autoscaler
4. Karpenter 노드 프로비저닝 실패
원인: - IAM 권한 부족 - Subnet/SecurityGroup 태그 누락 - Instance Profile 미연결
해결:
# Subnet 태그 확인
aws ec2 describe-subnets \
  --filters "Name=tag:karpenter.sh/discovery,Values=myeks" \
  --query "Subnets[*].[SubnetId, Tags]"

# EC2NodeClass 확인
kubectl get ec2nodeclass default -o yaml
5. Fargate Pod Pending 상태
원인: - Fargate Profile Selector 불일치 - Subnet 가용 IP 부족
해결:
# Fargate Profile 확인
eksctl get fargateprofile --cluster myeks

# Pod Label 확인 및 수정
kubectl label pod fargate-pod env=fargate

# Pod Events 확인
kubectl describe pod fargate-pod
공식 문서
- Amazon EKS User Guide
- Kubernetes HPA
- Kubernetes VPA
- KEDA Documentation
- Karpenter Documentation
- AWS Fargate
GitHub
관련 블로그
최종 업데이트: 2026-03-25