Istio - VM Support & Istio Traffic Flow
Istio 서비스 메시에 VM 워크로드를 통합하는 방법과 전체 트래픽 흐름을 정리한다.
클러스터 외부 가상머신을 Istio 서비스 메시에 통합하는 방법과 DNS 프록시를 통한 트래픽 흐름을 정리한다. 하이브리드 환경에서 일관된 서비스 메시 정책을 적용하는 방법을 다룬다.
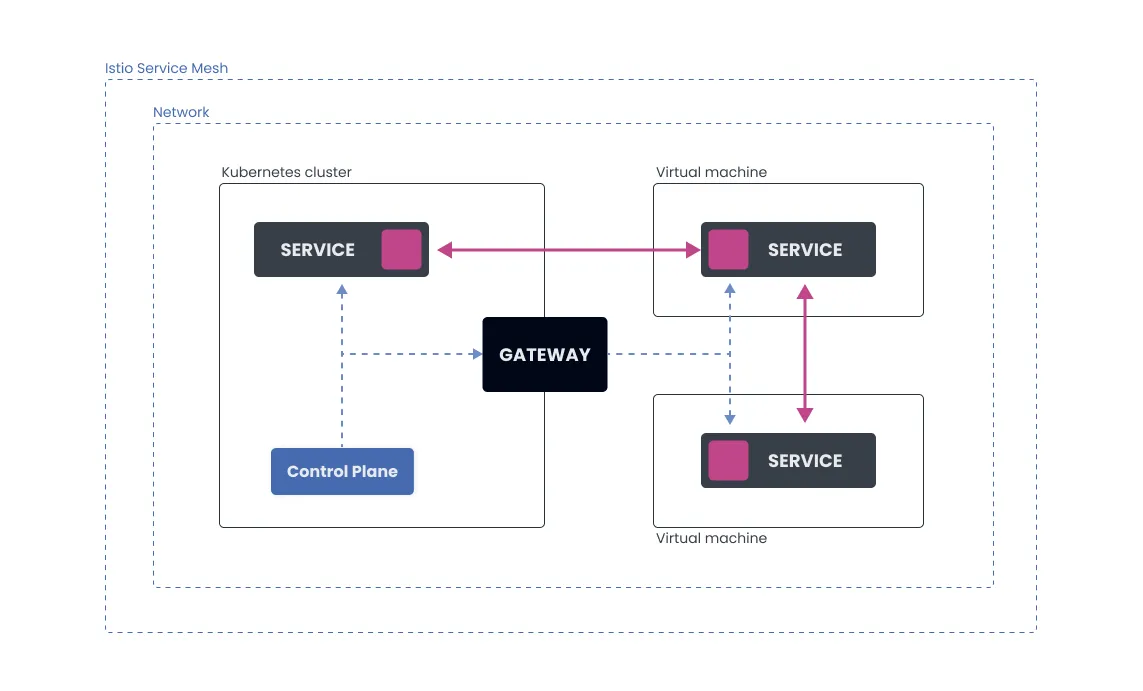
VM Support
VM Support Overview - 가상머신 지원의 필요성과 가치
하이브리드 클라우드 환경의 현실
현실적으로 많은 기업들이 직면하고 있는 상황을 살펴보면:
레거시 시스템의 존재 - 기존에 VM이나 베어메탈에서 실행되고 있는 핵심 비즈니스 애플리케이션 - 즉시 컨테이너화하기 어려운 복잡한 의존성을 가진 시스템 - 규제나 컴플라이언스 요구사항으로 인해 특정 환경에서만 실행 가능한 워크로드
마이그레이션의 점진적 접근 - Big Bang 방식의 전체 마이그레이션은 위험성이 높음 - 단계적이고 점진적인 마이그레이션이 현실적 - 마이그레이션 과정에서도 일관된 보안과 정책 적용 필요
Istio VM Support의 핵심 가치
Istio는 쿠버네티스 클러스터뿐만 아니라 가상머신(VM)도 서비스 메시에 포함시킬 수 있는 강력한 기능을 제공한다. 이를 통해 기존 레거시 애플리케이션과 클라우드 네이티브 애플리케이션 간의 원활한 통신이 가능한다.
주요 특징:
- 통합된 서비스 메시: 클러스터 내외의 모든 워크로드를 단일 메시로 관리
- 일관된 보안 정책: mTLS, 인가 정책을 VM과 Pod에 동일하게 적용
- 통합된 관찰성: 메트릭, 로깅, 트레이싱을 모든 워크로드에서 일관되게 수집
- 트래픽 관리: 로드 밸런싱, 서킷 브레이커, 재시도 정책 등을 모든 워크로드에 적용
- 단계적 마이그레이션 지원: VM에서 컨테이너로의 점진적 전환 가능
실제 사용 사례
시나리오 1: 데이터베이스 통합
# 기존: VM에서 실행되는 MySQL 데이터베이스
# 새로운: Kubernetes의 마이크로서비스들이 MySQL에 접근
# 요구사항: 모든 DB 접근에 mTLS 적용, 접근 로그 수집
시나리오 2: 레거시 API 서비스
VM 아키텍처 구성 요소 - 심화 분석
┌─────────────────────────────────────────────────────────────────┐
│                    VM Support Architecture                     │
├─────────────────────────────────────────────────────────────────┤
│                                                                 │
│  ┌─────────────────┐         ┌─────────────────────────────────┐ │
│  │   Kubernetes    │◄──────► │         VM Workloads           │ │
│  │    Cluster      │         │                                 │ │
│  │                 │         │  ┌─────┐  ┌─────┐  ┌─────┐     │ │
│  │  ┌───────────┐  │         │  │VM-1 │  │VM-2 │  │VM-3 │     │ │
│  │  │   istiod  │  │         │  │     │  │     │  │     │     │ │
│  │  │(Control   │  │         │  └─────┘  └─────┘  └─────┘     │ │
│  │  │Plane)     │  │         │     │        │        │        │ │
│  │  └───────────┘  │         │     ▼        ▼        ▼        │ │
│  │                 │         │  ┌─────────────────────────┐    │ │
│  │  ┌───────────┐  │  mTLS   │  │    istio-agent +        │    │ │
│  │  │East-West  │◄─┼─────────┼─►│     Envoy Proxy         │    │ │
│  │  │Gateway    │  │         │  └─────────────────────────┘    │ │
│  │  └───────────┘  │         │                                 │ │
│  │                 │         │  ┌─────────────────────────┐    │ │
│  │  ┌───────────┐  │         │  │    DNS Proxy +          │    │ │
│  │  │  Service  │  │         │  │  Service Discovery      │    │ │
│  │  │   Mesh    │  │         │  └─────────────────────────┘    │ │
│  │  │Workloads  │  │         │                                 │ │
│  │  └───────────┘  │         └─────────────────────────────────┘ │
│  └─────────────────┘                                             │
│                                                                   │
│  WorkloadGroup ──► WorkloadEntry ──► VM Instance Registration     │
│  Security Policies ──► mTLS ──► Service-to-Service Auth           │
└─────────────────────────────────────────────────────────────────┘
핵심 구성 요소 상세 분석
1. East-West Gateway - 클러스터 간 통신의 핵심
East-West Gateway는 Istio 서비스 메시에서 클러스터 간 또는 클러스터와 외부 워크로드 간의 통신을 담당하는 특별한 Envoy 프록시이다.
# East-West Gateway의 주요 특징
특징:
  - 클러스터 경계를 넘나드는 트래픽 처리
  - mTLS 종료 및 시작점
  - 서비스 디스커버리 정보 교환
  - 로드 밸런싱 및 트래픽 정책 적용

포트 구성:
  - 15021: 헬스 체크 포트
  - 15012: istiod와의 xDS 통신
  - 15017: 웹훅 및 CA 통신
  - 15443: TLS 트래픽 (사용자 정의 가능)
2. WorkloadGroup - VM 워크로드의 논리적 그룹화
WorkloadGroup은 동일한 특성을 가진 VM 워크로드들을 논리적으로 그룹화하는 리소스이다.
# WorkloadGroup의 주요 역할
역할:
  - VM 인스턴스들의 템플릿 정의
  - 공통 메타데이터 및 레이블 관리
  - 서비스 어카운트 및 보안 정책 적용
  - 네트워크 설정 및 포트 구성

관리 범위:
  - 동적 스케일링 지원
  - 인스턴스 라이프사이클 관리
  - 헬스 체크 구성
  - 메트릭 수집 설정
3. WorkloadEntry - 개별 VM 인스턴스의 표현
WorkloadEntry는 개별 VM 인스턴스를 Istio 서비스 메시에 등록하는 리소스이다.
# WorkloadEntry의 세부 기능
기능:
  - VM 인스턴스의 네트워크 정보 등록
  - 서비스 엔드포인트로서의 역할
  - 헬스 상태 추적
  - 동적 등록/해제 지원

네트워크 정보:
  - IP 주소 및 포트 매핑
  - 네트워크 토폴로지 정보
  - 지역/가용영역 정보
  - 성능 메트릭 라벨링
4. istio-agent - VM에서의 Istio 대리자
istio-agent(pilot-agent)는 VM에서 실행되어 Envoy 프록시를 관리하고 컨트롤 플레인과 통신하는 핵심 컴포넌트이다.
# istio-agent의 핵심 책임
책임:
  - Envoy 프록시 라이프사이클 관리
  - 컨트롤 플레인과의 xDS 통신
  - 인증서 관리 및 갱신
  - DNS 프록시 기능 제공
  - 헬스 체크 및 메트릭 수집

프로세스 구조:
  - pilot-agent: 메인 에이전트 프로세스
  - envoy: 데이터 플레인 프록시
  - DNS proxy: 로컬 DNS 해석기
네트워크 아키텍처 설계 고려사항
네트워크 연결성
# VM과 클러스터 간 필수 연결 포트
클러스터 → VM:
  - 15006: Envoy 인바운드 리스너
  - 애플리케이션 포트 (예: 8080, 9090)

VM → 클러스터:
  - 15010: istiod pilot 포트
  - 15011: istiod 포트 (deprecated)
  - 15012: istiod xDS 포트
  - 15014: istiod 모니터링 포트
보안 고려사항
# 인증서 및 보안 설정
필수 요소:
  - 루트 CA 인증서
  - 워크로드 인증서
  - JWT 토큰
  - 네트워크 정책

보안 계층:
  - 네트워크 레벨: 방화벽, VPC 피어링
  - 전송 레벨: mTLS
  - 애플리케이션 레벨: JWT 검증
VM 통합 실습 - 단계별 상세 가이드
East-West Gateway 설치 및 설정 - 상세 구현
East-West Gateway는 클러스터 외부의 워크로드와 클러스터 내부 서비스 간의 통신을 가능하게 하는 핵심 컴포넌트이다. 이는 일반적인 Ingress Gateway와는 다른 특별한 목적을 가집니다.
East-West Gateway vs Ingress Gateway 비교
| 특성 | Ingress Gateway | East-West Gateway |
|---|---|---|
| 목적 | 외부 클라이언트 → 클러스터 | 클러스터 ↔ 외부 워크로드 |
| 트래픽 방향 | 단방향 (인바운드) | 양방향 |
| mTLS | 선택적 | 필수 |
| 서비스 디스커버리 | 불필요 | 필수 |
1단계: East-West Gateway 설치
# East-West Gateway 전용 설정으로 Istio 설치
istioctl install --set values.pilot.env.EXTERNAL_ISTIOD=true \
  --set values.global.meshID=mesh1 \
  --set values.global.network=network1 \
  --set values.istiodRemote.enabled=true

# 설치 확인
kubectl get pods -n istio-system
NAME                                    READY   STATUS    RESTARTS   AGE
istio-eastwestgateway-74fb7c8d4-xyz12   1/1     Running   0          2m
istiod-12345-abcde                      1/1     Running   0          3m
2단계: Cross-Network Gateway 설정
# cross-network-gateway 적용
kubectl apply -f - <<EOF
apiVersion: networking.istio.io/v1alpha3
kind: Gateway
metadata:
  name: cross-network-gateway
  namespace: istio-system
spec:
  selector:
    istio: eastwestgateway
  servers:
  - port:
      number: 15021
      name: status-port
      protocol: HTTP
    hosts:
    - "*"
  - port:
      number: 15012
      name: tls-istiod
      protocol: TLS
    tls:
      mode: PASSTHROUGH
    hosts:
    - "*"
  - port:
      number: 15017
      name: tls-istiodwebhook
      protocol: TLS
    tls:
      mode: PASSTHROUGH
    hosts:
    - "*"
EOF
3단계: istiod 서비스 노출 설정
istiod 컨트롤 플레인을 외부 VM에서 접근할 수 있도록 노출해야 한다.
# istiod 노출을 위한 Gateway 및 VirtualService 설정
kubectl apply -f - <<EOF
apiVersion: networking.istio.io/v1alpha3
kind: Gateway
metadata:
  name: istiod-gateway
  namespace: istio-system
spec:
  selector:
    istio: eastwestgateway
  servers:
    - port:
        number: 15012
        name: tls-istiod
        protocol: TLS
      tls:
        mode: PASSTHROUGH
      hosts:
        - "*"
    - port:
        number: 15017
        name: tls-istiodwebhook
        protocol: TLS
      tls:
        mode: PASSTHROUGH
      hosts:
        - "*"
---
apiVersion: networking.istio.io/v1alpha3
kind: VirtualService
metadata:
  name: istiod-vs
  namespace: istio-system
spec:
  hosts:
  - "*"
  gateways:
  - istiod-gateway
  tls:
  - match:
    - port: 15012
      sniHosts:
      - "*"
    route:
    - destination:
        host: istiod.istio-system.svc.cluster.local
        port:
          number: 15012
  - match:
    - port: 15017
      sniHosts:
      - "*"
    route:
    - destination:
        host: istiod.istio-system.svc.cluster.local
        port:
          number: 443
EOF
4단계: 설정 검증
# Gateway 및 VirtualService 확인
kubectl get gw,vs -A
NAMESPACE       NAME                                                AGE
istio-system    gateway.networking.istio.io/cross-network-gateway   2m23s
istio-system    gateway.networking.istio.io/istiod-gateway           9s
istioinaction   gateway.networking.istio.io/coolstore-gateway       84m

NAMESPACE       NAME                                                       GATEWAYS                HOSTS                         AGE
istio-system    virtualservice.networking.istio.io/istiod-vs              ["istiod-gateway"]      ["*"]                         9s
istioinaction   virtualservice.networking.istio.io/webapp-virtualservice   ["coolstore-gateway"]   ["webapp.istioinaction.io"]   84m

# East-West Gateway 서비스 확인
kubectl get svc -n istio-system istio-eastwestgateway
NAME                    TYPE           CLUSTER-IP     EXTERNAL-IP    PORT(S)                                                           AGE
istio-eastwestgateway   LoadBalancer   10.96.123.45   203.0.113.10   15021:31394/TCP,15012:30586/TCP,15017:32425/TCP,15443:31691/TCP   5m
East-West Gateway 설정 구성도
┌─────────────────────────────────────────────────────────────────┐
│                East-West Gateway Configuration                  │
├─────────────────────────────────────────────────────────────────┤
│                                                                 │
│        VM Network              │          Kubernetes Cluster    │
│                                │                                 │
│  ┌─────────────────┐           │    ┌─────────────────────────┐ │
│  │                 │           │    │                         │ │
│  │  forum-vm-1     │           │    │      istiod             │ │
│  │  10.10.0.25     │◄──────────┼────┤      (Control Plane)   │ │
│  │                 │  Port     │    │                         │ │
│  │  istio-agent ◄──┤  15012    │    └─────────────────────────┘ │
│  │  + envoy        │           │                  │             │
│  └─────────────────┘           │                  │             │
│                                │                  │             │
│  ┌─────────────────┐           │    ┌─────────────▼─────────┐   │
│  │                 │           │    │                       │   │
│  │  forum-vm-2     │◄──────────┼────┤  East-West Gateway    │   │
│  │  10.10.0.26     │  Ports:   │    │                       │   │
│  │                 │  15012    │    │  ┌─────────────────┐  │   │
│  │  istio-agent ◄──┤  15017    │    │  │  Gateway Rules  │  │   │
│  │  + envoy        │  15021    │    │  │  - istiod expo  │  │   │
│  └─────────────────┘           │    │  │  - xDS traffic  │  │   │
│                                │    │  │  - Cert mgmt    │  │   │
│  ┌─────────────────┐           │    │  └─────────────────┘  │   │
│  │                 │           │    │                       │   │
│  │  forum-vm-3     │◄──────────┼────┤  LoadBalancer IP:     │   │
│  │  10.10.0.27     │           │    │  203.0.113.10         │   │
│  │                 │           │    └───────────────────────┘   │
│  │  istio-agent ◄──┤           │                                │
│  │  + envoy        │           │                                │
│  └─────────────────┘           │                                │
│                                │                                │
└─────────────────────────────────────────────────────────────────┘
WorkloadGroup으로 워크로드 그룹 나타내기 - 심화 설정
WorkloadGroup은 VM 워크로드의 집합을 정의하며, 서비스 메시에서 이들을 어떻게 관리할지 명시한다. 이는 Kubernetes의 Deployment와 유사한 역할을 하지만, VM 환경에 특화된 기능을 제공한다.
WorkloadGroup의 핵심 개념
WorkloadGroup은 다음과 같은 중요한 역할을 수행한다:
- 템플릿 정의: VM 인스턴스들이 따라야 할 공통 설정 템플릿
- 메타데이터 관리: 라벨, 애노테이션 등의 공통 메타데이터
- 네트워크 설정: 포트 매핑, 프로토콜 정의
- 보안 정책: ServiceAccount, 보안 컨텍스트 설정
1단계: 네임스페이스 및 ServiceAccount 설정
# istioinaction 네임스페이스 생성 (이미 존재하지 않는 경우)
kubectl create namespace istioinaction

# VM 워크로드용 ServiceAccount 생성
kubectl apply -f - <<EOF
apiVersion: v1
kind: ServiceAccount
metadata:
  name: forum
  namespace: istioinaction
  labels:
    app: forum
---
apiVersion: v1
kind: Service
metadata:
  name: forum
  namespace: istioinaction
  labels:
    app: forum
spec:
  ports:
  - port: 8080
    name: http
    protocol: TCP
  selector:
    app: forum
EOF
2단계: WorkloadGroup 생성 및 설정
# forum-vm-workloadgroup.yaml
apiVersion: networking.istio.io/v1alpha3
kind: WorkloadGroup
metadata:
  name: forum-vm
  namespace: istioinaction
  labels:
    app: forum
    version: vm
spec:
  metadata:
    labels:
      app: forum
      version: vm
      tier: backend
    annotations:
      sidecar.istio.io/inject: "false"  # VM은 자체 Envoy 사용
  template:
    ports:
      http: 8080
      metrics: 9090      # Prometheus 메트릭 포트
      health: 8081       # 헬스 체크 포트
    serviceAccount: forum
    network: vm-network  # VM이 속한 네트워크 식별자
3단계: WorkloadGroup 적용 및 검증
# WorkloadGroup 적용
kubectl apply -f forum-vm-workloadgroup.yaml

# 생성된 WorkloadGroup 확인
kubectl get workloadgroup -n istioinaction
NAME       AGE
forum-vm   30s

# WorkloadGroup 상세 정보 확인
kubectl describe workloadgroup forum-vm -n istioinaction
Name:         forum-vm
Namespace:    istioinaction
Labels:       app=forum
              version=vm
Annotations:  <none>
API Version:  networking.istio.io/v1alpha3
Kind:         WorkloadGroup
Metadata:
  Creation Timestamp:  2024-01-15T10:30:00Z
Spec:
  Metadata:
    Annotations:
      sidecar.istio.io/inject:  false
    Labels:
      App:     forum
      Tier:    backend
      Version: vm
  Template:
    Network:          vm-network
    Ports:
      Health:  8081
      Http:    8080
      Metrics: 9090
    Service Account:  forum
가상머신에 istio-agent 설치 및 설정 - 완전 가이드
istio-agent는 VM에서 실행되어 Envoy 프록시를 관리하고 컨트롤 플레인과 통신하는 핵심 컴포넌트이다. 이는 Kubernetes 환경의 istio-proxy 사이드카와 동일한 역할을 수행한다.
istio-agent의 주요 구성 요소
- pilot-agent: 메인 에이전트 프로세스, Envoy 라이프사이클 관리
- envoy: 실제 데이터 플레인 프록시
- DNS proxy: 로컬 DNS 쿼리 처리
- Certificate manager: mTLS 인증서 관리
1단계: VM 환경 준비
# [forum-vm에서 실행]
# 시스템 업데이트 및 필수 패키지 설치
sudo apt update && sudo apt install -y curl wget unzip

# 방화벽 설정 (필요한 포트 오픈)
sudo ufw allow 8080/tcp   # 애플리케이션 포트
sudo ufw allow 8081/tcp   # 헬스 체크 포트
sudo ufw allow 9090/tcp   # 메트릭 포트
sudo ufw allow 15000/tcp  # Envoy 관리 포트
sudo ufw allow 15001/tcp  # Envoy 아웃바운드 포트
sudo ufw allow 15006/tcp  # Envoy 인바운드 포트
sudo ufw allow 15090/tcp  # Envoy 메트릭 포트

# 네트워크 연결성 확인
ping -c 3 <KUBERNETES_CLUSTER_IP>
telnet <EAST_WEST_GATEWAY_IP> 15012
2단계: Istio 바이너리 다운로드 및 설치
# [forum-vm에서 실행]
# Istio 최신 버전 다운로드
curl -L https://istio.io/downloadIstio | ISTIO_VERSION=1.17.2 sh -
cd istio-1.17.2

# 바이너리 시스템 경로에 복사
sudo cp bin/istio-proxy /usr/local/bin/
sudo cp bin/pilot-agent /usr/local/bin/

# 실행 권한 부여
sudo chmod +x /usr/local/bin/istio-proxy
sudo chmod +x /usr/local/bin/pilot-agent

# 설치 확인
pilot-agent version
istio-proxy version
3단계: VM 워크로드 등록 및 인증 설정
# [Kubernetes 클러스터에서 실행]
# VM 워크로드를 위한 워크로드 엔트리 생성
istioctl x workload entry configure \
  -f forum-vm-workloadgroup.yaml \
  --name forum-vm-1 \
  --namespace istioinaction \
  --autoregister

# 또는 수동으로 WorkloadEntry 생성
kubectl apply -f - <<EOF
apiVersion: networking.istio.io/v1alpha3
kind: WorkloadEntry
metadata:
  name: forum-vm-1
  namespace: istioinaction
  labels:
    app: forum
    version: vm
spec:
  address: "10.10.0.25"
  labels:
    app: forum
    version: vm
    instance-id: "i-1234567890abcdef0"
  serviceAccount: forum
  network: vm-network
  ports:
    http: 8080
    metrics: 9090
    health: 8081
EOF
4단계: 인증서 및 토큰 생성
# [Kubernetes 클러스터에서 실행]
# VM용 인증 토큰 생성
kubectl create token forum \
  --namespace istioinaction \
  --duration=24h > token

# 루트 CA 인증서 추출
kubectl get configmap istio-ca-root-cert -n istio-system -o jsonpath='{.data.root-cert\.pem}' > root-cert.pem

# 인증서 체인 생성 (자동으로 생성됨)
# cert-chain.pem은 istio-agent가 시작될 때 자동으로 생성됩니다.

# VM으로 인증 파일들 전송
scp token root-cert.pem forum-vm:/tmp/
5단계: Istio 설정 파일 생성
# [forum-vm에서 실행]
# Istio 설정 디렉토리 생성
sudo mkdir -p /etc/istio/config
sudo mkdir -p /var/lib/istio/envoy
sudo mkdir -p /etc/certs
sudo mkdir -p /var/run/secrets/tokens

# cluster.env 파일 생성
sudo tee /var/lib/istio/envoy/cluster.env <<EOF
ISTIO_SERVICE_CIDR=10.96.0.0/12
ISTIO_INBOUND_PORTS=8080,8081,9090
ISTIO_LOCAL_EXCLUDE_PORTS=15000,15001,15006,15090
ISTIO_NAMESPACE=istioinaction
SERVICE_ACCOUNT=forum
ISTIO_META_WORKLOAD_NAME=forum-vm-1
ISTIO_META_OWNER=kubernetes://apis/networking.istio.io/v1alpha3/namespaces/istioinaction/workloadentries/forum-vm-1
ISTIO_META_MESH_ID=cluster.local
ISTIO_META_CLUSTER_ID=Kubernetes
ISTIO_META_NETWORK=vm-network
PILOT_ENABLE_WORKLOAD_ENTRY_AUTOREGISTRATION=true
PILOT_ENABLE_CROSS_CLUSTER_WORKLOAD_ENTRY=true
EOF

# mesh.yaml 파일 생성
sudo tee /etc/istio/config/mesh.yaml <<EOF
defaultConfig:
  discoveryAddress: <EAST_WEST_GATEWAY_IP>:15012
  proxyMetadata:
    PILOT_ENABLE_WORKLOAD_ENTRY_AUTOREGISTRATION: true
    ISTIO_META_DNS_CAPTURE: true
    ISTIO_META_DNS_AUTO_ALLOCATE: true
trustDomain: cluster.local
EOF

# 인증서 및 토큰 배치
sudo cp /tmp/root-cert.pem /etc/certs/
sudo cp /tmp/token /var/run/secrets/tokens/istio-token
sudo chmod 600 /var/run/secrets/tokens/istio-token
6단계: istio-agent 서비스 등록 및 시작
# [forum-vm에서 실행]
# systemd 서비스 파일 생성
sudo tee /etc/systemd/system/istio.service <<EOF
[Unit]
Description=Istio Pilot Agent
After=network.target

[Service]
Type=simple
User=root
Environment="PILOT_ENABLE_WORKLOAD_ENTRY_AUTOREGISTRATION=true"
Environment="CA_ADDR=<EAST_WEST_GATEWAY_IP>:15012"
Environment="PILOT_CERT_PROVIDER=istiod"
Environment="ISTIO_META_AUTO_REGISTER_GROUP=forum-vm"
ExecStart=/usr/local/bin/pilot-agent proxy
Restart=always
RestartSec=10

[Install]
WantedBy=multi-user.target
EOF

# 서비스 등록 및 시작
sudo systemctl daemon-reload
sudo systemctl enable istio
sudo systemctl start istio

# 서비스 상태 확인
sudo systemctl status istio
7단계: istio-agent 동작 확인
# [forum-vm에서 실행]
# Envoy 관리 인터페이스 확인
curl localhost:15000/ready
curl localhost:15000/stats/prometheus | grep envoy_server_state

# 클러스터 정보 확인
curl localhost:15000/clusters | grep outbound

# 인증서 정보 확인
curl localhost:15000/certs

# istio-agent 로그 확인
sudo journalctl -u istio -f
VM에서 istio-agent 설치 과정
┌─────────────────────────────────────────────────────────────────┐
│                    istio-agent Installation                     │
├─────────────────────────────────────────────────────────────────┤
│                                                                 │
│  Step 1: Environment Setup                                     │
│  ┌─────────────────────────────────────────────────────────┐   │
│  │ $ sudo apt update && sudo apt install curl wget unzip  │   │
│  │ $ sudo ufw allow 8080/tcp  # App port                  │   │
│  │ $ sudo ufw allow 15006/tcp # Envoy inbound             │   │
│  │ $ sudo ufw allow 15012/tcp # istiod connection         │   │
│  └─────────────────────────────────────────────────────────┘   │
│                                                                 │
│  Step 2: Binary Installation                                   │
│  ┌─────────────────────────────────────────────────────────┐   │
│  │ $ curl -L https://istio.io/downloadIstio | sh -        │   │
│  │ $ sudo cp bin/pilot-agent /usr/local/bin/              │   │
│  │ $ sudo cp bin/istio-proxy /usr/local/bin/              │   │
│  │ $ sudo chmod +x /usr/local/bin/*                       │   │
│  └─────────────────────────────────────────────────────────┘   │
│                                                                 │
│  Step 3: Configuration Files                                   │
│  ┌─────────────────────────────────────────────────────────┐   │
│  │ /etc/istio/config/mesh.yaml                            │   │
│  │ /var/lib/istio/envoy/cluster.env                       │   │
│  │ /etc/certs/root-cert.pem                               │   │
│  │ /var/run/secrets/tokens/istio-token                    │   │
│  └─────────────────────────────────────────────────────────┘   │
│                                                                 │
│  Step 4: Service Registration                                  │
│  ┌─────────────────────────────────────────────────────────┐   │
│  │ $ sudo systemctl enable istio                          │   │
│  │ $ sudo systemctl start istio                           │   │
│  │ $ sudo systemctl status istio                          │   │
│  │   ● istio.service - Istio Pilot Agent                  │   │
│  │     Loaded: loaded (/etc/systemd/system/istio.service) │   │
│  │     Active: active (running) since...                  │   │
│  └─────────────────────────────────────────────────────────┘   │
│                                                                 │
│  Step 5: Verification                                          │
│  ┌─────────────────────────────────────────────────────────┐   │
│  │ $ curl localhost:15000/ready                            │   │
│  │ $ curl localhost:15000/clusters | grep outbound        │   │
│  │ $ curl localhost:15000/certs                            │   │
│  └─────────────────────────────────────────────────────────┘   │
└─────────────────────────────────────────────────────────────────┘
클러스터 서비스로 트래픽 라우팅 - 실전 시나리오
VM에서 클러스터 내부 서비스로 트래픽을 라우팅하는 과정은 Istio의 강력한 서비스 디스커버리와 트래픽 관리 기능을 보여주는 핵심 사례이다.
트래픽 라우팅의 단계별 과정
- DNS 해석: VM의 애플리케이션이 서비스 이름으로 요청
- Envoy 인터셉트: outbound 리스너가 트래픽 캐치
- 서비스 디스커버리: istiod에서 엔드포인트 정보 획득
- 로드 밸런싱: 여러 엔드포인트 중 하나 선택
- mTLS 연결: 선택된 엔드포인트와 보안 연결 설정
실습 시나리오: VM에서 웹 애플리케이션 서비스 호출
# [forum-vm에서 실행]
# 1. 기본 DNS 해석 테스트
nslookup webapp.istioinaction.svc.cluster.local
# 결과: Istio DNS 프록시가 240.240.0.1로 해석

# 2. HTTP 요청 테스트 (Envoy를 통한 라우팅)
curl -v webapp.istioinaction.svc.cluster.local
# 예상 응답: 웹 애플리케이션의 HTML 응답

# 3. 상세한 요청 헤더 확인
curl -H "User-Agent: forum-vm-client/1.0" \
     -H "X-Request-ID: $(uuidgen)" \
     webapp.istioinaction.svc.cluster.local/api/status

# 4. mTLS 연결 확인
curl -v webapp.istioinaction.svc.cluster.local 2>&1 | grep -i tls
Envoy 설정을 통한 트래픽 분석
# [forum-vm에서 실행]
# 아웃바운드 클러스터 확인
curl localhost:15000/config_dump | jq '.configs[2].dynamic_active_clusters[] | select(.cluster.name | contains("webapp"))'

# 엔드포인트 정보 확인
curl localhost:15000/clusters | grep webapp
# 출력 예시:
# outbound|80||webapp.istioinaction.svc.cluster.local::10.244.1.5:8080::cx_active::1
# outbound|80||webapp.istioinaction.svc.cluster.local::10.244.1.6:8080::cx_active::0

# 요청 통계 확인
curl localhost:15000/stats | grep webapp
고급 트래픽 관리 설정
# 트래픽 정책 적용 (Kubernetes 클러스터에서)
apiVersion: networking.istio.io/v1alpha3
kind: DestinationRule
metadata:
  name: webapp-destination-rule
  namespace: istioinaction
spec:
  host: webapp.istioinaction.svc.cluster.local
  trafficPolicy:
    connectionPool:
      tcp:
        maxConnections: 100
      http:
        http1MaxPendingRequests: 50
        maxRequestsPerConnection: 10
    loadBalancer:
      simple: LEAST_CONN
    outlierDetection:
      consecutiveErrors: 3
      interval: 30s
      baseEjectionTime: 30s
  subsets:
  - name: v1
    labels:
      version: v1
  - name: v2
    labels:
      version: v2
트래픽을 WorkloadEntry로 라우팅 - 역방향 트래픽
클러스터에서 VM으로 트래픽을 보내는 것은 더욱 복잡한 설정을 요구하며, WorkloadEntry의 정확한 구성이 핵심이다.
WorkloadEntry 고급 설정
# 상세한 WorkloadEntry 설정
apiVersion: networking.istio.io/v1alpha3
kind: WorkloadEntry
metadata:
  name: forum-vm-1
  namespace: istioinaction
  labels:
    app: forum
    version: vm
    region: us-west-2
    zone: us-west-2a
spec:
  address: "10.10.0.25"
  labels:
    app: forum
    version: vm
    instance-id: "i-1234567890abcdef0"
    region: us-west-2
    zone: us-west-2a
  serviceAccount: forum
  network: vm-network
  locality: us-west-2/us-west-2a
  weight: 100  # 로드 밸런싱 가중치
  ports:
    http: 8080
    metrics: 9090
    health: 8081
VM 서비스 헬스 체크 설정
# [forum-vm에서 실행]
# 헬스 체크 엔드포인트 생성
cat > /tmp/health-server.py <<EOF
#!/usr/bin/env python3
import http.server
import socketserver
import json

class HealthHandler(http.server.BaseHTTPRequestHandler):
    def do_GET(self):
        if self.path == '/health':
            self.send_response(200)
            self.send_header('Content-type', 'application/json')
            self.end_headers()
            response = {
                'status': 'healthy',
                'timestamp': '$(date -Iseconds)',
                'version': 'vm-1.0.0'
            }
            self.wfile.write(json.dumps(response).encode())
        else:
            self.send_response(404)
            self.end_headers()

PORT = 8081
Handler = HealthHandler

with socketserver.TCPServer(("", PORT), Handler) as httpd:
    print(f"Health server running on port {PORT}")
    httpd.serve_forever()
EOF

# 헬스 서버 실행
python3 /tmp/health-server.py &
클러스터에서 VM 서비스 호출 테스트
# [Kubernetes 클러스터에서 실행]
# 테스트 Pod 생성
kubectl run test-client --image=curlimages/curl --rm -it --restart=Never -- sh

# Pod 내부에서 VM 서비스 호출
curl forum.istioinaction.svc.cluster.local:8080
curl forum.istioinaction.svc.cluster.local:8081/health

# 로드 밸런싱 테스트 (여러 번 호출)
for i in {1..10}; do
  curl -s forum.istioinaction.svc.cluster.local:8081/health | jq -r '.instance_id'
  sleep 1
done
컨트롤 플레인의 가상머신 설정: 상호 인증 강제 - 보안 심화
mTLS(mutual TLS)는 Istio 서비스 메시의 핵심 보안 기능으로, VM과 클러스터 워크로드 간의 모든 통신을 암호화하고 인증한다.
mTLS 아키텍처 이해
# mTLS 연결 과정
단계:
  1. 클라이언트 인증서 검증
  2. 서버 인증서 검증
  3. 암호화된 채널 설정
  4. SPIFFE ID 기반 인가

SPIFFE ID 형식:
  - 클러스터: spiffe://cluster.local/ns/istioinaction/sa/webapp
  - VM: spiffe://cluster.local/ns/istioinaction/sa/forum
1단계: 전역 mTLS 정책 설정
# 네임스페이스 전체에 STRICT mTLS 적용
apiVersion: security.istio.io/v1beta1
kind: PeerAuthentication
metadata:
  name: default
  namespace: istioinaction
spec:
  mtls:
    mode: STRICT
---
# 특정 서비스에 대한 세부 설정
apiVersion: security.istio.io/v1beta1
kind: PeerAuthentication
metadata:
  name: forum-mtls
  namespace: istioinaction
spec:
  selector:
    matchLabels:
      app: forum
  mtls:
    mode: STRICT
  portLevelMtls:
    8080:
      mode: STRICT
    8081:
      mode: PERMISSIVE  # 헬스 체크는 유연하게
2단계: 인가 정책 설정
# 세밀한 인가 정책 정의
apiVersion: security.istio.io/v1beta1
kind: AuthorizationPolicy
metadata:
  name: forum-access-control
  namespace: istioinaction
spec:
  selector:
    matchLabels:
      app: forum
  rules:
  - from:
    - source:
        principals: ["cluster.local/ns/istioinaction/sa/webapp"]
        namespaces: ["istioinaction"]
    to:
    - operation:
        methods: ["GET", "POST"]
        paths: ["/api/*"]
    when:
    - key: request.headers[user-role]
      values: ["admin", "user"]
  - from:
    - source:
        principals: ["cluster.local/ns/istio-system/sa/istio-proxy"]
    to:
    - operation:
        methods: ["GET"]
        paths: ["/health", "/metrics"]
3단계: mTLS 연결 상태 모니터링
# [forum-vm에서 실행]
# 인증서 상태 확인
curl localhost:15000/certs | jq '.certificates[] | {uri, valid_from, valid_to}'

# mTLS 연결 통계
curl localhost:15000/stats | grep ssl
# 출력 예시:
# listener.0.0.0.0_15006.ssl.connection_error: 0
# listener.0.0.0.0_15006.ssl.handshake: 24
# cluster.outbound|80||webapp.istioinaction.svc.cluster.local.ssl.handshake: 12

# 상호 인증 실패 로그 확인
sudo journalctl -u istio -f | grep -i "certificate\|tls\|ssl"
4단계: 보안 정책 테스트
# [Kubernetes 클러스터에서 실행]
# 인가되지 않은 서비스에서 접근 시도
kubectl run unauthorized-client \
  --image=curlimages/curl \
  --rm -it --restart=Never \
  --overrides='{"spec":{"serviceAccount":"default"}}' \
  -- curl forum.istioinaction.svc.cluster.local:8080
# 예상 결과: RBAC: access denied

# 인가된 서비스에서 접근
kubectl run authorized-client \
  --image=curlimages/curl \
  --rm -it --restart=Never \
  --overrides='{"spec":{"serviceAccount":"webapp"}}' \
  -- curl forum.istioinaction.svc.cluster.local:8080
# 예상 결과: 성공적인 응답
VM과 클러스터 간 mTLS 통신 구성
┌─────────────────────────────────────────────────────────────────┐
│                      mTLS Configuration                         │
├─────────────────────────────────────────────────────────────────┤
│                                                                 │
│   Kubernetes Cluster               VM Workload                  │
│                                                                 │
│  ┌─────────────────────┐         ┌─────────────────────────┐    │
│  │                     │   mTLS  │                         │    │
│  │   webapp-pod        │◄───────►│   forum-vm-1            │    │
│  │                     │         │                         │    │
│  │  SPIFFE ID:         │         │  SPIFFE ID:             │    │
│  │  cluster.local/ns/  │         │  cluster.local/ns/      │    │
│  │  istioinaction/sa/  │         │  istioinaction/sa/      │    │
│  │  webapp             │         │  forum                  │    │
│  │                     │         │                         │    │
│  │  ┌───────────────┐  │         │  ┌───────────────────┐  │    │
│  │  │ Envoy Sidecar │◄─┼─────────┼─►│ istio-agent +     │  │    │
│  │  │               │  │  TLS    │  │ Envoy Proxy       │  │    │
│  │  │ - Client Cert │  │ Handsh  │  │                   │  │    │
│  │  │ - Server Cert │  │ ake     │  │ - Client Cert     │  │    │
│  │  │ - CA Trust    │  │         │  │ - Server Cert     │  │    │
│  │  └───────────────┘  │         │  │ - CA Trust        │  │    │
│  └─────────────────────┘         │  └───────────────────┘  │    │
│                                  └─────────────────────────┘    │
│                                                                 │
│  Certificate Rotation:                                         │
│  ┌─────────────────────────────────────────────────────────┐   │
│  │ istiod (CA) ──► Auto-renewal every 24h                 │   │
│  │              ──► SPIFFE-based identity                 │   │
│  │              ──► Root CA validation                    │   │
│  └─────────────────────────────────────────────────────────┘   │
│                                                                 │
│  Security Policies:                                            │
│  ┌─────────────────────────────────────────────────────────┐   │
│  │ PeerAuthentication: STRICT                              │   │
│  │ AuthorizationPolicy: RBAC rules                        │   │
│  │ DestinationRule: TLS settings                          │   │
│  └─────────────────────────────────────────────────────────┘   │
└─────────────────────────────────────────────────────────────────┘
DNS 프록시 이해하기 - 심화 분석
DNS 프록시가 클러스터 호스트네임을 해석하는 방법 - 완전 가이드
Istio의 DNS 프록시는 서비스 메시 내에서 효율적이고 일관된 호스트네임 해석을 제공하는 핵심 컴포넌트이다. 이는 단순한 DNS 캐싱을 넘어서 서비스 메시의 트래픽 관리와 깊이 통합되어 있다.
DNS 프록시의 고급 기능
- 지능형 해석: 서비스 메시 내부와 외부 서비스를 자동으로 구분
- 가상 IP 할당: 클러스터 서비스에 대한 일관된 가상 IP 제공
- 멀티클러스터 지원: 여러 클러스터에 걸친 서비스 해석
- 워크로드 기반 라우팅: 워크로드 특성에 따른 차별화된 해석
DNS 해석 상세 과정 분석:
1단계: 클라이언트 DNS 쿼리 생성
# [forum-vm에서 실행]
# 애플리케이션에서 DNS 쿼리 발생
curl webapp.istioinaction.svc.cluster.local

# DNS 쿼리 패킷 분석
sudo tcpdump -i any -n "port 53" &
nslookup webapp.istioinaction.svc.cluster.local
# 패킷 캡처 결과 분석:
# 10.10.0.25.34567 > 127.0.0.53.53: UDP DNS query for webapp.istioinaction.svc.cluster.local
2단계: 운영체제 DNS 처리 과정
# [forum-vm에서 실행]
# hosts 파일 확인
cat /etc/hosts
# 127.0.0.1 localhost
# 127.0.1.1 forum-vm

# resolv.conf 확인
cat /etc/resolv.conf
# nameserver 127.0.0.53
# options edns0 trust-ad
# search istioinaction.svc.cluster.local svc.cluster.local cluster.local

# systemd-resolved 상태 확인
systemctl status systemd-resolved
resolvectl status
3단계: systemd-resolverd의 역할
# [forum-vm에서 실행]
# DNS 해석기 설정 확인
resolvectl dns
# Link 2 (ens3): 8.8.8.8 8.8.4.4
# Link 1 (lo): 127.0.0.53

# DNS 캐시 상태 확인
resolvectl statistics
# DNSSEC supported: yes
# Transactions: 1247
# Cache size: 156
4단계: iptables를 통한 DNS 프록시 리다이렉트
# [forum-vm에서 실행]
# DNS 트래픽 리다이렉트 규칙 상세 분석
iptables-save | grep 'to-ports 15053'
-A OUTPUT -d 127.0.0.53/32 -p udp -m udp --dport 53 -j REDIRECT --to-ports 15053
-A ISTIO_OUTPUT -d 127.0.0.53/32 -p tcp -m tcp --dport 53 -j REDIRECT --to-ports 15053

# NAT 테이블 전체 확인
iptables -t nat -L -n -v
Chain OUTPUT (policy ACCEPT 6 packets, 1519 bytes)
 pkts bytes target     prot opt in     out     source               destination
    6  1519 ISTIO_OUTPUT  6    --  *      *       0.0.0.0/0            0.0.0.0/0

Chain ISTIO_OUTPUT (1 references)
 pkts bytes target     prot opt in     out     source               destination
    1   291 RETURN     0    --  *      lo      127.0.0.6            0.0.0.0/0
    0     0 ISTIO_IN_REDIRECT  6    --  *      lo      0.0.0.0/0           !127.0.0.1            tcp dpt:!15008 owner UID match 1337
    0     0 RETURN     0    --  *      lo      0.0.0.0/0            0.0.0.0/0            !owner UID match 1337
    5  1228 RETURN     0    --  *      *       0.0.0.0/0            0.0.0.0/0            owner UID match 1337
    0     0 ISTIO_IN_REDIRECT  6    --  *      lo      0.0.0.0/0           !127.0.0.1            tcp dpt:!15008 owner GID match 1337
    0     0 RETURN     0    --  *      lo      0.0.0.0/0            0.0.0.0/0            !owner GID match 1337
    0     0 RETURN     0    --  *      *       0.0.0.0/0            0.0.0.0/0            owner GID match 1337
    0     0 ISTIO_REDIRECT  0    --  *      *       0.0.0.0/0            0.0.0.0/0
5단계: DNS 프록시의 지능형 처리
# [forum-vm에서 실행]
# DNS 프록시 프로세스 확인
netstat -ltunp | egrep 'PID|15053'
Proto Recv-Q Send-Q Local Address           Foreign Address         State       PID/Program name
tcp        0      0 127.0.0.1:15053        0.0.0.0:*               LISTEN      26955/pilot-agent
udp        0      0 127.0.0.1:15053        0.0.0.0:*                           26955/pilot-agent

# DNS 프록시 설정 확인
curl localhost:15000/config_dump | jq '.configs[] | select(.["@type"] | contains("type.googleapis.com/udpa.type.v1.TypedStruct"))'
6단계: 서비스 메시 내 DNS 해석 결과
# [forum-vm에서 실행]
# 클러스터 서비스 해석 테스트
dig @127.0.0.1 -p 15053 webapp.istioinaction.svc.cluster.local

# ; <<>> DiG 9.16.1-Ubuntu <<>> @127.0.0.1 -p 15053 webapp.istioinaction.svc.cluster.local
# ;; global options: +cmd
# ;; Got answer:
# ;; ->>HEADER<<- opcode: QUERY, status: NOERROR, id: 12345
# ;; flags: qr rd ra; QUERY: 1, ANSWER: 1, AUTHORITY: 0, ADDITIONAL: 1

# ;; QUESTION SECTION:
# ;webapp.istioinaction.svc.cluster.local. IN A

# ;; ANSWER SECTION:
# webapp.istioinaction.svc.cluster.local. 30 IN A 240.240.0.1

# Istio가 할당한 가상 IP 확인
nslookup webapp.istioinaction.svc.cluster.local
# Server:    127.0.0.53
# Address:   127.0.0.53#53
# Non-authoritative answer:
# Name: webapp.istioinaction.svc.cluster.local
# Address: 240.240.0.1
DNS 프록시 고급 설정 및 튜닝
# DNS 프록시 상세 설정 (istio-agent 시작 시)
ISTIO_META_DNS_CAPTURE: "true"
ISTIO_META_DNS_AUTO_ALLOCATE: "true"
ISTIO_META_DNS_DOMAIN: "cluster.local"
PILOT_ENABLE_DNS_CAPTURE: "true"
DNS 쿼리 흐름 모니터링
# [forum-vm에서 실행]
# 실시간 DNS 쿼리 모니터링
watch -d "iptables -v --numeric --table nat --list OUTPUT ; echo ; iptables -v --numeric --table nat --list ISTIO_OUTPUT"

# lo 인터페이스 트래픽 확인
tcpdump -nnqi lo not net 127.0.0.1
# 15:00:02.955442 IP 127.0.0.6.35151 > 10.10.0.26.http: tcp 239
# 15:00:02.955569 IP 10.10.0.26.http > 127.0.0.6.35151: tcp 238

# 네트워크 인터페이스 통계
watch -d ifconfig lo
# lo: flags=73<UP,LOOPBACK,RUNNING>  mtu 65536
#     inet 127.0.0.1  netmask 255.0.0.0
#     inet6 ::1  prefixlen 128  scopeid 0x10<host>
#     loop  txqueuelen 1000  (Local Loopback)
#     RX packets 127341  bytes 404699497 (385.9 MiB)
#     RX errors 0  dropped 0  overruns 0  frame 0
#     TX packets 127341  bytes 404699497 (385.9 MiB)
클러스터 서비스 호스트네임 해석의 흐름
┌─────────────────────────────────────────────────────────────────┐
│                    DNS Proxy Traffic Flow                       │
├─────────────────────────────────────────────────────────────────┤
│                                                                 │
│ 1. Application DNS Query                                        │
│    ┌─────────────────────────────────────────────────────┐     │
│    │ curl webapp.istioinaction.svc.cluster.local        │     │
│    └─────────────────────┬───────────────────────────────┘     │
│                          │                                     │
│ 2. OS DNS Resolution     ▼                                     │
│    ┌─────────────────────────────────────────────────────┐     │
│    │ /etc/hosts → /etc/resolv.conf → systemd-resolved   │     │
│    │ 127.0.0.53:53                                      │     │
│    └─────────────────────┬───────────────────────────────┘     │
│                          │                                     │
│ 3. iptables Redirect     ▼                                     │
│    ┌─────────────────────────────────────────────────────┐     │
│    │ OUTPUT → ISTIO_OUTPUT → REDIRECT                    │     │
│    │ :53 → :15053                                        │     │
│    └─────────────────────┬───────────────────────────────┘     │
│                          │                                     │
│ 4. DNS Proxy Processing  ▼                                     │
│    ┌─────────────────────────────────────────────────────┐     │
│    │ pilot-agent DNS proxy (127.0.0.1:15053)            │     │
│    │                                                     │     │
│    │ IF service mesh domain:                             │     │
│    │   └─► Return VIP (240.240.0.1)                     │     │
│    │ ELSE:                                               │     │
│    │   └─► Forward to upstream DNS                       │     │
│    └─────────────────────┬───────────────────────────────┘     │
│                          │                                     │
│ 5. Virtual IP Resolution ▼                                     │
│    ┌─────────────────────────────────────────────────────┐     │
│    │ webapp.istioinaction.svc.cluster.local              │     │
│    │            ↓                                        │     │
│    │      240.240.0.1 (VIP)                             │     │
│    └─────────────────────┬───────────────────────────────┘     │
│                          │                                     │
│ 6. Envoy Proxy Route     ▼                                     │
│    ┌─────────────────────────────────────────────────────┐     │
│    │ Outbound Listener (15001)                           │     │
│    │ └─► Cluster: outbound|80||webapp...                 │     │
│    │     └─► Real Endpoints: 10.244.1.5:8080            │     │
│    │                         10.244.1.6:8080            │     │
│    └─────────────────────────────────────────────────────┘     │
│                                                                 │
│ DNS Cache & Performance:                                       │
│ ┌─────────────────────────────────────────────────────────┐   │
│ │ • Local VIP allocation for consistent addressing       │   │
│ │ • 30s TTL for service mesh services                    │   │
│ │ • Automatic cleanup on service removal                 │   │
│ │ • Multi-cluster service discovery support              │   │
│ └─────────────────────────────────────────────────────────┘   │
└─────────────────────────────────────────────────────────────────┘
실습 내용
실습 1: VM Support 환경 구축
실습 1-1: 멀티 VM 환경에서의 서비스 메시 통합
시나리오: 여러 VM 인스턴스를 하나의 서비스 그룹으로 관리하며, 로드 밸런싱과 헬스 체크를 구현
# [Kubernetes 클러스터에서 실행]
# 3개 VM 인스턴스를 위한 WorkloadEntry 생성
for i in {1..3}; do
kubectl apply -f - <<EOF
apiVersion: networking.istio.io/v1alpha3
kind: WorkloadEntry
metadata:
  name: forum-vm-${i}
  namespace: istioinaction
  labels:
    app: forum
    version: vm
    auto-scaling: "true"
spec:
  address: "10.10.0.$(($i+24))"  # 10.10.0.25, 10.10.0.26, 10.10.0.27
  labels:
    app: forum
    version: vm
    auto-scaling: "true"
  serviceAccount: forum
  network: vm-network
  ports:
    http: 8080
    metrics: 9090
    health: 8081
  weight: $(( 100 + $i * 10 ))  # 차등 가중치 적용
EOF
done

# WorkloadEntry 목록 확인
kubectl get workloadentry -n istioinaction
NAME          AGE   ADDRESS
forum-vm-1    10s   10.10.0.25
forum-vm-2    8s    10.10.0.26
forum-vm-3    6s    10.10.0.27
로드 밸런싱 검증
# [Kubernetes 클러스터에서 실행]
# 클러스터에서 VM 서비스에 대한 로드 밸런싱 테스트
kubectl run loadbalancer-test --image=curlimages/curl --rm -it --restart=Never -- sh

# Pod 내부에서 실행
for i in {1..30}; do
  curl -s forum.istioinaction.svc.cluster.local:8081/health | jq -r '.instance_id'
  sleep 0.5
done
# 출력 예시:
# vm-1
# vm-2
# vm-1
# vm-3
# vm-2
# ... (가중치에 따른 분산 확인)

# 엔드포인트 분산 상태 확인
kubectl get endpoints forum -n istioinaction -o yaml
실습 1-2: VM 애플리케이션 배포 및 서비스 등록
간단한 웹 서비스 배포 (각 VM에서 실행)
# [각 forum-vm에서 실행]
# Node.js 간단한 웹 서버 생성
cat > /tmp/forum-app.js <<'EOF'
const http = require('http');
const os = require('os');

const hostname = os.hostname();
const port = 8080;

const server = http.createServer((req, res) => {
  const timestamp = new Date().toISOString();

  if (req.url === '/health') {
    res.writeHead(200, { 'Content-Type': 'application/json' });
    res.end(JSON.stringify({
      status: 'healthy',
      hostname: hostname,
      timestamp: timestamp,
      instance_id: process.env.INSTANCE_ID || 'unknown',
      version: '1.0.0'
    }));
  } else if (req.url === '/api/posts') {
    res.writeHead(200, { 'Content-Type': 'application/json' });
    res.end(JSON.stringify({
      posts: [
        { id: 1, title: 'VM Integration with Istio', author: 'DevOps Team' },
        { id: 2, title: 'Service Mesh Best Practices', author: 'Platform Team' }
      ],
      served_by: hostname,
      timestamp: timestamp
    }));
  } else {
    res.writeHead(200, { 'Content-Type': 'text/html' });
    res.end(`
      <html>
        <head><title>Forum VM Service</title></head>
        <body>
          <h1>Forum Service - VM Instance</h1>
          <p>Hostname: ${hostname}</p>
          <p>Timestamp: ${timestamp}</p>
          <p>Instance ID: ${process.env.INSTANCE_ID || 'unknown'}</p>
          <hr>
          <a href="/api/posts">View Posts API</a><br>
          <a href="/health">Health Check</a>
        </body>
      </html>
    `);
  }
});

server.listen(port, () => {
  console.log(`Forum service running at http://localhost:${port}/`);
  console.log(`Instance: ${hostname}`);
});
EOF

# Node.js 설치 (Ubuntu 기준)
curl -fsSL https://deb.nodesource.com/setup_18.x | sudo -E bash -
sudo apt-get install -y nodejs

# 환경 변수 설정 및 서비스 시작
export INSTANCE_ID="vm-$(hostname | cut -d'-' -f3)"
node /tmp/forum-app.js &

# 서비스 등록 (systemd)
sudo tee /etc/systemd/system/forum-app.service <<EOF
[Unit]
Description=Forum Application
After=network.target

[Service]
Type=simple
User=ubuntu
Environment="INSTANCE_ID=vm-$(hostname | cut -d'-' -f3)"
ExecStart=/usr/bin/node /tmp/forum-app.js
Restart=always
RestartSec=5

[Install]
WantedBy=multi-user.target
EOF

sudo systemctl enable forum-app
sudo systemctl start forum-app
sudo systemctl status forum-app
실습 2: 트래픽 흐름 분석 및 모니터링
실습 2-1: Envoy 프록시 상세 분석
Envoy 설정 및 통계 심화 분석
# [forum-vm에서 실행]
# Envoy 전체 설정 덤프 및 분석
curl -s localhost:15000/config_dump | jq . > /tmp/envoy-config.json

# 클러스터 설정 분석
curl -s localhost:15000/config_dump | jq '.configs[2].dynamic_active_clusters[] | select(.cluster.name | contains("outbound"))'

# 리스너 설정 확인
curl -s localhost:15000/config_dump | jq '.configs[1].dynamic_active_listeners[]'

# 라우트 설정 확인
curl -s localhost:15000/config_dump | jq '.configs[3].dynamic_route_configs[]'

# 실시간 통계 모니터링
watch -d -n 2 'curl -s localhost:15000/stats | grep -E "(cluster\.|server\.|listener\.)" | head -20'

# 특정 서비스에 대한 통계
curl -s localhost:15000/stats | grep webapp | sort
연결 상태 및 성능 메트릭 분석
# [forum-vm에서 실행]
# 활성 연결 상태
curl -s localhost:15000/clusters | awk -F'::' '{print $1 "::" $2}' | sort | uniq -c

# 서킷 브레이커 상태
curl -s localhost:15000/stats | grep -E "(outlier_detection|circuit_breakers)"

# 요청 성공률 및 지연시간
curl -s localhost:15000/stats | grep -E "(upstream_rq_|upstream_cx_)"

# 메모리 및 CPU 사용량
curl -s localhost:15000/stats | grep -E "(memory|cpu)"
실습 2-2: 분산 트레이싱 구현
Jaeger 트레이싱 설정
# [Kubernetes 클러스터에서 실행]
# Jaeger 설치
kubectl apply -f https://raw.githubusercontent.com/istio/istio/release-1.17/samples/addons/jaeger.yaml

# Jaeger 서비스 확인
kubectl get pods -n istio-system | grep jaeger
jaeger-5d44bc5c5d-xyz12    1/1     Running   0          2m

# 포트 포워딩으로 Jaeger UI 접근 설정
kubectl port-forward -n istio-system svc/jaeger 16686:16686 &
트레이싱 테스트 및 분석
# [forum-vm에서 실행]
# 트레이싱 헤더와 함께 요청 전송
for i in {1..10}; do
  TRACE_ID=$(openssl rand -hex 16)
  SPAN_ID=$(openssl rand -hex 8)

  curl -H "x-trace-id: ${TRACE_ID}" \
       -H "x-span-id: ${SPAN_ID}" \
       -H "x-b3-traceid: ${TRACE_ID}" \
       -H "x-b3-spanid: ${SPAN_ID}" \
       -H "x-b3-sampled: 1" \
       webapp.istioinaction.svc.cluster.local/api/catalog

  echo "Trace ID: ${TRACE_ID}"
  sleep 2
done

# VM 애플리케이션에서 아웃바운드 트레이싱 확인
curl -H "x-request-id: $(uuidgen)" \
     -H "x-b3-sampled: 1" \
     localhost:8080/api/posts
실습 3: 고급 트래픽 관리 및 보안
실습 3-1: 카나리 배포 및 A/B 테스팅
VM과 클러스터 워크로드 간 트래픽 분할
# VM 서비스의 새 버전을 위한 VirtualService
apiVersion: networking.istio.io/v1alpha3
kind: VirtualService
metadata:
  name: forum-canary
  namespace: istioinaction
spec:
  hosts:
  - forum.istioinaction.svc.cluster.local
  http:
  - match:
    - headers:
        canary-user:
          exact: "true"
    route:
    - destination:
        host: forum.istioinaction.svc.cluster.local
        subset: vm-v2
      weight: 100
  - route:
    - destination:
        host: forum.istioinaction.svc.cluster.local
        subset: vm-v1
      weight: 90
    - destination:
        host: forum.istioinaction.svc.cluster.local
        subset: vm-v2
      weight: 10
---
apiVersion: networking.istio.io/v1alpha3
kind: DestinationRule
metadata:
  name: forum-subsets
  namespace: istioinaction
spec:
  host: forum.istioinaction.svc.cluster.local
  subsets:
  - name: vm-v1
    labels:
      version: v1
  - name: vm-v2
    labels:
      version: v2
카나리 배포 테스트
# [Kubernetes 클러스터에서 실행]
# 일반 사용자 트래픽 (90% v1, 10% v2)
for i in {1..20}; do
  curl -s forum.istioinaction.svc.cluster.local:8080 | grep "Version:" | cut -d' ' -f2
done

# 카나리 사용자 트래픽 (100% v2)
for i in {1..10}; do
  curl -H "canary-user: true" -s forum.istioinaction.svc.cluster.local:8080 | grep "Version:" | cut -d' ' -f2
done
실습 3-2: 고급 보안 정책 구현
네트워크 정책과 인가 정책의 조합
# 세밀한 접근 제어 정책
apiVersion: security.istio.io/v1beta1
kind: AuthorizationPolicy
metadata:
  name: forum-rbac-policy
  namespace: istioinaction
spec:
  selector:
    matchLabels:
      app: forum
  rules:
  # 관리자만 전체 API 접근 가능
  - from:
    - source:
        principals: ["cluster.local/ns/istioinaction/sa/admin"]
    to:
    - operation:
        methods: ["GET", "POST", "PUT", "DELETE"]
        paths: ["/api/*"]
    when:
    - key: request.headers[role]
      values: ["admin"]

  # 일반 사용자는 읽기만 가능
  - from:
    - source:
        principals: ["cluster.local/ns/istioinaction/sa/webapp"]
    to:
    - operation:
        methods: ["GET"]
        paths: ["/api/posts", "/api/users"]
    when:
    - key: request.time.hour
      values: ["9", "10", "11", "12", "13", "14", "15", "16", "17"]  # 업무 시간만

  # 헬스 체크는 모든 시스템 계정에서 접근 가능
  - from:
    - source:
        principals: ["cluster.local/ns/istio-system/sa/istio-proxy"]
    to:
    - operation:
        methods: ["GET"]
        paths: ["/health", "/metrics"]
실습 4: 성능 최적화 및 모니터링
실습 4-1: 메트릭 수집 및 분석
Prometheus 메트릭 설정
# ServiceMonitor for VM workloads
apiVersion: monitoring.coreos.com/v1
kind: ServiceMonitor
metadata:
  name: forum-vm-metrics
  namespace: istioinaction
spec:
  selector:
    matchLabels:
      app: forum
  endpoints:
  - port: metrics
    interval: 30s
    path: /stats/prometheus
  - port: app-metrics
    interval: 30s
    path: /metrics
    scheme: http
커스텀 대시보드를 위한 Grafana 설정
# [Kubernetes 클러스터에서 실행]
# Grafana 설치
kubectl apply -f https://raw.githubusercontent.com/istio/istio/release-1.17/samples/addons/grafana.yaml

# Grafana 포트 포워딩
kubectl port-forward -n istio-system svc/grafana 3000:3000 &

# VM 메트릭 확인을 위한 쿼리 예시
cat > /tmp/vm-metrics-queries.promql <<'EOF'
# VM 인스턴스별 요청률
sum(rate(istio_requests_total{destination_workload="forum-vm"}[5m])) by (destination_workload_namespace, destination_workload, source_workload)

# VM 인스턴스별 응답 시간
histogram_quantile(0.99,
  sum(rate(istio_request_duration_milliseconds_bucket{destination_workload="forum-vm"}[5m]))
  by (destination_workload, le)
)

# VM 인스턴스별 오류율
sum(rate(istio_requests_total{destination_workload="forum-vm",response_code!~"2.."}[5m]))
/
sum(rate(istio_requests_total{destination_workload="forum-vm"}[5m])) * 100

# Envoy 메모리 사용량 (VM별)
envoy_server_memory_allocated_bytes{instance=~".*forum-vm.*"}

# 활성 연결 수
envoy_cluster_upstream_cx_active{cluster_name=~".*forum.*"}
EOF
실습 4-2: 성능 튜닝 및 최적화
연결 풀 및 서킷 브레이커 최적화
apiVersion: networking.istio.io/v1alpha3
kind: DestinationRule
metadata:
  name: forum-performance-tuning
  namespace: istioinaction
spec:
  host: forum.istioinaction.svc.cluster.local
  trafficPolicy:
    connectionPool:
      tcp:
        maxConnections: 50          # VM 리소스에 맞게 조정
        connectTimeout: 10s
        keepAlive:
          time: 7200s
          interval: 75s
      http:
        http1MaxPendingRequests: 100  # 대기열 크기
        http2MaxRequests: 1000
        maxRequestsPerConnection: 10
        maxRetries: 3
        consecutiveGatewayErrors: 3
        h2UpgradePolicy: UPGRADE      # HTTP/2 강제 업그레이드
    loadBalancer:
      simple: LEAST_CONN              # VM 환경에서 효과적
      consistentHash:
        httpCookie:
          name: "session-id"
          ttl: 3600s
    outlierDetection:
      consecutiveErrors: 3
      interval: 30s
      baseEjectionTime: 30s
      maxEjectionPercent: 50
      minHealthPercent: 30            # 최소 건강한 인스턴스 비율
VM 시스템 레벨 최적화
# [각 forum-vm에서 실행]
# 네트워크 성능 튜닝
sudo sysctl -w net.core.somaxconn=32768
sudo sysctl -w net.core.netdev_max_backlog=5000
sudo sysctl -w net.ipv4.tcp_max_syn_backlog=8192
sudo sysctl -w net.ipv4.tcp_fin_timeout=30

# 파일 디스크립터 한계 증가
echo "* soft nofile 65536" | sudo tee -a /etc/security/limits.conf
echo "* hard nofile 65536" | sudo tee -a /etc/security/limits.conf

# Envoy 프록시 메모리 최적화
# cluster.env에 추가
echo "PILOT_ENABLE_WORKLOAD_ENTRY_MEMORY_OPTIMIZATION=true" | sudo tee -a /var/lib/istio/envoy/cluster.env

# systemd 서비스 리소스 제한
sudo tee /etc/systemd/system/istio.service.d/resource-limits.conf <<EOF
[Service]
MemoryMax=1G
CPUQuota=200%
EOF

sudo systemctl daemon-reload
sudo systemctl restart istio
실습 5: 트러블슈팅 및 문제 해결
실습 5-1: 일반적인 문제 해결
네트워크 연결 문제 진단
# [forum-vm에서 실행]
# 1. 기본 네트워크 연결성 확인
ping -c 3 <EAST_WEST_GATEWAY_IP>
telnet <EAST_WEST_GATEWAY_IP> 15012

# 2. DNS 해석 문제 진단
nslookup webapp.istioinaction.svc.cluster.local
dig @127.0.0.1 -p 15053 webapp.istioinaction.svc.cluster.local

# 3. iptables 규칙 확인
sudo iptables-save | grep "15053"

# 4. 인증서 문제 진단
curl -v localhost:15000/certs | jq '.certificates[] | {uri, valid_from, valid_to}'

# 5. istiod 연결 상태 확인
curl -v localhost:15000/stats | grep "control_plane.connected_state"
Envoy 프록시 문제 진단
# [forum-vm에서 실행]
# Envoy 프로세스 상태 확인
ps aux | grep envoy
systemctl status istio

# Envoy 로그 분석
sudo journalctl -u istio -f --since "10 minutes ago" | grep -E "(error|Error|ERROR|warn|Warn|WARN)"

# 설정 동기화 상태 확인
curl localhost:15000/config_dump | jq '.configs[0].bootstrap.node'

# 업스트림 클러스터 헬스 확인
curl localhost:15000/clusters | grep -E "(HEALTHY|UNHEALTHY)" | sort

# 리스너 상태 확인
curl localhost:15000/listeners | jq '.listener_statuses[]'
실습 5-2: 성능 문제 진단 및 해결
지연시간 분석
# [forum-vm에서 실행]
# 요청별 지연시간 분석
curl -w "@-" -o /dev/null -s "webapp.istioinaction.svc.cluster.local" <<'EOF'
     time_namelookup:  %{time_namelookup}\n
        time_connect:  %{time_connect}\n
     time_appconnect:  %{time_appconnect}\n
    time_pretransfer:  %{time_pretransfer}\n
       time_redirect:  %{time_redirect}\n
  time_starttransfer:  %{time_starttransfer}\n
                     ----------\n
          time_total:  %{time_total}\n
EOF

# Envoy 내부 지연시간 확인
curl localhost:15000/stats | grep -E "(downstream_rq_time|upstream_rq_time)" | sort

# 연결 풀 상태 확인
curl localhost:15000/stats | grep -E "(cx_pool|cx_active|cx_connect_fail)"
메모리 및 CPU 사용량 분석
# [forum-vm에서 실행]
# Envoy 메모리 사용량 상세 분석
curl localhost:15000/memory | jq .

# 시스템 리소스 모니터링
iostat -x 1 5
free -h
top -p $(pgrep pilot-agent) -p $(pgrep envoy)

# Envoy 내부 메트릭
curl localhost:15000/stats | grep -E "(memory|buffer|heap)" | sort
트러블슈팅 가이드
공통 문제 해결 방법
1. VM 등록 실패
# 문제: WorkloadEntry가 인식되지 않음
# 해결:
kubectl get workloadentry -n istioinaction
kubectl describe workloadentry forum-vm-1 -n istioinaction

# 네트워크 설정 확인
kubectl get configmap istio -n istio-system -o yaml | grep defaultConfig -A 20
2. mTLS 인증 실패
# 문제: 인증서 관련 오류
# 해결:
curl localhost:15000/certs | jq '.certificates[] | select(.cert_chain != null)'

# 인증서 갱신
sudo systemctl restart istio
3. DNS 해석 문제
VM Support 문제 해결 플로우차트
┌─────────────────────────────────────────────────────────────────┐
│                  VM Support Troubleshooting Flow               │
├─────────────────────────────────────────────────────────────────┤
│                                                                 │
│  Issue Reported                                                │
│        │                                                       │
│        ▼                                                       │
│  ┌─────────────────┐                                           │
│  │ Connectivity    │                                           │
│  │ Problem?        │─────► YES ──┐                             │
│  └─────────────────┘              │                            │
│        │                          │                            │
│        │ NO                       ▼                            │
│        ▼                    ┌─────────────────┐                │
│  ┌─────────────────┐        │ Network Checks  │                │
│  │ DNS Resolution  │        │ • ping gateway  │                │
│  │ Problem?        │─────► YES ──► telnet :15012  │                │
│  └─────────────────┘        │ • firewall      │                │
│        │                    │ • routing       │                │
│        │ NO                 └─────────────────┘                │
│        ▼                                                       │
│  ┌─────────────────┐                                           │
│  │ Certificate     │                                           │
│  │ Problem?        │─────► YES ──┐                             │
│  └─────────────────┘              │                            │
│        │                          │                            │
│        │ NO                       ▼                            │
│        ▼                    ┌─────────────────┐                │
│  ┌─────────────────┐        │ Certificate     │                │
│  │ Service         │        │ Diagnostics     │                │
│  │ Registration    │        │ • Check expiry  │                │
│  │ Problem?        │─────► YES ──► curl :15000/certs │                │
│  └─────────────────┘        │ • Restart agent │                │
│        │                    └─────────────────┘                │
│        │ NO                                                    │
│        ▼                                                       │
│  ┌─────────────────┐                                           │
│  │ Performance     │                                           │
│  │ Issue?          │─────► YES ──┐                             │
│  └─────────────────┘              │                            │
│        │                          │                            │
│        │ NO                       ▼                            │
│        ▼                    ┌─────────────────┐                │
│  ┌─────────────────┐        │ Performance     │                │
│  │ Advanced        │        │ Analysis        │                │
│  │ Debugging       │        │ • Memory usage  │                │
│  └─────────────────┘        │ • Connection    │                │
│                             │   pools         │                │
│  Common Solutions:          │ • Latency       │                │
│  • Restart istio service   │   metrics       │                │
│  • Check WorkloadEntry     └─────────────────┘                │
│  • Verify iptables rules                                       │
│  • Review istiod logs                                          │
│  • Check resource limits                                       │
│                                                                 │
│  Debug Commands:                                               │
│  ┌─────────────────────────────────────────────────────────┐   │
│  │ $ curl localhost:15000/ready                            │   │
│  │ $ curl localhost:15000/clusters                         │   │
│  │ $ iptables-save | grep 15053                            │   │
│  │ $ journalctl -u istio -f                                │   │
│  │ $ kubectl describe workloadentry <name>                 │   │
│  └─────────────────────────────────────────────────────────┘   │
└─────────────────────────────────────────────────────────────────┘
핵심 포인트
VM Support의 핵심 가치
- 하이브리드 아키텍처 지원: 기존 VM과 새로운 컨테이너 워크로드의 원활한 통합
- 일관된 정책 적용: 보안, 트래픽 관리, 관찰성을 모든 워크로드에 동일하게 적용
- 점진적 마이그레이션: Big Bang 방식이 아닌 단계적 클라우드 네이티브 전환 지원
- 운영 복잡성 감소: 단일 컨트롤 플레인으로 이기종 환경 관리
DNS 프록시의 혁신
- 지능형 서비스 디스커버리: 메시 내부와 외부 서비스를 자동으로 구분
- 투명한 트래픽 인터셉트: 애플리케이션 코드 변경 없이 메시 통합
- 성능 최적화: 로컬 캐싱과 효율적인 라우팅으로 지연시간 최소화
- 확장성: 멀티클러스터 환경에서도 일관된 서비스 이름 해석
고급 시나리오
멀티클러스터 VM 통합
# 클러스터 간 VM 워크로드 공유
apiVersion: networking.istio.io/v1alpha3
kind: ServiceEntry
metadata:
  name: cross-cluster-vm-service
  namespace: istioinaction
spec:
  hosts:
  - forum.remote-cluster.local
  ports:
  - number: 8080
    name: http
  location: MESH_EXTERNAL
  resolution: DNS
  addresses:
  - 240.240.1.10  # 원격 클러스터의 가상 IP
  endpoints:
  - address: forum-vm.remote-datacenter.com
    ports:
      http: 8080
자동 스케일링 구현
# VM 인스턴스 자동 등록 스크립트
#!/bin/bash
WORKLOAD_GROUP="forum-vm"
NAMESPACE="istioinaction"
VM_IP=$(curl -s http://169.254.169.254/latest/meta-data/local-ipv4)
INSTANCE_ID=$(curl -s http://169.254.169.254/latest/meta-data/instance-id)

# WorkloadEntry 동적 생성
kubectl apply -f - <<EOF
apiVersion: networking.istio.io/v1alpha3
kind: WorkloadEntry
metadata:
  name: forum-vm-${INSTANCE_ID}
  namespace: ${NAMESPACE}
  labels:
    app: forum
    version: vm
    auto-scaling: "true"
spec:
  address: "${VM_IP}"
  labels:
    app: forum
    version: vm
    auto-scaling: "true"
  serviceAccount: forum
  network: vm-network
  ports:
    http: 8080
    metrics: 9090
    health: 8081
EOF
공식 문서
추가 학습 자료
이번 8주차 스터디를 통해 Istio의 VM Support와 DNS 프록시의 동작 원리를 심도 있게 학습했다.
주요 성과: - O VM과 Kubernetes 클러스터의 완전한 서비스 메시 통합 - O DNS 프록시를 통한 투명한 서비스 디스커버리 구현 - O 하이브리드 환경에서의 일관된 보안 정책 적용 - O 실무 중심의 트러블슈팅 및 성능 최적화 경험
VM Support는 Istio가 단순한 Kubernetes 서비스 메시를 넘어서 진정한 하이브리드 클라우드 플랫폼으로 진화할 수 있게 해주는 핵심 기능이다. 이를 통해 기업들은 기존 투자를 보호하면서도 현대적인 클라우드 네이티브 아키텍처의 이점을 누릴 수 있다.