EKS 소개 및 배포
Week 1 학습 주제: Amazon EKS의 기본 개념을 이해하고, eksctl, Terraform, CloudFormation을 활용한 다양한 배포 방법과 EKS Cluster Endpoint Access 전략을 학습한다.
Amazon EKS 소개
1. Amazon EKS
Amazon EKS (Elastic Kubernetes Service)
- AWS에서 제공하는 관리형 Kubernetes 서비스
- Kubernetes Control Plane을 AWS가 완전 관리
- 자동 업그레이드, 패치, 백업 지원
- AWS 서비스와 네이티브 통합
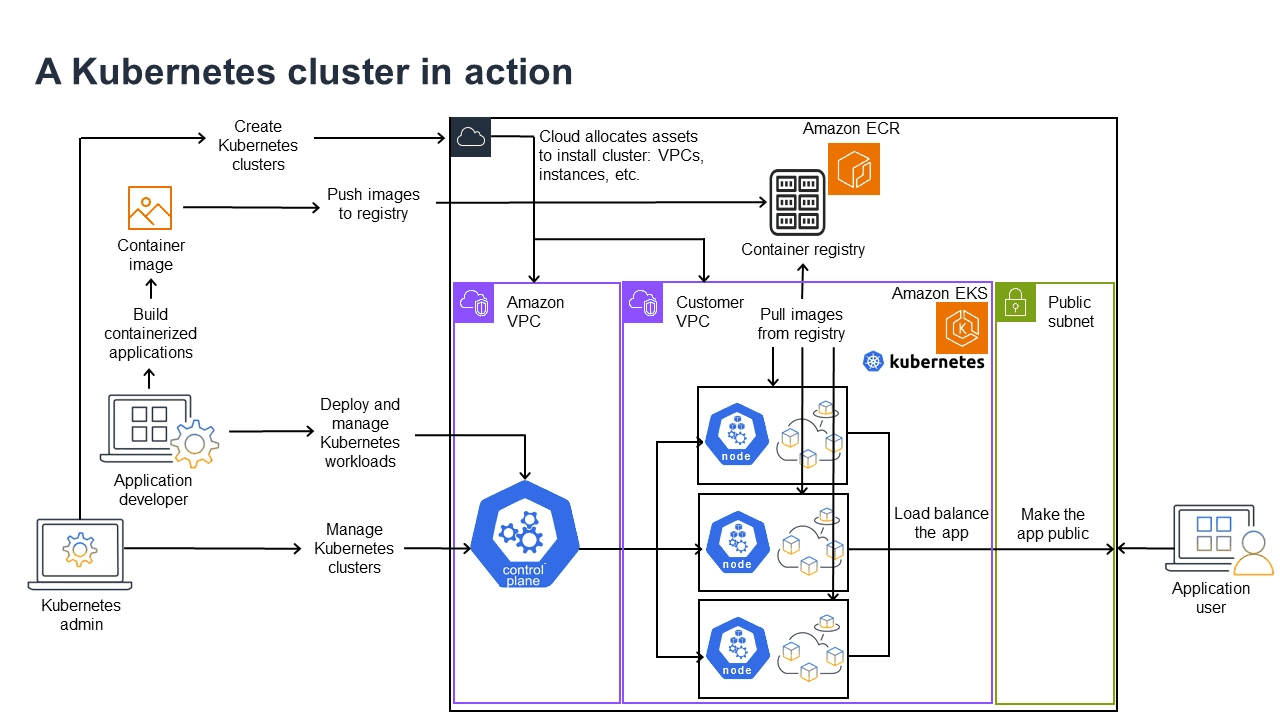
관리자와 개발자의 동선이 다르다는 점이 눈에 띈다. 클러스터 관리자는 control plane을 상대하고, 애플리케이션 개발자는 이미지를 ECR에 올린 뒤 워크로드를 배포한다. control plane은 AWS 소유 VPC에, 노드는 고객 VPC에 각각 놓이며, 사용자 트래픽은 public subnet의 로드밸런서를 통해 들어온다.
EKS 클러스터는 두 가지로 구성된다:
- Managed Control Plane (AWS 관리):
- API Server instances (Multi-AZ HA)
- etcd instances (자동 백업)
- Controller Manager
-
Scheduler
-
EC2 Managed Instances (사용자 관리 또는 AWS 관리):
- Self-managed Node Groups (사용자 직접 관리)
- Managed Node Groups (AWS 관리)
- Fargate (서버리스)
graph TB
    subgraph "EKS Control Plane (AWS 관리)"
        A[API Server]
        B[etcd]
        C[Controller Manager]
        D[Scheduler]
    end

    subgraph "Data Plane (사용자 선택)"
        E[EC2 Managed<br/>Node Groups]
        F[Self-Managed<br/>Nodes]
        G[AWS Fargate<br/>Serverless]
    end

    subgraph "Supporting AWS Services"
        H[Application LB]
        I[Network LB]
        J[EBS Volumes]
        K[EFS]
    end

    A --> E
    A --> F
    A --> G
    E --> H
    E --> I
    E --> J
    F --> K
2. EKS vs Vanilla Kubernetes
| 항목 | Vanilla Kubernetes (k8s) | Amazon EKS |
|---|---|---|
| Control Plane 관리 | 사용자 직접 관리 | AWS 관리 (HA, 백업, 패치) |
| 업그레이드 | 수동 (kubeadm) | AWS 콘솔/CLI 원클릭 |
| etcd 백업 | 수동 스크립트 | 자동 백업 (AWS 관리) |
| HA 구성 | 수동 설정 (3 Control Plane) | 기본 Multi-AZ 구성 |
| 보안 패치 | 수동 적용 | AWS 자동 적용 |
| AWS 통합 | 수동 설정 (IAM, VPC 등) | 네이티브 통합 |
| 비용 | 인프라 비용만 | Control Plane $0.10/시간 + 인프라 |
| 관리 복잡도 | 높음 | 낮음 (AWS가 관리) |
EKS Auto Mode: - Control Plane뿐만 아니라 Node, Storage, Load Balancing까지 자동 관리 - Karpenter, EBS CSI Driver, AWS Load Balancer Controller 등 자동 설치 - 인프라 걱정 없이 Kubernetes API만 사용
3. EKS 기능
3.1 관리 인터페이스
EKS는 다양한 관리 방법을 제공한다:
| 관리 방법 | 설명 |
|---|---|
| AWS Management Console | 웹 UI를 통한 클러스터 관리 |
| Amazon EKS API/SDK | 프로그래매틱 액세스 |
| AWS CDK | Infrastructure as Code (TypeScript, Python 등) |
| AWS CLI | 명령줄 인터페이스 |
| eksctl CLI | EKS 전용 CLI 도구 |
| AWS CloudFormation | YAML/JSON 템플릿 기반 배포 |
| Terraform | HashiCorp의 IaC 도구 |
3.2 액세스 제어
Kubernetes 및 AWS Identity and Access Management(IAM) 통합:
- IAM 인증: AWS IAM 사용자/역할로 Kubernetes 인증
- RBAC: Kubernetes 네이티브 권한 관리
- IRSA (IAM Roles for Service Accounts): Pod에 IAM 역할 부여
3.3 컴퓨팅 리소스
다양한 컴퓨팅 옵션 제공:
| 컴퓨팅 옵션 | 설명 |
|---|---|
| Amazon EC2 인스턴스 | Nitro, Graviton 등 다양한 인스턴스 타입 |
| AWS Fargate | 서버리스 컨테이너 실행 |
| Spot Instances | 저렴한 비용 (최대 90% 절감) |
| Karpenter | 자동 스케일링 (EKS Auto Mode) |
| Bottlerocket OS | 컨테이너 최적화 OS |
3.4 스토리지
EKS Auto Mode는 다양한 스토리지 옵션을 자동 관리:
| 스토리지 옵션 | 설명 |
|---|---|
| Amazon EBS | 블록 스토리지 (CSI Driver 자동 설치) |
| Amazon EFS | 파일 시스템 (다중 AZ 공유) |
| Amazon FSx | 고성능 파일 시스템 |
| Amazon EBS CSI Driver | Kubernetes PersistentVolume 지원 |
3.5 모니터링 및 로깅
관찰성 도구 통합:
- Prometheus, CloudWatch, Grafana: 메트릭 수집 및 시각화
- EKS 클러스터 로깅: Control Plane 로그 CloudWatch로 전송
- Container Insights: 컨테이너 메트릭 및 로그 통합
3.6 k8s 호환성 및 자동 업데이트
Kubernetes 호환성:
- 표준 Kubernetes API 완전 지원
- Upstream Kubernetes와 동일한 동작
- 커뮤니티 도구 및 플러그인 사용 가능
버전 업데이트:
- 최신 Kubernetes 버전 지원 (약 14개월 지원)
- Extended Support: 추가 12개월 지원 (총 26개월)
- In-place 업그레이드: 클러스터 재생성 불필요
- Managed Node Group: 자동 롤링 업데이트
4. EKS 요금
Amazon EKS 요금 구조:
- Control Plane: $0.10/시간 (약 $73/월)
- EC2 Worker Nodes: EC2 인스턴스 요금 (온디맨드/예약/Spot)
- Fargate: vCPU/메모리 사용량 기반
- EBS Volumes: EBS 볼륨 요금 (GB당)
- Network LB: NLB 요금 (시간당 + 데이터 전송)
- Application LB: ALB 요금 (시간당 + LCU)
- Data Transfer: VPC 간 데이터 전송 요금
예시 계산 (Small 클러스터): - Control Plane: $73/월 - 2x t3.medium (Worker): $60/월 - 100GB EBS: $10/월 - Total: 약 $143/월
EKS 아키텍처
1. Control Plane 관리
AWS가 관리하는 Control Plane 컴포넌트:
graph TB
    subgraph "AWS Managed Control Plane"
        subgraph "AZ-1"
            API1[API Server 1]
            ETCD1[etcd 1]
        end
        subgraph "AZ-2"
            API2[API Server 2]
            ETCD2[etcd 2]
        end
        subgraph "AZ-3"
            API3[API Server 3]
            ETCD3[etcd 3]
        end

        CM[Controller Manager<br/>Leader Election]
        SCH[Scheduler<br/>Leader Election]
    end

    subgraph "Customer VPC"
        LB[Network Load Balancer<br/>API Endpoint]
        WN1[Worker Node 1]
        WN2[Worker Node 2]
    end

    API1 --> ETCD1
    API2 --> ETCD2
    API3 --> ETCD3

    ETCD1 <--> ETCD2
    ETCD2 <--> ETCD3
    ETCD3 <--> ETCD1

    LB --> API1
    LB --> API2
    LB --> API3

    CM -.-> API1
    SCH -.-> API2

    WN1 --> LB
    WN2 --> LB
- Multi-AZ HA: 3개 AZ에 분산 배치
- Auto Scaling: API Server 자동 스케일링
- Automatic Backup: etcd 자동 백업 (AWS S3)
- Security Patching: AWS가 보안 패치 자동 적용
- Monitoring: Control Plane 메트릭 CloudWatch 전송
2. Data Plane 선택
EKS는 3가지 Data Plane 옵션을 제공한다:
2.1 Self-Managed Node Groups
- 사용자가 직접 EC2 인스턴스 관리
- 완전한 제어권 (Custom AMI, User Data 등)
- 업데이트 책임: 사용자가 직접 업그레이드
2.2 Managed Node Groups (권장)
- AWS가 노드 라이프사이클 관리
- 자동 업데이트: Kubernetes 버전 업그레이드 시 자동 롤링 업데이트
- ASG 통합: Auto Scaling Group 자동 생성
- Spot Instance 지원
2.3 AWS Fargate (서버리스)
- 서버리스 컨테이너 실행
- 노드 관리 불필요
- Pod 단위 과금 (vCPU/메모리)
- 제한사항: DaemonSet, HostNetwork, Privileged Container 불가
비교표:
| 특징 | Self-Managed | Managed Node Groups | Fargate |
|---|---|---|---|
| 관리 복잡도 | 높음 | 중간 | 낮음 |
| 제어권 | 완전 제어 | 부분 제어 | 제한적 |
| 자동 업데이트 | |||
| Spot 지원 | |||
| DaemonSet | |||
| 비용 | EC2 요금 | EC2 요금 | vCPU/메모리 요금 |
3. 네트워킹 구성
EKS 클러스터 네트워크 구성:
graph TB
    subgraph "AWS Managed VPC (Control Plane)"
        CP[API Server 기능성 보장<br/>백엔드 관리]
    end

    subgraph "Customer VPC"
        subgraph "Public Subnet (AZ-1)"
            NAT1[NAT Gateway]
            NLB1[Network LB]
        end

        subgraph "Public Subnet (AZ-2)"
            NAT2[NAT Gateway]
            NLB2[Network LB]
        end

        subgraph "Private Subnet (AZ-1)"
            WN1[Worker Node 1]
            POD1[Pods]
        end

        subgraph "Private Subnet (AZ-2)"
            WN2[Worker Node 2]
            POD2[Pods]
        end
    end

    CP --> NLB1
    CP --> NLB2
    NLB1 --> WN1
    NLB2 --> WN2
    WN1 --> POD1
    WN2 --> POD2
    WN1 -.Internet Access.-> NAT1
    WN2 -.Internet Access.-> NAT2
| 개념 | 설명 |
|---|---|
| VPC | Kubernetes 클러스터가 실행되는 격리된 네트워크 |
| 서브넷 | Public (NAT, LB) / Private (Worker 노드, Pod) |
| Security Group | 노드 간 통신 제어 |
| CNI 플러그인 | AWS VPC CNI (기본), Calico, Cilium 등 |
4. 클러스터 구성 요소
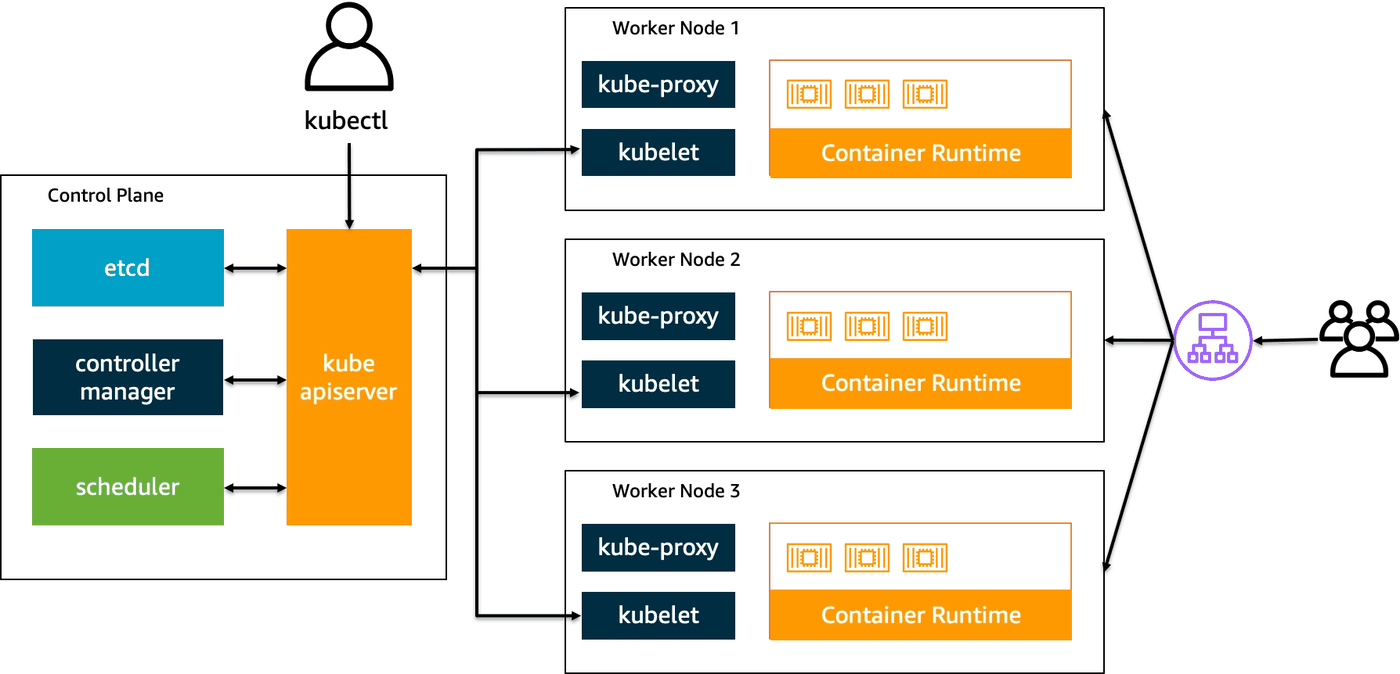
kubectl은 kube-apiserver로만 말을 걸고, apiserver가 etcd·controller manager·scheduler와 워커 노드의 kubelet 사이를 중계한다. 즉 apiserver가 유일한 관문이며, EKS에서 AWS가 관리해주는 영역이 왼쪽 Control Plane 박스에 해당한다.
EKS 클러스터를 구성하는 주요 컴포넌트:
4.1 Control Plane 컴포넌트 (AWS 관리)
| 컴포넌트 | 역할 | 비고 |
|---|---|---|
| API Server ( kube-apiserver) |
Kubernetes API 노출 | 모든 요청의 진입점 Network Load Balancer를 통해 접근 |
| etcd | 클러스터 상태 저장 (Key-Value) | Multi-AZ 복제 (Raft consensus) AWS가 자동 백업 관리 |
| Controller Manager ( kube-controller-manager) |
Deployment, ReplicaSet 등 리소스 관리 | Leader Election (단일 active 인스턴스) |
| Scheduler ( kube-scheduler) |
Pod를 적절한 노드에 스케줄링 | Leader Election |
4.2 Data Plane 컴포넌트 (Worker 노드)
| 컴포넌트 | 역할 | 비고 |
|---|---|---|
| kubelet | 노드에서 실행되는 에이전트 | API Server와 통신하여 Pod 관리 |
| kube-proxy | 네트워크 프록시 | Service IP to Pod IP 라우팅 |
| Container Runtime | 컨테이너 실행 환경 | containerd (권장), Docker (Deprecated) Kubernetes 1.24+는 dockershim 제거 |
4.3 클러스터 Add-ons (선택적 설치)
| Add-on | 역할 |
|---|---|
| CoreDNS | 클러스터 내부 DNS |
| AWS VPC CNI | Pod 네트워크 플러그인 |
| kube-proxy | Service 네트워크 프록시 |
| AWS Load Balancer Controller | ALB/NLB Ingress |
| Amazon EBS CSI Driver | EBS 볼륨 지원 (EKS Auto Mode는 자동) |
| Cluster Autoscaler / Karpenter | 노드 자동 스케일링 |
EKS 배포 방법
1. eksctl을 이용한 배포
eksctl은 EKS 클러스터를 가장 쉽게 배포할 수 있는 CLI 도구이다.
1.1 기본 클러스터 생성
# 가장 간단한 클러스터 생성 (기본 설정)
eksctl create cluster \
  --name myeks \
  --region ap-northeast-2 \
  --version 1.34 \
  --nodegroup-name ng-1 \
  --node-type t3.medium \
  --nodes 2 \
  --nodes-min 2 \
  --nodes-max 4

# 클러스터 생성 확인
kubectl get nodes
kubectl get pods -A
1.2 YAML 파일을 이용한 클러스터 생성
# cluster.yaml
apiVersion: eksctl.io/v1alpha5
kind: ClusterConfig

metadata:
  name: myeks
  region: ap-northeast-2
  version: "1.34"

# VPC 설정
vpc:
  cidr: 192.168.0.0/16
  nat:
    gateway: HighlyAvailable  # NAT Gateway HA 구성

# IAM OIDC Provider (IRSA 필수)
iam:
  withOIDC: true

# Managed Node Group
managedNodeGroups:
  - name: ng-1
    instanceType: t3.medium
    desiredCapacity: 2
    minSize: 2
    maxSize: 4
    volumeSize: 20
    ssh:
      allow: true
      publicKeyName: my-keypair
    labels:
      role: worker
    tags:
      nodegroup-name: ng-1
    iam:
      withAddonPolicies:
        imageBuilder: true
        autoScaler: true
        externalDNS: true
        certManager: true
        appMesh: true
        ebs: true
        efs: true
        albIngress: true
        cloudWatch: true

# CloudWatch 로깅 활성화
cloudWatch:
  clusterLogging:
    enableTypes: ["api", "audit", "authenticator", "controllerManager", "scheduler"]
# YAML 파일로 클러스터 생성
eksctl create cluster -f cluster.yaml

# 클러스터 정보 확인
eksctl get cluster
eksctl utils describe-stacks --region ap-northeast-2 --cluster myeks
1.3 클러스터 삭제
2. Terraform을 이용한 배포
Terraform은 Infrastructure as Code 도구로 재현 가능한 클러스터 배포가 가능한다.
2.1 Terraform 코드 작성
# main.tf
terraform {
  required_version = ">= 1.14.0"

  required_providers {
    aws = {
      source  = "hashicorp/aws"
      version = "~> 5.0"
    }
  }
}

provider "aws" {
  region = "ap-northeast-2"
}

# VPC 모듈 (terraform-aws-modules/vpc)
module "vpc" {
  source  = "terraform-aws-modules/vpc/aws"
  version = "5.0.0"

  name = "myeks-vpc"
  cidr = "10.0.0.0/16"

  azs             = ["ap-northeast-2a", "ap-northeast-2b", "ap-northeast-2c"]
  private_subnets = ["10.0.1.0/24", "10.0.2.0/24", "10.0.3.0/24"]
  public_subnets  = ["10.0.101.0/24", "10.0.102.0/24", "10.0.103.0/24"]

  enable_nat_gateway   = true
  single_nat_gateway   = true
  enable_dns_hostnames = true
  enable_dns_support   = true

  # EKS 태그 (필수)
  public_subnet_tags = {
    "kubernetes.io/role/elb" = "1"
  }

  private_subnet_tags = {
    "kubernetes.io/role/internal-elb" = "1"
  }

  tags = {
    Environment = "dev"
    Terraform   = "true"
  }
}

# EKS 모듈 (terraform-aws-modules/eks)
module "eks" {
  source  = "terraform-aws-modules/eks/aws"
  version = "~> 20.0"

  cluster_name    = "myeks"
  cluster_version = "1.34"

  cluster_endpoint_public_access  = true
  cluster_endpoint_private_access = false

  vpc_id     = module.vpc.vpc_id
  subnet_ids = module.vpc.private_subnets

  # Managed Node Group
  eks_managed_node_groups = {
    ng-1 = {
      name           = "ng-1"
      instance_types = ["t3.medium"]

      min_size     = 2
      max_size     = 4
      desired_size = 2

      disk_size = 20

      labels = {
        role = "worker"
      }

      tags = {
        NodeGroup = "ng-1"
      }
    }
  }

  # Cluster access entry
  enable_cluster_creator_admin_permissions = true

  tags = {
    Environment = "dev"
    Terraform   = "true"
  }
}

# Outputs
output "cluster_endpoint" {
  description = "Endpoint for EKS control plane"
  value       = module.eks.cluster_endpoint
}

output "cluster_name" {
  description = "Kubernetes Cluster Name"
  value       = module.eks.cluster_name
}
2.2 Terraform 실행
# Terraform 초기화
terraform init

# 계획 확인
terraform plan

# 클러스터 배포
terraform apply -auto-approve

# kubeconfig 업데이트
aws eks update-kubeconfig --region ap-northeast-2 --name myeks

# 클러스터 확인
kubectl get nodes
kubectl get pods -A

# 클러스터 삭제
terraform destroy -auto-approve
3. CloudFormation을 이용한 배포
AWS CloudFormation은 AWS 네이티브 IaC 도구이다.
3.1 CloudFormation 템플릿
# eks-cluster.yaml
AWSTemplateFormatVersion: '2010-09-09'
Description: 'EKS Cluster with CloudFormation'

Parameters:
  ClusterName:
    Type: String
    Default: myeks
    Description: EKS Cluster Name

  KubernetesVersion:
    Type: String
    Default: "1.34"
    Description: Kubernetes Version

Resources:
  # EKS Cluster IAM Role
  EKSClusterRole:
    Type: AWS::IAM::Role
    Properties:
      AssumeRolePolicyDocument:
        Version: '2012-10-17'
        Statement:
          - Effect: Allow
            Principal:
              Service: eks.amazonaws.com
            Action: 'sts:AssumeRole'
      ManagedPolicyArns:
        - arn:aws:iam::aws:policy/AmazonEKSClusterPolicy

  # EKS Cluster
  EKSCluster:
    Type: AWS::EKS::Cluster
    Properties:
      Name: !Ref ClusterName
      Version: !Ref KubernetesVersion
      RoleArn: !GetAtt EKSClusterRole.Arn
      ResourcesVpcConfig:
        SubnetIds:
          - subnet-xxx  # Private Subnet 1
          - subnet-yyy  # Private Subnet 2
        EndpointPublicAccess: true
        EndpointPrivateAccess: false

  # Node IAM Role
  NodeInstanceRole:
    Type: AWS::IAM::Role
    Properties:
      AssumeRolePolicyDocument:
        Version: '2012-10-17'
        Statement:
          - Effect: Allow
            Principal:
              Service: ec2.amazonaws.com
            Action: 'sts:AssumeRole'
      ManagedPolicyArns:
        - arn:aws:iam::aws:policy/AmazonEKSWorkerNodePolicy
        - arn:aws:iam::aws:policy/AmazonEC2ContainerRegistryReadOnly
        - arn:aws:iam::aws:policy/AmazonEKS_CNI_Policy

  # Managed Node Group
  NodeGroup:
    Type: AWS::EKS::Nodegroup
    Properties:
      ClusterName: !Ref EKSCluster
      NodegroupName: ng-1
      NodeRole: !GetAtt NodeInstanceRole.Arn
      Subnets:
        - subnet-xxx  # Private Subnet 1
        - subnet-yyy  # Private Subnet 2
      ScalingConfig:
        MinSize: 2
        MaxSize: 4
        DesiredSize: 2
      InstanceTypes:
        - t3.medium
      DiskSize: 20

Outputs:
  ClusterName:
    Description: EKS Cluster Name
    Value: !Ref EKSCluster

  ClusterEndpoint:
    Description: EKS Cluster Endpoint
    Value: !GetAtt EKSCluster.Endpoint
3.2 CloudFormation 배포
# CloudFormation 스택 생성
aws cloudformation create-stack \
  --stack-name myeks-stack \
  --template-body file://eks-cluster.yaml \
  --capabilities CAPABILITY_IAM \
  --region ap-northeast-2

# 스택 생성 상태 확인
aws cloudformation describe-stacks \
  --stack-name myeks-stack \
  --region ap-northeast-2

# kubeconfig 업데이트
aws eks update-kubeconfig --region ap-northeast-2 --name myeks

# 스택 삭제
aws cloudformation delete-stack \
  --stack-name myeks-stack \
  --region ap-northeast-2
4. AWS Management Console 배포
AWS 콘솔을 통한 GUI 배포도 가능한다.
단계별 배포 과정:
- AWS Console → EKS → Clusters → Create cluster
- Cluster 설정:
- Name: myeks
- Kubernetes version: 1.34
- Cluster service role: EKSClusterRole (미리 생성)
- Networking:
- VPC: 기존 VPC 선택
- Subnets: Private 서브넷 선택 (최소 2개 AZ)
- Security groups: Default
- Cluster endpoint access: Public
- Logging: Control Plane 로그 활성화 (선택)
- Review and create
- Node Group 추가:
- Compute → Add node group
- Name: ng-1
- Node IAM role: NodeInstanceRole
- Instance type: t3.medium
- Scaling: Min 2, Max 4, Desired 2
EKS Cluster Endpoint Access
EKS Cluster Endpoint Access는 API Server에 접근하는 방식을 제어한다.
1. Endpoint Access 모드
EKS는 3가지 Endpoint Access 모드를 제공한다:
graph TB
    subgraph "1. Public Endpoint Access"
        P1[Internet] --> P2[Public API Endpoint]
        P2 --> P3[Control Plane]
        P4[Worker Nodes] --> P2
    end

    subgraph "2. Public + Private"
        PP1[Internet] --> PP2[Public API Endpoint]
        PP2 --> PP3[Control Plane]
        PP4[Worker Nodes] --> PP5[Private API Endpoint]
        PP5 --> PP3
    end

    subgraph "3. Fully Private"
        FP1[VPC Only] --> FP2[Private API Endpoint]
        FP2 --> FP3[Control Plane]
        FP4[Worker Nodes] --> FP2
    end
2. Public Cluster Endpoint Access
특징: - API Server가 Public Endpoint로 노출 - 인터넷에서 kubectl 명령 실행 가능 - Worker 노드도 Public Endpoint 사용 (NAT Gateway 경유)
장점: - 간단한 설정 - 외부에서 클러스터 관리 가능
단점: - 보안 위험 (Public 노출) - CIDR 화이트리스트 필수
설정 방법:
# eksctl로 Public 클러스터 생성
eksctl create cluster \
  --name myeks \
  --region ap-northeast-2 \
  --vpc-public-subnets subnet-xxx,subnet-yyy \
  --vpc-private-subnets subnet-aaa,subnet-bbb

# Terraform
cluster_endpoint_public_access  = true
cluster_endpoint_private_access = false
cluster_endpoint_public_access_cidrs = ["1.2.3.4/32"]  # IP 제한
3. Public & Private Cluster Endpoint Access (권장)
특징: - Public Endpoint: 외부에서 kubectl 접근 (CIDR 제한 가능) - Private Endpoint: Worker 노드는 VPC 내부 통신 - 최적의 보안과 편의성
장점: - Worker 노드는 Private Endpoint 사용 (VPC 내부 통신) - 외부에서도 kubectl 사용 가능 (IP 제한) - NAT Gateway 비용 절감
단점: - Public Endpoint 노출 (IP 제한 필수)
설정 방법:
# eksctl
eksctl utils update-cluster-endpoint-access \
  --cluster=myeks \
  --region=ap-northeast-2 \
  --public-access=true \
  --private-access=true \
  --approve

# Terraform
cluster_endpoint_public_access  = true
cluster_endpoint_private_access = true
cluster_endpoint_public_access_cidrs = ["203.0.113.0/24"]
4. Fully Private Cluster Endpoint Access
특징: - Private Endpoint만 활성화 - 외부 인터넷 접근 불가 - VPC 내부에서만 kubectl 접근 - 가장 높은 보안 수준
요구사항: - VPN 또는 AWS Direct Connect: VPC 접근 필수 - VPC Endpoint (PrivateLink): AWS 서비스 접근 - Bastion Host: VPC 내부에서 kubectl 실행
장점: - 최고 수준의 보안 - 외부 공격 표면 최소화
단점: - VPN/DX 필수 - 관리 복잡도 증가
설정 방법:
# eksctl
eksctl utils update-cluster-endpoint-access \
  --cluster=myeks \
  --region=ap-northeast-2 \
  --public-access=false \
  --private-access=true \
  --approve

# Terraform
cluster_endpoint_public_access  = false
cluster_endpoint_private_access = true
graph TB
    subgraph "On-Premise / Remote Office"
        DEV[Developer]
    end

    subgraph "AWS Cloud"
        subgraph "VPN/Direct Connect"
            VPN[AWS VPN Gateway]
        end

        subgraph "VPC"
            subgraph "Private Subnet"
                BASTION[Bastion Host<br/>kubectl]
                WN1[Worker Node 1]
                WN2[Worker Node 2]
                EP[VPC Endpoint<br/>PrivateLink]
            end
        end

        subgraph "AWS Managed"
            CP[EKS Control Plane<br/>Private Endpoint]
            ECR[ECR]
            CW[CloudWatch]
        end
    end

    DEV --> VPN
    VPN --> BASTION
    BASTION --> CP
    WN1 --> CP
    WN2 --> CP
    WN1 --> EP
    EP --> ECR
    EP --> CW
EKS Best Practices 아키텍처
1. VPC 구성 권장사항
EKS Best Practices VPC 구성:
graph TB
    subgraph "AWS Region"
        subgraph "VPC (10.0.0.0/16)"
            subgraph "AZ-1"
                PUB1[Public Subnet<br/>10.0.1.0/24<br/>NAT GW, ALB]
                PRIV1[Private Subnet<br/>10.0.11.0/24<br/>Worker Nodes, Pods]
            end

            subgraph "AZ-2"
                PUB2[Public Subnet<br/>10.0.2.0/24<br/>NAT GW, ALB]
                PRIV2[Private Subnet<br/>10.0.12.0/24<br/>Worker Nodes, Pods]
            end

            subgraph "AZ-3"
                PUB3[Public Subnet<br/>10.0.3.0/24]
                PRIV3[Private Subnet<br/>10.0.13.0/24]
            end

            IGW[Internet Gateway]
        end

        CP[EKS Control Plane<br/>AWS Managed]
    end

    PUB1 --> IGW
    PUB2 --> IGW
    PUB3 --> IGW

    PRIV1 --> PUB1
    PRIV2 --> PUB2
    PRIV3 --> PUB3

    PRIV1 --> CP
    PRIV2 --> CP
    PRIV3 --> CP
- 최소 2개 AZ (권장: 3개 AZ)
- Public 서브넷: NAT Gateway, Load Balancer
- Private 서브넷: Worker 노드, Pod
- CIDR 범위: 최소 /16 (예: 10.0.0.0/16)
- 서브넷 태그 (필수):
2. 서브넷 구성
서브넷 크기 권장사항:
- Public 서브넷: /24 (256 IP) - NAT Gateway, ALB/NLB용
- Private 서브넷: /19 ~ /17 (8,192 ~ 32,768 IP) - Worker 노드 + Pod IP
Pod IP 계산: - t3.medium: 최대 17개 IP (1개 Primary ENI + 16개 Secondary IP) - Pod 수 = (노드 수) × (노드당 Pod 수) - 예: 100개 노드 × 17 Pod = 1,700개 IP 필요
3. X-ENI (Cross-ENI)
X-ENI (Cross-Account Elastic Network Interface):
- EKS Control Plane (AWS 계정)과 Worker 노드 (Customer VPC) 간 통신
- VPC Endpoint 방식으로 Private 연결
- Worker 노드는 ENI를 통해 Control Plane에 접근
graph LR
    subgraph "Customer VPC"
        WN[Worker Node<br/>kubelet]
        ENI[X-ENI<br/>VPC Endpoint]
    end

    subgraph "AWS Managed VPC"
        CP[EKS Control Plane<br/>API Server]
    end

    WN --> ENI
    ENI -.Private Link.-> CP
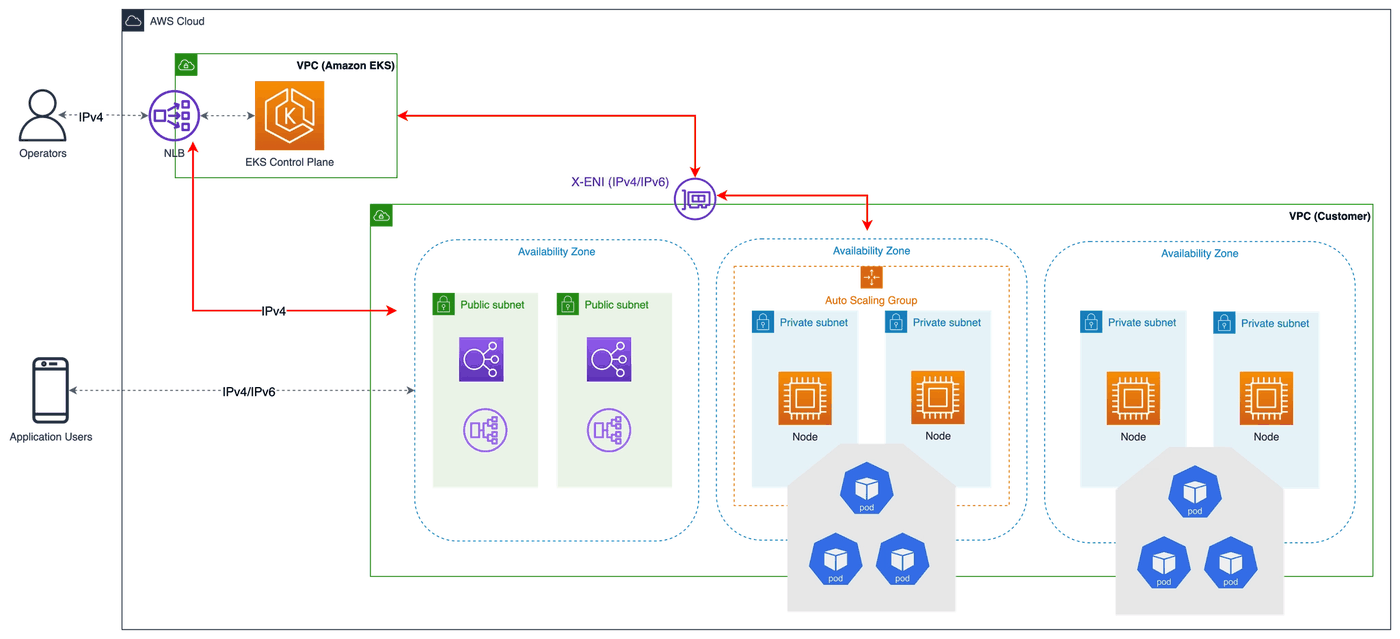
실제 배치를 보면 X-ENI가 두 VPC 사이에 걸쳐 있는 이유가 분명해진다. 왼쪽 VPC(Amazon EKS)의 control plane과 오른쪽 VPC(Customer)의 노드는 서로 다른 계정 소유이므로 직접 통신할 수 없고, X-ENI가 그 경계를 잇는다. 운영자는 NLB를 거쳐 IPv4로 control plane에 접근하고, 애플리케이션 사용자 트래픽은 public subnet의 로드밸런서로 들어와 private subnet의 Pod에 도달한다.
4. 보안 그룹 설정
EKS 보안 그룹 구성:
Cluster Security Group (AWS 자동 생성): Control Plane과 Worker 노드 간 통신, 그리고 노드 간 Pod to Pod 통신을 허용한다.
Node Security Group (사용자 관리): SSH 접근(22/tcp)과 추가 애플리케이션 포트를 직접 관리한다.
권장 규칙:
# Cluster Security Group (AWS 자동 생성)
Inbound:
  - 443/tcp: Worker 노드 → Control Plane (API 요청)
  - 10250/tcp: Control Plane → Worker 노드 (kubelet)

Outbound:
  - All Traffic: 허용

# Node Security Group
Inbound:
  - 22/tcp: Bastion Host에서 SSH
  - 1025-65535/tcp: Node to Node (Pod 통신)
  - NodePort 범위: 30000-32767/tcp

Outbound:
  - All Traffic: 허용 (인터넷, AWS 서비스 접근)
EKS Auto Mode
1. Auto Mode 개요
EKS Auto Mode는 2025년 출시된 새로운 클러스터 관리 모드이다.
- 완전 관리형: Control Plane + Data Plane + Add-ons까지 자동 관리
- Karpenter 자동 설치: 노드 자동 스케일링
- EBS CSI Driver 자동 설치: 스토리지 자동 프로비저닝
- AWS Load Balancer Controller 자동 설치: ALB/NLB Ingress 자동 생성
Standard Mode vs Auto Mode:
graph TB
    subgraph "Standard Mode (기존)"
        SM1[Control Plane<br/>AWS 관리]
        SM2[Worker Nodes<br/>사용자 관리]
        SM3[Add-ons<br/>수동 설치]
        SM4[Scaling<br/>수동 구성]
    end

    subgraph "Auto Mode (2025)"
        AM1[Control Plane<br/>AWS 관리]
        AM2[Worker Nodes<br/>Karpenter 자동]
        AM3[Add-ons<br/>자동 설치]
        AM4[Scaling<br/>자동 구성]
    end
2. Managed Capabilities
Auto Mode가 자동으로 관리하는 항목:
Compute (Karpenter): 노드를 자동으로 프로비저닝한다. Spot/On-Demand를 혼합 사용하며 Pod 요구사항에 맞는 최적 인스턴스 타입을 자동으로 선택한다.
Storage: EBS CSI Driver를 자동 설치하고 PersistentVolume을 자동 생성한다. 스냅샷과 리사이즈도 자동으로 지원한다.
Load Balancing: AWS Load Balancer Controller를 자동 설치한다. Ingress는 ALB로, Service(LoadBalancer)는 NLB로 자동 생성된다.
3. Standard Mode vs Auto Mode
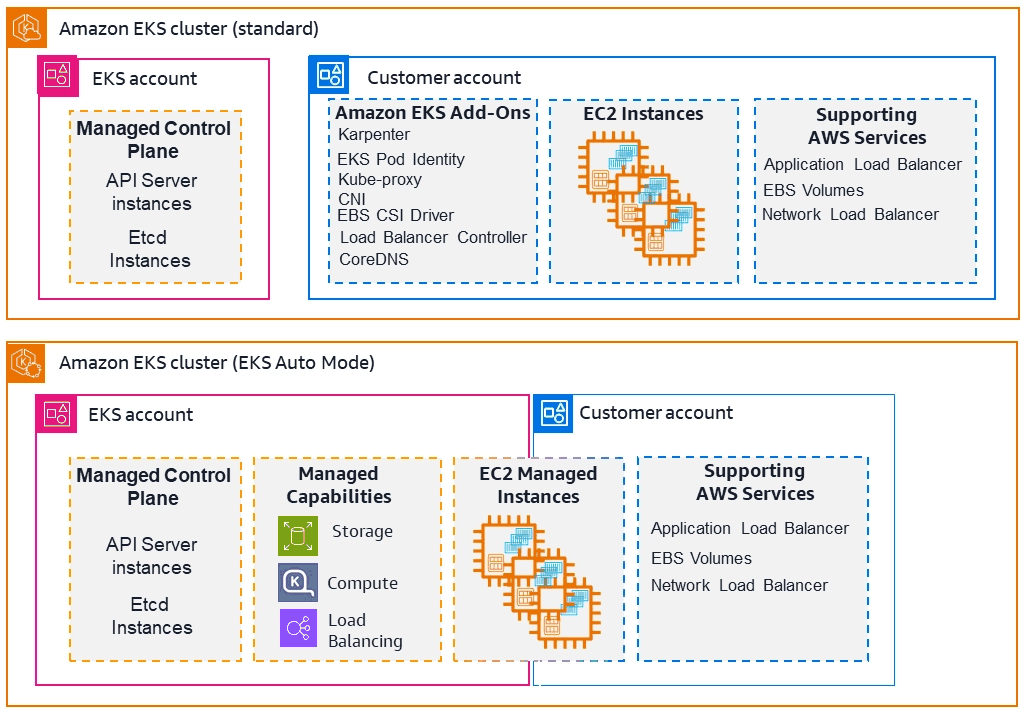
두 그림에서 EKS 계정(분홍)과 고객 계정(파랑)을 가르는 선이 어디에 있는지를 비교하면 차이가 명확하다. Standard에서는 Karpenter, CNI, EBS CSI Driver 같은 Add-on과 EC2 인스턴스가 전부 고객 계정 쪽에 있다. Auto Mode에서는 Storage·Compute·Load Balancing이 Managed Capabilities로 EKS 계정 쪽으로 넘어가고, EC2도 관리형 인스턴스가 된다. 관리 부담이 줄어드는 대신 통제권도 함께 넘어간다는 트레이드오프가 경계선의 이동으로 드러난다.
| 항목 | Standard Mode | Auto Mode |
|---|---|---|
| Control Plane | AWS 관리 | AWS 관리 |
| Worker Nodes | 사용자 관리 (ASG, Managed Node Group) | Karpenter 자동 관리 |
| Node Scaling | 수동 (Cluster Autoscaler) | 자동 (Karpenter) |
| Storage | 수동 설치 (EBS CSI Driver) | 자동 설치 |
| Load Balancer | 수동 설치 (LB Controller) | 자동 설치 |
| Add-ons | 수동 설치 | 자동 설치 |
| 관리 복잡도 | 높음 | 낮음 |
| 비용 | Control Plane $0.10/시간 + 인프라 | 동일 |
Auto Mode 활성화:
# eksctl (Auto Mode 지원 예정)
eksctl create cluster \
  --name myeks-auto \
  --region ap-northeast-2 \
  --auto-mode

# AWS CLI
aws eks create-cluster \
  --name myeks-auto \
  --region ap-northeast-2 \
  --compute-config enabled=true \
  --storage-config enabled=true \
  --load-balancing-config enabled=true
EKS 최신 기능
1. Cluster Insights
Cluster Insights는 업그레이드 가능 여부를 분석하고 권장사항을 제공한다.
- Deprecated API 감지: Kubernetes 버전 업그레이드 시 제거되는 API 사용 여부 확인
- 호환성 검사: 현재 클러스터에서 사용 중인 리소스가 다음 버전에서 호환되는지 확인
- 권장사항 제공: 업그레이드 전 수정해야 할 사항 안내
확인 방법:
# AWS Console: EKS → Clusters → myeks → Upgrade insights
# CLI
aws eks list-insights \
  --region ap-northeast-2 \
  --cluster-name myeks
2. Upgrade Insights
Upgrade Insights는 클러스터 업그레이드 시 발생할 수 있는 문제를 사전에 감지한다.
감지 항목: - Deprecated APIs: v1.29에서 제거된 API 사용 여부 - Pod Security Standards: PSP → PSS 마이그레이션 필요 여부 - Add-on 호환성: CoreDNS, VPC CNI 등 버전 호환성
3. Global Dashboard
EKS Global Dashboard는 모든 리전의 클러스터를 한눈에 확인할 수 있다.
- Cross-Region 클러스터 목록: 모든 리전의 클러스터 상태 확인
- 버전 분포: Kubernetes 버전별 클러스터 수
- 업그레이드 상태: 업그레이드 필요 클러스터 표시
4. Container Network Observability
Enhanced Container Network Observability는 Pod 간 네트워크 흐름을 시각화한다.
| 기능 | 설명 |
|---|---|
| Pod-to-Pod 통신 흐름 | VPC Flow Monitor 통합 |
| DNS 쿼리 추적 | 실패한 DNS 쿼리 분석 |
| Network Performance | 레이턴시, 패킷 드롭 모니터링 |
| Service Map | Pod 간 의존성 시각화 |
핵심 개념 정리
1. EKS의 장점
관리형 Control Plane: AWS가 etcd와 API Server를 직접 관리한다. HA 구성과 자동 백업이 기본 제공되며, 업그레이드도 원클릭으로 처리된다.
AWS 통합: IAM 기반 인증/인가(IRSA), VPC 네이티브 네트워킹, EBS/EFS 스토리지, ECR·CloudWatch·X-Ray까지 AWS 생태계와 긴밀하게 연동된다.
보안 준수: FIPS 140-2, PCI-DSS, SOC, HIPAA 등 주요 컴플라이언스를 충족한다. KMS를 통한 Secrets 암호화와 VPC Private Endpoint도 지원한다.
자동화: Managed Node Groups로 노드 생애 주기를 위임하고, Karpenter 기반 Auto Scaling과 Add-on 자동 업데이트로 운영 부담을 줄인다.
2. Control Plane vs Data Plane
Control Plane (AWS 관리):
| 컴포넌트 | 역할 |
|---|---|
| API Server | Kubernetes API 노출 |
| etcd | 클러스터 상태 저장 |
| Controller Manager | 리소스 관리 |
| Scheduler | Pod 스케줄링 |
| 관리 | AWS가 완전 관리 (HA, 백업, 패치) |
Data Plane (사용자 선택):
| 컴포넌트 | 설명 |
|---|---|
| EC2 Worker Nodes | 사용자 관리 또는 AWS Managed |
| Fargate | 서버리스 |
| kubelet, kube-proxy | 노드에서 실행 |
| 관리 | 사용자 책임 (업데이트, 스케일링) |
3. Endpoint Access 전략 비교
권장사항:
- 개발/테스트: Public Endpoint (간편함)
- 프로덕션: Public + Private (보안 + 편의성)
- 금융/의료: Fully Private (최고 보안)
| 전략 | 보안 수준 | 관리 편의성 | 비용 | 추천 환경 |
|---|---|---|---|---|
| Public | 낮음 | 개발/테스트 | ||
| Public + Private | 중간 | 프로덕션 (권장) | ||
| Fully Private | 높음 (VPN/DX) | 금융, 의료, 정부 |
최종 업데이트: 2026-03-18