Ansible
에이전트 없이 SSH로 인프라를 코드로 관리하는 자동화 도구다.
소개
Ansible은 Red Hat이 개발한 오픈소스 IT 자동화 도구로, 서버 구성 관리, 애플리케이션 배포, 오케스트레이션을 지원한다. Python 기반으로 작성되었으며, 에이전트 설치 없이 SSH를 통해 원격 노드를 관리한다.
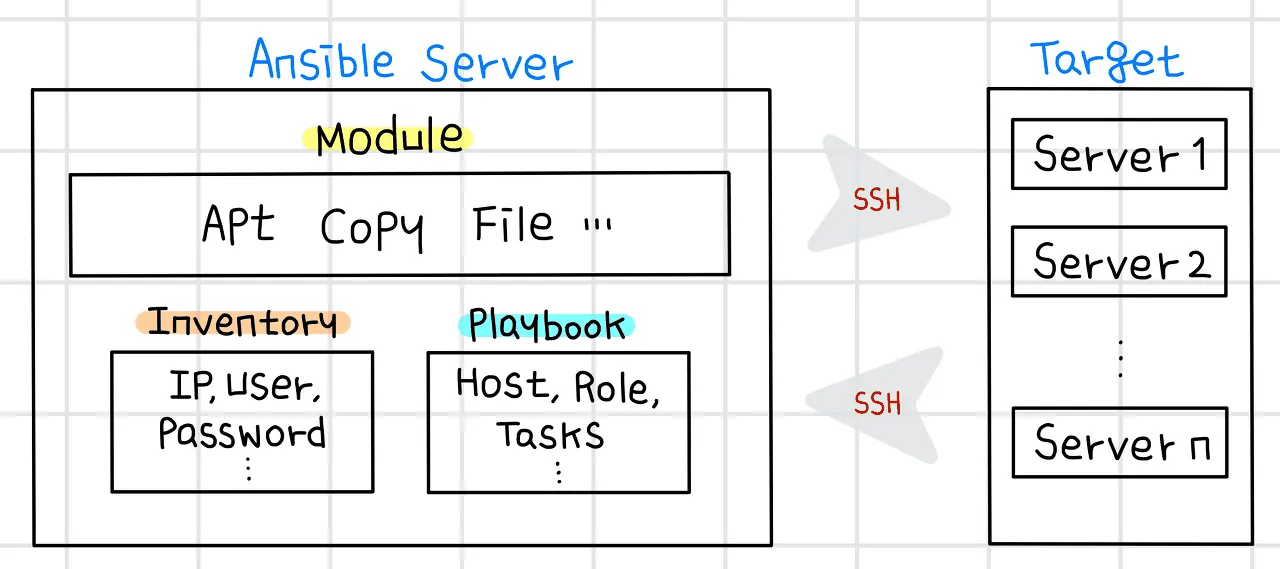
SSH 화살표가 양방향인 점이 핵심이다. Ansible은 Module 코드를 대상 서버로 밀어 넣고 실행 결과를 같은 연결로 되받아온다. 또 Inventory와 Playbook의 역할 분담이 드러나는데, Inventory는 IP·user·Password 같은 접속 정보를 갖고 Playbook은 Host·Role·Tasks 같은 수행할 작업을 갖는다. 동일한 Playbook을 Inventory만 바꿔 다른 서버군에 그대로 돌릴 수 있는 이유가 이 분리에 있다.
Terraform vs Ansible
| 항목 | Terraform | Ansible |
|---|---|---|
| 용도 | 인프라 프로비저닝 | 구성 관리 및 배포 |
| 접근 방식 | 선언적(Declarative) | 절차적(Procedural) + 선언적 |
| 상태 관리 | State 파일 관리 | Stateless (멱등성으로 보장) |
| 통신 방식 | API 호출 | SSH (에이전트 불필요) |
| 주요 사용처 | 클라우드 리소스 생성 | OS 설정, 패키지 설치, 앱 배포 |
함께 사용하는 패턴: - Terraform으로 VM 생성 → Ansible로 소프트웨어 설치 및 구성 - Terraform에서 Dynamic Inventory 생성 → Ansible에서 자동 적용
설치
Control Node 요구사항
- OS: Linux, macOS (Windows는 WSL2 필요)
- Python: 3.9 이상
- SSH 클라이언트: OpenSSH
설치 방법
pip 설치 (권장):
패키지 관리자:
# Ubuntu/Debian
sudo apt update
sudo apt install ansible

# RHEL/CentOS
sudo dnf install ansible

# macOS
brew install ansible
Managed Node 요구사항
- Python 2.7 또는 3.5 이상
- SSH 서버 실행 중
- 필요 시 sudo 권한
Inventory
Inventory는 Ansible이 관리할 호스트 목록을 정의하는 파일이다. INI 또는 YAML 형식으로 작성한다.
INI 형식
# inventory.ini
[webservers]
web1.example.com
web2.example.com

[databases]
db1.example.com
db2.example.com

[production:children]
webservers
databases

[production:vars]
ansible_user=admin
ansible_ssh_private_key_file=~/.ssh/prod.pem
YAML 형식
# inventory.yml
all:
  children:
    webservers:
      hosts:
        web1.example.com:
        web2.example.com:
    databases:
      hosts:
        db1.example.com:
        db2.example.com:
    production:
      children:
        webservers:
        databases:
      vars:
        ansible_user: admin
        ansible_ssh_private_key_file: ~/.ssh/prod.pem
동적 인벤토리
클라우드 환경에서는 동적 인벤토리를 사용한다:
# AWS 동적 인벤토리
ansible-inventory -i aws_ec2.yml --graph

# 스크립트 기반
ansible-playbook -i ./dynamic_inventory.py site.yml
AWS 동적 인벤토리 예시 (aws_ec2.yml):
plugin: aws_ec2
regions:
  - us-west-2
filters:
  tag:Environment: production
keyed_groups:
  - key: tags.Role
    prefix: role
Playbook
Playbook은 Ansible 작업을 정의하는 YAML 파일이다. 여러 Play로 구성되며, 각 Play는 호스트 그룹과 Task로 구성된다.
기본 구조
# site.yml
---
- name: Configure webservers
  hosts: webservers
  become: yes
  vars:
    http_port: 80
    max_clients: 200

  tasks:
    - name: Install nginx
      apt:
        name: nginx
        state: present
        update_cache: yes

    - name: Start nginx service
      service:
        name: nginx
        state: started
        enabled: yes
Task 조건부 실행
tasks:
  - name: Install Apache (Ubuntu)
    apt:
      name: apache2
      state: present
    when: ansible_distribution == "Ubuntu"

  - name: Install Apache (CentOS)
    yum:
      name: httpd
      state: present
    when: ansible_distribution == "CentOS"
Loop
tasks:
  - name: Install multiple packages
    apt:
      name: "{{ item }}"
      state: present
    loop:
      - nginx
      - git
      - vim

  - name: Create users
    user:
      name: "{{ item.name }}"
      state: present
      groups: "{{ item.groups }}"
    loop:
      - { name: 'alice', groups: 'wheel' }
      - { name: 'bob', groups: 'developers' }
Handler
Handler는 변경이 발생했을 때만 실행되는 Task다:
tasks:
  - name: Update nginx config
    template:
      src: nginx.conf.j2
      dest: /etc/nginx/nginx.conf
    notify:
      - Restart nginx
      - Reload systemd

handlers:
  - name: Restart nginx
    service:
      name: nginx
      state: restarted

  - name: Reload systemd
    systemd:
      daemon_reload: yes
Block 및 에러 처리
tasks:
  - name: Handle deployment
    block:
      - name: Deploy application
        copy:
          src: app.jar
          dest: /opt/app/

      - name: Start application
        service:
          name: myapp
          state: started

    rescue:
      - name: Rollback deployment
        command: /opt/app/rollback.sh

      - name: Send alert
        mail:
          subject: "Deployment failed"
          to: ops@example.com

    always:
      - name: Log deployment attempt
        lineinfile:
          path: /var/log/deployments.log
          line: "{{ ansible_date_time.iso8601 }}: Deployment attempted"
변수
변수 정의 위치
| 우선순위 | 위치 | 예시 |
|---|---|---|
| 1 (최고) | Extra vars | ansible-playbook -e "version=1.2.3" |
| 2 | Task vars | vars: 섹션 |
| 3 | Block vars | block: 내 vars: |
| 4 | Role vars | roles/myrole/vars/main.yml |
| 5 | Play vars | vars: 섹션 |
| 6 | Host vars | host_vars/hostname.yml |
| 7 | Group vars | group_vars/groupname.yml |
| 8 (최저) | Role defaults | roles/myrole/defaults/main.yml |
변수 사용
# group_vars/webservers.yml
---
http_port: 80
max_clients: 200
app_version: "1.0.0"

# Playbook에서 사용
tasks:
  - name: Deploy application
    template:
      src: app.conf.j2
      dest: /etc/app/app.conf
    vars:
      custom_var: "{{ app_version }}-{{ ansible_hostname }}"
Facts
Facts는 Ansible이 자동으로 수집하는 시스템 정보다:
tasks:
  - name: Print OS info
    debug:
      msg: "{{ ansible_distribution }} {{ ansible_distribution_version }}"

  - name: Install package based on OS
    package:
      name: "{{ 'httpd' if ansible_os_family == 'RedHat' else 'apache2' }}"
      state: present
Facts 수집 비활성화 (성능 개선):
Role
Role은 Playbook을 재사용 가능한 구조로 조직화하는 방법이다.
디렉터리 구조
roles/
└── nginx/
    ├── defaults/
    │   └── main.yml         # 기본 변수
    ├── files/
    │   └── nginx.conf       # 정적 파일
    ├── handlers/
    │   └── main.yml         # Handler
    ├── meta/
    │   └── main.yml         # 의존성 정의
    ├── tasks/
    │   └── main.yml         # Task 목록
    ├── templates/
    │   └── nginx.conf.j2    # Jinja2 템플릿
    ├── tests/
    │   └── test.yml         # 테스트 Playbook
    └── vars/
        └── main.yml         # Role 변수
Role 생성
Role 사용
# site.yml
---
- name: Setup webservers
  hosts: webservers
  roles:
    - role: nginx
      vars:
        nginx_port: 8080
    - role: php-fpm
    - role: mysql
Role 의존성
graph TB
    webapp[webapp role]
    webapp --> nginx[nginx role]
    webapp --> php[php-fpm role]
    nginx --> common[common role]
    php --> common
주요 모듈
패키지 관리
| 모듈 | 설명 | 예시 |
|---|---|---|
apt |
Debian/Ubuntu 패키지 | apt: name=nginx state=present |
yum |
RHEL/CentOS 패키지 (YUM) | yum: name=httpd state=latest |
dnf |
RHEL/CentOS 패키지 (DNF) | dnf: name=nginx state=present |
package |
OS 자동 감지 | package: name=git state=present |
파일 관리
| 모듈 | 설명 | 예시 |
|---|---|---|
copy |
파일 복사 | copy: src=app.conf dest=/etc/app/ |
template |
Jinja2 템플릿 렌더링 | template: src=nginx.j2 dest=/etc/nginx/nginx.conf |
file |
파일/디렉터리 속성 | file: path=/var/log/app state=directory mode=0755 |
lineinfile |
파일 내 특정 줄 수정 | lineinfile: path=/etc/hosts line='192.168.1.10 server1' |
서비스 관리
- name: Manage service
  service:
    name: nginx
    state: started     # started, stopped, restarted, reloaded
    enabled: yes       # 부팅 시 자동 시작
명령 실행
| 모듈 | 멱등성 | 사용처 |
|---|---|---|
command |
❌ | 단순 명령 실행 (셸 기능 미지원) |
shell |
❌ | 셸 기능 필요 시 (파이프, 리다이렉트) |
raw |
❌ | Python 미설치 시 (부트스트랩) |
script |
❌ | 로컬 스크립트 업로드 후 실행 |
# 멱등성 보장 예시
- name: Check if app installed
  command: /usr/local/bin/myapp --version
  register: app_check
  ignore_errors: yes
  changed_when: false

- name: Install app if not present
  command: /tmp/install_app.sh
  when: app_check.rc != 0
베스트 프랙티스
디렉터리 구조
ansible/
├── ansible.cfg              # Ansible 설정
├── inventory/
│   ├── production/
│   │   ├── hosts.yml
│   │   └── group_vars/
│   │       ├── all.yml
│   │       └── webservers.yml
│   └── staging/
│       ├── hosts.yml
│       └── group_vars/
├── roles/
│   ├── common/
│   ├── nginx/
│   └── mysql/
├── playbooks/
│   ├── site.yml
│   ├── webservers.yml
│   └── databases.yml
└── files/
    └── scripts/
변수 관리
민감 정보는 Ansible Vault로 암호화:
# 파일 암호화
ansible-vault encrypt group_vars/production/vault.yml

# 암호화된 변수 사용
ansible-playbook site.yml --ask-vault-pass

# 암호 파일 사용
echo "mypassword" > .vault_pass
ansible-playbook site.yml --vault-password-file .vault_pass
암호화된 변수 파일 예시:
# group_vars/production/vault.yml (암호화 전)
---
vault_db_password: "supersecret123"
vault_api_key: "abc123xyz"

# group_vars/production/vars.yml (암호화 안 함)
---
db_password: "{{ vault_db_password }}"
api_key: "{{ vault_api_key }}"
멱등성 보장
# ❌ 멱등성 없음
- name: Add user
  command: useradd alice

# ✅ 멱등성 보장
- name: Add user
  user:
    name: alice
    state: present
태그 활용
- name: Deploy application
  hosts: webservers
  tasks:
    - name: Install dependencies
      apt:
        name: "{{ item }}"
      loop:
        - nginx
        - git
      tags:
        - packages
        - dependencies

    - name: Deploy code
      git:
        repo: https://github.com/myapp/repo.git
        dest: /var/www/app
      tags:
        - deploy

    - name: Restart service
      service:
        name: nginx
        state: restarted
      tags:
        - deploy
        - restart
태그로 실행:
# deploy 태그만 실행
ansible-playbook site.yml --tags deploy

# packages 태그 제외
ansible-playbook site.yml --skip-tags packages
Check Mode와 Diff
# Dry-run (변경 없이 시뮬레이션)
ansible-playbook site.yml --check

# 변경 사항 표시
ansible-playbook site.yml --diff

# 둘 다 사용
ansible-playbook site.yml --check --diff
Ansible Lint
# ansible-lint 설치
pip install ansible-lint

# Playbook 검증
ansible-lint playbooks/site.yml

# 모든 Playbook 검증
ansible-lint playbooks/
CI/CD 통합
# .gitlab-ci.yml
stages:
  - validate
  - deploy

validate:
  stage: validate
  script:
    - ansible-lint playbooks/
    - ansible-playbook playbooks/site.yml --syntax-check

deploy_staging:
  stage: deploy
  script:
    - ansible-playbook -i inventory/staging playbooks/site.yml
  only:
    - develop

deploy_production:
  stage: deploy
  script:
    - ansible-playbook -i inventory/production playbooks/site.yml
  only:
    - main
  when: manual